Print Friendly and PDF

Tuesday, November 24, 2015

Andi Puttu | Andi Unda | Cashew Rice balls | Malabar Delicacy

There are many recipes from Kerala which are just isolated in that area and are hard to find anywhere outside.This is one such recipe from Malabar but I tasted this recipe at my in laws place.My FIL introduced this snack to me at home when once he bought from the local bakery there.I tasted these balls then for the first time and never had seen such a snack at my place though its similar to ari unda(rice balls).I loved them very much and so made it a point to buy them thereafter from the bakeries there.They are popularly called 'andi puttu' or 'andi unda' meaning cashew balls.Being away from home,I was craving for these and so started preparing them at home.I have made them a couple of times now and is a fool proof recipe.


They are so easy to prepare and kids also love this snack.They love to take it to school for their snack time as well when they get bored of their regular affair of fruits and salads.The biggest drawback about this snack is that you can't make them in big batches and store,it turns rancid in just 2-3 days if not stored properly as it has fresh coconut.The recipe uses simple ingredients like fresh grated coconut,roasted rice powder and cashews.I have sneaked in blanched almonds along with cashews to make it more healthy and there is no use of ghee or butter in this recipe.If you plan to use cashews alone then use a cup of cashews.They are very easy to prepare and can be instantly had for tea.Make sure to use red matta rice that is available in all Indian grocery stores which adds the taste and color.Also,the dark colored jaggery or karipetti is best suited to make this snack but here we hardly get that and so I have used whatever was available here.These are very tempting and you can't stop munching so there will be hardly any left overs.Don't worry,go ahead and try after reading the 'notes' section !!


Preparation time~15 minutes
Cooking time~ 15 minutes
Serves~15-17 balls
Ingredients
*parboiled rice/red matta rice 1/2 cup
jaggery 3/4 cup-1 cup
*cashew nuts 1/2 cup
*blanched almonds 1/2 cup
grated coconut 1 cup
cardamom powder 1/2 tsp(optional)


Method
  • Dry roast the cashews/almonds in a wok until nicely done without burning (keep stirring) on low flame.Transfer to a plate and leave aside.
  • Then in the same wok /kadai/cheeni chatti,transfer the rice and fry the rice until nicely roasted and light browned.The rice starts to pop once its nicely roasted,you can switch off flame at that point.Transfer immediately to another plate or remove from residual heat.Leave to cool and then blend in a blender to fine powder.Transfer to a plate.

  • In a blender jar,add the cashews/almonds and pulse two times.Remove on a plate and separate the big chunks of cashew/almond pieces.Add to blender and pulse again two times(this ensures even coarse chopped mixture).Transfer to a plate.To the same blender,add the grated coconut or thawed frozen coconut.Pulse two more times to break the *long strands of coconut but if you are using freshly grated coconut then make sure to grate it fine so that you can skip this step .
  • Now in a sauce pan,melt the *jaggery with 2tbsp of water.Strain for any impurities.Put it back on stove and keep stirring on low medium flame to get a one string consistency.Add cardamom powder if using at this point.To this,mix the cashew/almond and coconut mixture.And finally,tip the powdered rice.Keep mixing to combine well.Switch off flame.
  • Wait till its warm to touch.Shape in roundels or balls,serve with tea or store in air tight bags and refrigerate.


NOTES
* The recipe is adapted from Magpie's recipes.
* The authentic recipe uses only cashew nuts.And if you are using cashews alone then use 1 cup.But I used a mixture of cashew and almonds so that I sneak in almonds for kids.I used blanched almonds.
*I haven't washed the rice as the rice absorbs water once washed and so doesn't powder smooth.I have tried washing the rice the first time when I made the balls but the rice was coarsely powdered.If you feel it very important to wash the rice before using,then wash and rinse one or two times,drain the water immediately and spread on layers of paper towel.Sun dry or dry in oven before roasting and powdering.
*You can just add grated jaggery and proceed to mix with other ingredients if you know the jaggery has no impurities.Grated jaggery gives the solid hard undas/balls whereas balls made with the melted jaggery takes time to solidify.It has to rest for two hours to give that feel at room temperature.
* I haven't sieved the powder as the rice flour is very smooth once powdered as it is roasted and then blend.Its always better to keep a little extra table spoon of rice powdered.If you feel the moisture is too much in the mixture can add the ground rice to absorb the moisture.I didn't add any extra rice powder other than mentioned in the list.
* I use daily delight brand of frozen coconut and it has long strands of coconut.But if you use any other brand then don't pulse if its finely grated.
* You can slightly roast the coconut just to dry the moisture out without changing the color of the coconut.That way it may help to store longer. OR Wring the frozen coconut on layers of paper towels to remove excess moisture.
* This snack doesn't remain fresh for long as the coconut may turn rancid.Refrigerate any left overs for 3-4 days,thaw before serving.

Friday, November 20, 2015

Bakery Style Chocolate Chip Muffins (Step by Step Pics)

Kids are always fascinated with these bite sized chocolate chips may that be in the form of cookies,muffins or any other treats.They love these a lot and the chocolate chip cookies that I posted long back is one of their favorite too.I hardly buy chocolate chip cookies from store and make these at home with kids help.They love to garnish them with chocolate chips as per desires.I had tried chocolate chip muffins in the past but this is just the BEST among all those chocolate chip bakes so far.Don't they look plump and cute??


When I say so,there must definitely be something right?? Yes...I have made these muffins two months back for the first time and kids loved these so much that I have already baked them thrice.These are very soft,delicious and filling muffins.The size of these muffins are huge and one muffins is good enough for a kids snack.they get to bite lot of chocolate chips too.They don't need any frosting and if your kids love a quick filling breakfast then this can be added to the list as these are made with wheat flour.Do try these out,am sure they will never ask you to buy chocolate chip muffins from bakeries any more.


Preparation time~15 minutes
Cooking time~ 25 minutes
Serves~12 large muffins
Ingredients
wheat flour 2 1/4 cup
baking powder 1tbsp
baking soda 1tsp
chocolate chips 1 1/4 cup
cooking oil 1/2 cup
milk 1 cup
eggs,at room temp 2
vanilla extract 1tbsp
granulated white sugar 1 cup
salt 1/3 tsp


Method
  • Pre heat oven to 425 degrees F and line a 12 muffin tray with oil or butter.Keep aside.
  • Sift the flour,baking powder,baking soda,salt twice and keep ready.Add in the chocolate chips(reserve two table spoon of chocolate chips for garnish,which I missed doing).
  • In another bowl,beat the eggs until foamy.Add the granulated white sugar and beat again for two minutes.The mix doubles in volume and sugar is dissolved,the egg mixture turns pale then add milk,oil and vanilla extract.

  • Fold the flour-chocolate chips mixture in three additions until well combined.If the batter looks very thick,then add one or two more tbsp of milk and get the consistency right.
  • Add spoonful of batter in the muffin tray and the batter will be more than 3/4th full(If you plan to use liners then you can do that but in that case you may get more than 12 muffins).Add the reserved chocolate chips if using at this point to garnish the top of the batter.
  • Tap the tray on the counter once or twice.Place in oven and bake for five minutes.Then,reduce the oven to 375 degrees F and continue to bake for 13-15 minutes or uuntil the tooth pick inserted in the center comes out clean and the sides look slightly browned.
  • Cool on wire rack for 10 minutes and then gently scoop out the muffins from the tray .Cool completely and serve with a cup of milk/tea/coffee.


NOTES
* The recipe is adapted from here but slightly modified. 
* These muffins taste delicious on the day of bake but they can be stored for 3-5 days.
* You can use all purpose flour(maida) too  instead of wheat flour.I have used Ashirwaad atta(wheat flour).
* You can use butter for a richer taste and flavor.If using butter,then use 8tbsp or 1 stick or 113gms of butter.Melt and use just like have used cooking oil.

RELATED POSTS
* Pumpkin Chocolate Chip Muffins
* Lemon Chocolate Chip Muffins
* Chocolate Chip Cookies

Wednesday, November 18, 2015

Padavalanga- Parippu Thoran | Snake Gourd- Lentil Stir Fry

Padavalanga Parippu thoran is a healthy stir fry made with padavalanga(snake gourd) and lentil(parippu) and grated coconut.This serves as a side dish with steamed rice.I make this stir fry whenever I buy snake gourd.Snake gourd is rich a high fiber vegetable and also known to have detoxifying properties.They also function as a good expectorant and there by boosts immune health.The stir fry should be tender and not over cooked to taste best.The lentils added to this thoran also gives a nice crunch and taste.Try it out sometime !!


Preparation time~ 15 mins
Cooking time~ 30 mins
Serves ~ 4-5

Ingredients
snake gourd /padavalanga 1 medium sized
toor dal/tuvara parippu 1/4 cup
shallots  5-6 sliced
green chillies vertical slit 2
turmeric powder 1/4tsp+ 1/4tsp
salt to taste
mustard seeds 1/2 tsp
curry leaves a sprig/thandu
oil 1tbsp

to grind coarse
grated coconut 1/2 cup
cumin seeds 1/2 tsp
green chillies 1 or 2
garlic clove 1 large


Method
  • Wash the snake gourd and scrape the skin of the snake gourd.Cut open vertically and remove seeds if any.Cut in small pieces and keep aside.
  • In another pan or use cooker,wash and add the dal,turmeric powder (1/4tsp) and salt with enough water to cook the dal.If using pressure cooker,cook for 2 whistles on high flame.If using open pan method,then keep a check closely so that the dal doesn't turn mushy.the dal should be tender or 3/4th cooked.

  • In the mean time,grind coarsely the ingredient listed under 'to grind' without adding any water.
  • In another pan,heat the oil,splutter mustard seeds.Followed by green chillies,curry leaves and shallots sliced.When it turns translucent,add turmeric powder on low flame.
  • Now,add the chopped snake gourd(padavalanga) and cooked dal.Add any left over(very little) cooked dal water too,don't add any additional water as snake gourd leaves out water when cooked.
  • Mix well,add salt and cover.Cook on low medium  flame for 6-7 mins until the snake gourd pieces are tender.Uncover,add in the coarsely ground coconut mixture.adjust salt,combine well and cook for 2more mins.Dry out any moisture left and switch off flame.Serve warm.


Monday, November 16, 2015

Kolambi Bhaat | Maharashtrian Style Prawn Rice(Step By Step Pics) | Lunch Box Ideas

Kolambi bhaat is an authentic one pot meal from Maharashtra which is prepared from rice, prawns and whole spices.When I first learnt about this prawn pulao, I fell for it immediately as the meal had few similarities to the tastes of Kerala food.It's nothing else but the use of coconut and coconut milk, and I was sure my family would love it.The addition of coconut paste and coconut milk adds a nice flavour to the bhaat and the spices are just right to match them.All loved this pulao at home and the best part is that you hardly require any side to this dish.You can make this for kids lunch box or for weekend meals.The prawns are cooked along with rice and remains juicy and curled up.The whole spices add a nice aroma along with freshly ground garam masala.The bhaat is garnished with coriander leaves, just like we do for biriyanis.If you love prawn dishes and love coconut flavours, then definitely you must try this one and enjoy at home !!


Preparation time~30 minutes (after prawns are cleaned)
Cooking time~ 30 minutes
Serves ~7-8
Ingredients
to marinate
prawns/shrimp/konju;peeled and deveined 1.14 lb or 500gms or 30-35 medium-sized
turmeric powder 1/2 tsp
pepper powder 1/4 tsp (optional)
lemon juice 1 tbsp
salt 1/3 tsp

*to grind
coconut grated 3/4 cup

basmati rice 2.5 cups (500 gms)
onions finely chopped 2 large
green chillies 3-4 vertical slit
tomato 2 large finely chopped
ginger-garlic paste 1 tbsp
red chilli powder 2 tsp
coriander powder 2 tsp
turmeric powder 1/2 tsp
garam masala 1tsp
whole spices cloves 4,star anise 1,cinnamon 1" piece, bay leaf 2 
cumin seeds 1/ 2 tsp
shahjeera 1/4 tsp (optional)
coconut milk 3/4 cup thick
boiled water 4 + 1/4 cups
salt 3/4 tsp
oil 2-3 tbsp

to garnish
coriander leaves/cilantro 2tbsp

WATCH ON YOUTUBE - 


Method
  • Peel, clean and de vein prawns.Rub the prawns with lemon juice and coarse salt.Wash under running water and drain water.Keep aside and add the marination ingredients.Mix well and leave for half an hour.
  • In the meantime, wash and soak the basmati rice for 20 -30 mins.
  • Also, grind the ingredients under 'to grind' to a smooth paste by adding a little water.Keep aside.
  • In another pan or cooker, add the water and leave to boil parallel so that the water can be added to the rice when needed. 

  • Heat oil in a non-stick pan or cooker.Add the whole spices, fry till fragrant.
  • Add sliced onion and sauté until translucent.Add the spice powders on low flame.Then add the ground paste, chopped tomatoes.Cook this mixture for 3–4 minutes until tomatoes gets mushy.
  • Then finally add prawns (along with marinade) and sauté till prawns starts to change colour.Top it up with soaked rice.
  • Add the required boiling water (4.5 cups-5 cups) and coconut milk(1 cup), add salt (prawns marinade has salt, don't forget) if required and bring to a boil.
  • When the mixture starts to boil, add half of the chopped coriander leaves (reserve remaining for garnish).
  • Reduce heat to low to medium and cook covered for 10–12 minutes until the rice and prawns gets cooked.
  • Garnish with remaining cilantro.Serve warm with a pappad.


NOTES
* The recipe is adapted from here and here.I have adapted the fusion of both recipes which really worked good.
* You can add mint leaves too along with coriander leaves for added flavour.
* Ideally peanut oil should be used for original flavours, but I have used canola oil.
* Adding green chillies and pepper powder is optional.Omit if you don't like it spicy.Also, please keep in mind that coconut paste and coconut milk will definitely reduce the spices, so add accordingly otherwise you may end up tasting a bland bhaat. IMP :I have not added coconut paste in the video recipe and only added coconut milk.
* I have made a large batch of this bhaat but if you wish to make half the measure or for 1.5 cups rice and 14–16 prawns, then just reduce all the spices and ingredients to half and make.
* I have used 2 cups of water for each cup of rice.And so added 5 cups of water and 3/4 cup of coconut milk for 3 cups of rice.But if you cook the rice(1 cup) with 1.5 cups of rice then add water accordingly and don't forget about coconut milk.
* I have used my homemade garam masala to make this pulao, but you can always make using Maharashtrian goda masala.

For more prawn recipes, click here.


Friday, November 13, 2015

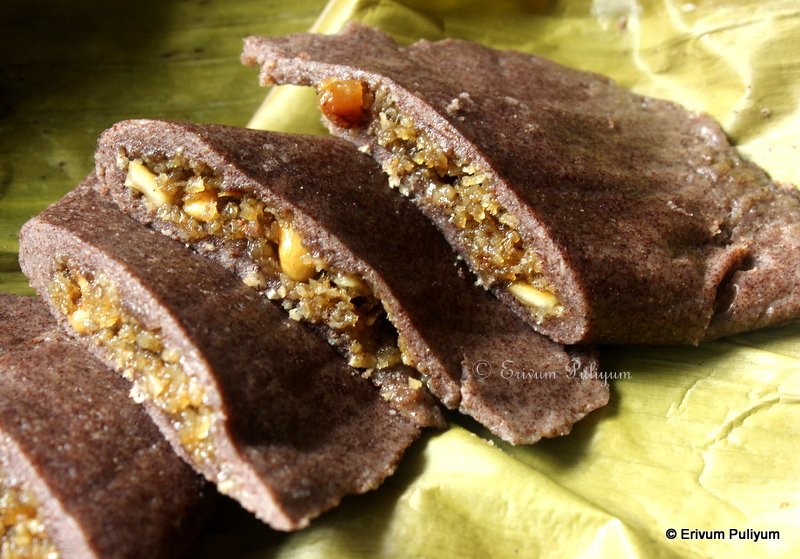
Ragi Ela Ada | Panjipullu Ada| Steamed Finger Millet Parcel

Hope everyone had a great Diwali with family and friends.And finally the wait for Diwali is over, and the drooling pics of sweets, savouries all over the blogosphere was overwhelming.Looking forward to drooling over 'Thanksgiving' recipes followed by 'Christmas' collections which marks the end of 2015.How fast does time fly??Whenever I look at my kids, I realize that time is really running;they were babies sometime back and now are school going.Anyway, can't stop the time, and we got to move on to keep pace with it.The traditional recipes of Kerala were very healthy and nutritious.All thanks to our great-grandparents who whipped these yummy recipes and were passed on to the next generations that did follow.But with time, many things changed, and those recipes have now been classified as the main source of carbohydrate mainly rice or tapioca (kappa) recipes and present day, people are asked to cut down carbohydrates as the increasing number of diabetics in Kerala takes its toll.What went wrong to all the healthy and nutritious foods?? Well…there are many factors to support these higher incidences.The sedentary lifestyle of people along with no exercise regimes has contributed to a large extent to this condition.Then, comes the pesticides, hormones injected in the plant right from the seedling to the fruit and animal products have added on to the situation.And the list goes on, where the main culprit to be blamed is the 'food'.Everything in moderation was the key principle what our grandparents followed as there wasn't much to waste, and they exercised well in the paddy fields, agricultural land and cultivated good organic foods too.Today the rice of what we eat is polished so neatly to attract buyers, whereas the rice of old times had the bran that made a whole nutritious food.I think these foods can still be enjoyed if we can actively bring about some changes in our lifestyle.


Moving on to today's post is a low carbohydrate steamed healthy snack that can be enjoyed by all age groups provided you moderate the amount of jaggery as per needs.Ragi is packed with iron and calcium.This is one of my favorite snack with ragi and make it often.Kids are not into the savory version of ragi, but ragi peechappam and ragi ela ada are their favorite.I have used frozen banana leaves but try to use fresh banana leaves to get the real flavors from the steamed banana leaves.The frozen leaves have very less aroma compared to that of the fresh leaves.The ragi flour is store brought and this can be prepared in very less time.These prepared adas can also be roasted in a mann chatti(clay pot) or kadai instead of steaming to give the ottada feel.I have tried both ottada version and ela ada version of this ragi snack and I feel in the ottada version, the filling becomes drier compared to the juicy steamed ones and I like the steamed ones better.Also, If you plan to dilute the jaggery (when added after straining the impurites) then coconut filling becomes dry.And so, I have used grated jaggery instead of purified jaggery, as there are no many impurities in the jaggery available here.This really adds that juicy feel when once cooked.If you are preparing this healthy snack for a diabetic or a person on low carbohydrate diet, then you may not add the amount of jaggery listed, but always reduce as required.Try these and enjoy making at home!!


Preparation time~15 minutes
Cooking time~15 minutes
Serves ~ 5 adas
Ingredients
for cover
ragi flour 1 cup
rice flour 1/4 cup
salt  a good pinch
water 1/2 cup

for filling
grated coconut 3/4cup
*jaggery grated 1.5cups
cardamom powder 1/2tsp
cumin powder 1/2 tsp

to wrap
banana leaves 5 or 6 pieces

Watch on YouTube-


Method
  • Sift the flours in a bowl and add a pinch of salt.Add boiled water and work to a chapathi like dough but a bit looser than chapathi as that gives soft adas(It's OK to have a sticky dough). Keep it covered for 10 minutes.
  • In another plate, mix the grated coconut, grated jaggery, cumin powder and cardamom powder.Thoroughly mix and leave for five minutes for the jaggery to blend in.
  • If using frozen leaves, thaw the leaves before use.Wash under running water.Cut out the banana leaves in rectangular shapes or any other desired shapes.
  • Divide the dough in five equal portions and place one portion on the cleaned banana leaf.Using the fingers, spread the dough on the leaf evenly (keep a bowl of water ready at hand to dip your fingers in it, and then try spreading the dough.Eases the work).
  • Now, place 2tbsp of the coconut-jaggery mixture on half of the spread dough, leaving a centimetre space at the edges.Fold the other half on top of the filling to cover it up and press down on the leaf to seal properly.
  • Repeat the same step to make more ragi ela ada and keep ready.
  • Heat water in a steamer and place the prepared ela ada in it (Please don't over fill the steamer with adas, leave space so that it gets cooked faster and also add sufficient water to cook otherwise the water in the steamer may dry up soon)
  • Cook covered on medium heat for 10–12 minutes, or till the leaves starts to pull out from the adas or the ragi changes to dark colour.
  • Remove from steamer and wait to cool lightly.Serve immediately just like that.


NOTES
* Adding rice flour is optional to ragi flour, you can make with ragi alone too, but I feel adding a little rice flour givesa nice texture to adas.
* You can use sugar instead of jaggery, too.But I feel jaggery is more healthy.
* I have used jaggery (1.5 cups) for kids, but for us just added a mild sweet flavour(1/2 cup).
* If you feel the jaggery has impurities, then it's better to dilute the jaggery in 1/4 cup water and strain the impurities.
* You can even add broken nuts and raisins to add taste to the filling.
* You can even try the ethakka filling in the ela ada that I tried earlier in this ragi ela ada, check out here.
* Cumin adds a nice flavor, omit if you don't like the flavors.

RELATED POSTS
* Ela Ada
* Ottada


Tuesday, November 10, 2015

Ghee Mysore Pak (Step by Step Pics) & Diwali Wishes !!!

Most of you might be busy with the last minute Diwali preparations-lighting lamps,making sweets,packing gifts,visiting friends and last but not the least enjoying fire works.We don't celebrate Diwali but making sweets,munching them is always a pleasure for my family.I love trying these sweets at home and in a way its a lot better than the adulterated ones form stores especially during festive season when demand is high.Wishing all my friends,readers and well wishers a Very Happy and safe Diwali !!!


Ghee Mysore Pak is a  famous Indian sweet made from besan,ghee and sugar.These are really melt in mouth consistency and all loved it.The ingredients list is very easy and the mesaures are simple to remember.If you still plan to take on a last minute sweet preparations,then this is just right for you.The procedure is real simple and only a few points like the one string consistency,continous stirring is to be kept in mind.When we stayed in Bangalore,I loved the ghee mysore pak from Sri Krishna Sweets a lot and never would leave a chance to buy them.Recently I was craving for them when I recollected the fond delicacies that I had in India.Ghee mysore pak was one of the best tasted ones but my first trial sometime back with a different measure though,didn't yield the melt in mouth consistency.Finally I found this recipe and tried which yielded the desired results and was very happy with the outcome.My better half was mad after the tastes as it tasted just like store brought ones.Do try for this Diwali or make for an happy occasion,am sure all will love it !!!


Preparation time~15 mins
Cooking time~ 20 mins
Serves~ 6-8 square pieces
Ingredients
besan/chick pea flour 1/2 cup
ghee melted 1/2 cup
*sugar 1/2 cup
water 2tbsp


Method
  • Heat a pan and add a tsp of ghee.When it is hot,add the measured besan in it and roast the besan for 2-3 mins by stirring continously on low medium flame until you the raw smell of besan disappears..
  • Then,leave to cool slightly and add the roasted flour to the sieve.Sieve the roasted flour so that there are no lumps in the flour.In that add the 2tbsp of ghee.Mix well without any lumps in a syrup consistency and keep ready.
  • Heat a pan with sugar and water (2tbsp).Wait till the sugar is dissolved and reaches one string consistency(One string consistency is when the sugar coats the back of the spoon and when you press a drop between your thumb and index finger,then it forms a string consistency).

  • At that point,add the besan mixture and continue to stir.Cook on medium flame by continous stirring.The mixture starts to thicken gradually as it gets cooked(the mixture shouldn't be left unattended and continous stirring is required.The ghee is absorbed in the sugar and besan.Add the remaining melted ghee and cook again till that ghee is absorbed.The whole process may take 15-18 mins.
  • The mixture comes together leaving out the edges and forms a sticky mass(I couldn't click the final pic as was in a hurry to transfer the mixture to the plate).At this point,switch off flame and transfer the contents in a greased plate or tray.Tap the tray on the counters to spread evenly(don't try to spread with a spatula).Leave to cool for 7-8 mins and then mark the lines on the sweet as desired.Cool completely and then break in pieces and serve.
  • Ghee Mysore pak is ready to be munched and mine got over in less than an hour.If you make larger batches and have left overs,then store at room temperature for 3days or refrigerate upto a week.


NOTES
* Roasting besan is an important step as the besan tastes raw without roasting.
* The recipe is adapted from here and I have followed the same as it was easy to remember the ingredient list; all in the ratio 1:1:1.Also,I have added the besan roasting step as its not mentioned in the making there.I saw vah chef's video to learn the roasting of besan.
* I made a very small batch as was apprehensive about the outcome and I don't like to trash the results if something went wrong.
*I have used homemade ghee in this recipe.
* You can always make larger batches by keeping in mind the ratio of 1:1:1;besan,sugar and ghee.
* You can can use half of ghee and oil to reduce fat but ghee mysore pak tastes best made in ghee.I have used ghee alone.
* Don't miss the syrup consistency else the besan mixture turns crumbly.
* Also,I have used only 1/2 cup sugar but you can go upto a cup if you like it more sweet like store brought.This was moderately sweet for us.

Stay tuned and hope you all enjoy Diwali with your loved ones !!


Monday, November 09, 2015

Quinoa Crepes | Quick Protein Packed Breakfast Ideas

Quinoa is a recent favorite at home and I have been experimenting this seed in many recipes.This is one such quick fix recipe to make a quick breakfast or for a after school snack.They are protein packed crepes and can be made filled with your desired filling of your choice.If you have the quinoa flour ready at hand then this hardly requires any time to put together.I spread the berry jam(that I made sometime back) just like jam rolls and kids loved it.This recipe had been sitting in my drafts for months now and back then blueberries were in season.But you can top with any other desired fruits of your choice.There is no obvious nutty tastes of quinoa,cinnamon adds a nice flavor to it.The thin crepes can be filled with some savory filling too to make a savory crepe.Try and enjoy with your loved ones !


Preparation time~ 20 mins
Cooking time~20 mins
Serves~ 8-10 crepes

Ingredients
quinoa flour 1/3 cup
whole wheat flour 1/4 cup
eggs 2 large
whole milk 1 1/2 cup
cinnamon powder1/2 tsp
corn starch 2tsp
honey 1tbsp
salt a pinch


Method
  • Combine both flours,corn starch,salt and cinnamon powder.
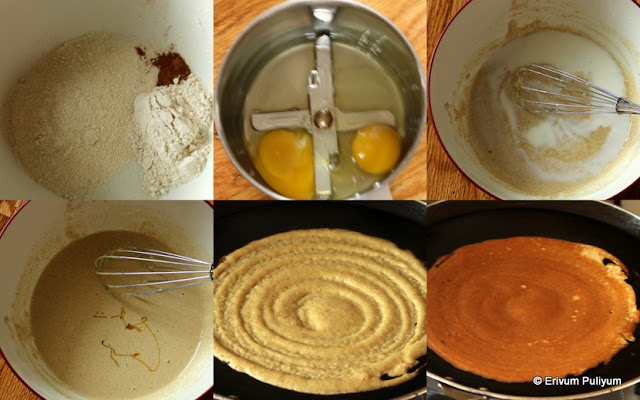
  • Lightly beat the eggs in a blender or with beater.Add flour mixture in it and mix well without lumps.Gradually add in milk and make a thin batter.

  • Heat a pan and add a ladle of batter.Spread evenly with the back of the ladle in a circle or swirl the pan.
  • Cook on low flame as it tends to get browned faster.Flip and cook the other side.Remove on a plate and keep covered.
  • Lower the heat to low and repeat the same step of making crepes till you finish the batter.
  • Lightly spread the jam or nutella in the inside and roll,serve.Dust with icing sugar and top with fruits of your desired choice(I served with berry jam and topped with blueberries).

NOTES
* I had shared the quinoa flour recipe sometime back,if you haven't checked out then the link is here.
* The recipe is adapted from here and I have tweaked slightly.The original recipe calls for two eggs and two egg whites but I used only two eggs and increased the quantity of milk instead.
* You can use all purpose flour instead of wheat flour too.In that case add milk as per the consistency.Wheat flour uses more milk and makes slightly thicker crepes than maida(all purpose flour) ones.
* You can make savory crepes using this recipe but omit the honey in the recipe.

RELATED POSTS
* Quinoa Idlis
* Quinoa Veg Pulao
* Quinoa Mango Parfait
* Quinoa Blueberry pancakes
* Quinoa Sago Kheer


Thursday, November 05, 2015

Chicken Ularthu | Nadan Kozhi Ularthiyathu | Kerala Style Dry Sauteed Chicken(Step by Step Pics)

Chicken dishes are always inviting at home and kids love chicken everyday for that matter,if you seriously ask them.But I don't generally cook chicken on week days and its mostly centered over the weekends.Its been quite some time since I posted a Chicken recipe.This is a very tasty chicken dry recipe made in the Kerala style.This is a way I remember having this recipe and has been always rated the very best.Not boasting about the tastes,believe me this is really scrumptious.This recipe is moderately spicy,the chicken pieces are well coated with the masala,the coconut bits adds that extra crunch.I don't frequently make this at home as it requires a little more effort than usual chicken recipes but worth to try.If you are planning to make this for guests or for potlucks,am sure you will receive accolades,no doubts.My hubby is a big fan of chicken ularthu(sauteed) and asks me to make it more often.This recipe can be tried with or without bones chicken,but I personally prefer with bones.Also,chicken breast may not be a right choice of meat for this ularthu(dry sauteed masala) as it requires an elaborate cooking.The chicken breast cooks faster and so may crumble up,mix up with the masala.Try this for your dear ones and let me know how it turned out too !!


Marination time~ 30 mins or max. overnight
Preparation time~ 20 mins
Cooking time~ 30-40 mins
Serves ~4
Ingredients
to marinate
chicken (with/without bones) 1.5lb  or 750 gms
turmeric powder 1/4tsp
hot chilly powder 1/2 tsp
crushed pepper 1/2 tsp
lemon juice 2tsp
salt to taste

for masala
onion 1 large sliced
shallots 1/2 cup sliced
ginger 2" piece or 2tbsp crushed
garlic 6-7 large cloves or 2tbsp crushed
green chillies 2-3 vertical slit
tomato half of 1 medium sized,chopped
kashmiri chilly powder 2tsp
hot chilli powder 1/2 tsp
coriander powder /malli podi 1.5tsp
garam masala 1/2 tsp
sliced coconut /thengakothu 2tbsp
curry leaves 2 sprig
salt to taste
oil 2 tbsp

for tempering 
onion 1 small,half moon sliced
curry leaves a sprig
red dry chillies 3 pieces
garam masala 1/4tsp
pepper powder/kurumulakku podi 1/2 tsp
fenugreek powder/uluva podi  a good pinch
oil 1-2 tbsp


Method
  • Clean and wash the chicken under running water,drain water by placing in a colander.marinate using the ingredients listed 'to marinate' for half an hour to overnight(I usually do overnight).
  • Heat a pressure cooker with oil under masala list.Add in crushed ginger and garlic,saute until the raw smell disappears.Add in the sliced onions,shallots,green chillies,curry leaves and sliced coconut.Saute on medium flame until the shallots and onions turn slightly golden brown(takes 5-6 mins).
  • Then,add in chopped tomato and mix well.Add the spice powders listed on low flame(else will burn) and then add the marinated chicken.Give a quick toss and add in 1/3 cup water.Let the mix start boiling,add salt lightly(if required as marinade has salt).Close the pressure cooker lid and continue to cook on medium flame for just one whistle.Wait till the pressure is released and if the gravy is watery then,continue to cook open on medium flame for another ten minutes until the gravy thickens and is creamy.Switch off flame.

  • Heat a heavy bottom non stick pan or kadai(wok).Add oil under 'tempering'.Add red dry chillies followed by sliced onion and curry leaves.Saute until the onion turns golden brown.Add the spice powders on low flame listed 'under tempering'.Add the chicken with the gravy.
  • Turn the heat to high and keep stirring for another 6-7 mins(time may vary depending on the amount of gravy left to dry) on medium to high flame until the chicken is completely blended with masala and is dry.The color is deep brownish and the oil oozes out at the sides.At this point,switch off flame and serve warm with chapathis/ vellayappam / idiyappam/ kallappam /pathiri or steamed rice.


NOTES
* I usually use a mix of kashmiri chilly powder and hot chilly powder.But you can moderate the spices as per tolerance and needs.
* Don't use more than half of tomato as the gravy may turn tangy and mushy.
* Adding green chillies is as per tolerance.Skip if you wish.
* I have used homemade garam masala powder.If you use store brought masala,then its better to dry roast the following whole spices to a fine powder and use.Cinnamon 1" stick,fennel seeds 1tsp,cloves 3,cardamom  3,star anise a small petal,poppy seeds 1/2tsp,pepper corn 1/4tsp,nutmeg 1/4tsp.Warm it up on low flame and then powder in a blender for use.
* I have used chicken thighs but you can use any other chicken pieces with bones.Chicken breast may not be suitable for this recipe.

RELATED POSTS
* Kerala style chicken fry 
* Chicken Roast(Kerala style)
* Spicy Chicken fry with roasted coconut 
* Nadan Kozhi Curry


Add caption


    Tuesday, November 03, 2015

    Colorful Parathas | Tricolor Parathas(Step by Step Pics) | Lunch Box Ideas

    Its fall everywhere here and that's a lovely weather(which  I love the most after spring).We are blessed to have a beautiful nature all around us shading different colors on tress and plants.Every corner looks like a wall pic or a post card.Though this is the scene every year here but it doesn't create a monotony.I love the pretty shades of trees dressed in yellow,orange,red and green mostly.Today's recipe post is an inspiration from these shades.Sounds strange,right?? But this wasn't made to match the fall colors at all,believe me.However,when kids saw these parathas,their creative heads immediately coined it as 'fall parathas'.And in a way it was very true,it truly had all the prominent shades of fall season.


    These parathas are made with natural colors from spinach,beetroot and carrots.I had my apprehensions about kids liking when I started making these parathas.But to my surprise,they were very much excited to have these colorful parathas not only by the colors but the taste too.The carrots and beets adds a sweet flavor to the parathas along with the spinach flavors,they complimented each other well.If the parathas were made with spinach alone or beets alone,am sure kids might have turned down.I was feeling bad as should have tried this earlier because my younger one who is a picky eater has demanded to make it more frequently.He totally loved it hot with ghee smeared on top.This can be made for kids lunch box and can be served with a simple raitha.Enjoy !!


    Preparation time~ 20 mins
    Cooking time~ 30 mins
    Serves ~10 parathas
    Ingredients
    whole wheat flour 3 cups
    chilly powder 3/4 tsp
    garam masala 1/4 tsp
    salt to taste

    beetroot 1/2 of 1
    carrot 2 medium sized
    spinach 1/2 of a bunch
    ghee/oil to smear


    Watch on YouTube -


    Method

    • Wash,peel and cut the beets,carrots in small pieces.Keep them separately.Add the beets in a pan and add 1/4 cup water.Cook covered for 5 mins on medium flame.Switch off flame and leave to cool.Similarly boil the carrots in 1/4 cup water for 5 mins and then leave aside to cool(the water used for cooking must have used up by now).when it is cooled grind in a blender without adding any water to a smooth puree.Wash the spinach leaves and add to a pan of boiling water.Blanch the spinach leaves for 2 mins and then drain water,add the leaves to a blender without water and blend until smooth.Each cup of puree should be 1/2 cup.

    • In a large bowl,take the wheat flour,add salt,chilly powder and garam masala powder.Mix well.Now separate each cup of flour in three separate bowls.To the first bowl,add beet puree little by little and knead to a smooth dough.To the second bowl,add the carrot puree and knead to a smooth dough.And to the third bowl,add the spinach puree and knead to a smooth dough(the puree may be used mostly,I had very little left overs).


    • Leave the dough covered for 20 mins to rest.After 20 mins,divide all the three doughs in equal number of marble sized balls.Now take balls from each colored dough and then roll in a rope shape.Keep the three ropes close to each other and the swirl the dough(tuck the loose ends) to get a round shape(see pics).Dust with flour and then roll out using rolling pin until desired thickness(the prepared rounds are thicker than regular chapathis).An alternate method is to stick all the three balls together and then press down to form a very small discs.Dust with flour and roll out using rolling pin.I felt the second method was much easier and faster than first one(you may have to dust more flour than we usually do for making chapathis as the dough is a bit sticky with the puree)
    • Now,heat a pan and transfer the prepared parathas when hot.Turn and fry all sides and drizzle oil /ghee over the top on both sides.Slide out to a plate and repeat this step till you finish making all parathas.
    • Serve warm with pickle"(we had with garlic pickle) or a simple raitha !!

    NOTES
    *The cooked beets or carrots or spinach should be pureed without adding any water.
    * The dough shouldn't be very stiff else it becomes very difficult to roll out.
    * Don't make the parathas very thin and shouldn't be less than 1/8" thickness.
    * These parathas can be made as three different parathas like spinach parathas,beet parathas or carrot parathas too but I have my doubts about kids tastes.
    * These parathas are made by dipping in flour frequently so smearing with oil or ghee is a must other wise it becomes very dry.I smeared ghee for kids.

    RELATED POSTS
    * Tricolor Puttu
    * Beets Dosa
    * Carrot Rice