Strawberry-Beet juice works as a healthy detox for the body, and so can be added to a healthy breakfast menu. This drink doesn't require many ingredients, you can always add a piece of ginger or lime to spike a bit, but I have kept it very simple. Give this a try and enjoy !!
Watch the YouTube #shorts here on the Strawberry Beet juice.
Wash, clean the strawberries, hull and cut small. Peel, wash and cut the beetroot in small cubes. Add the beetroot cubes to blender jar, pulse in a mixer. Then, add the strawberries. Grind again smooth. Add water, sugar and blend again. Strain and serve in glasses with ice cubes. The taste is on the sweeter side, though strawberries have a tangy flavour which gets subsided in the sugar and beetroot. You can always add half a lemon to spike the tangy flavours.
NOTES
* You can add a piece of ginger and half of lemon.
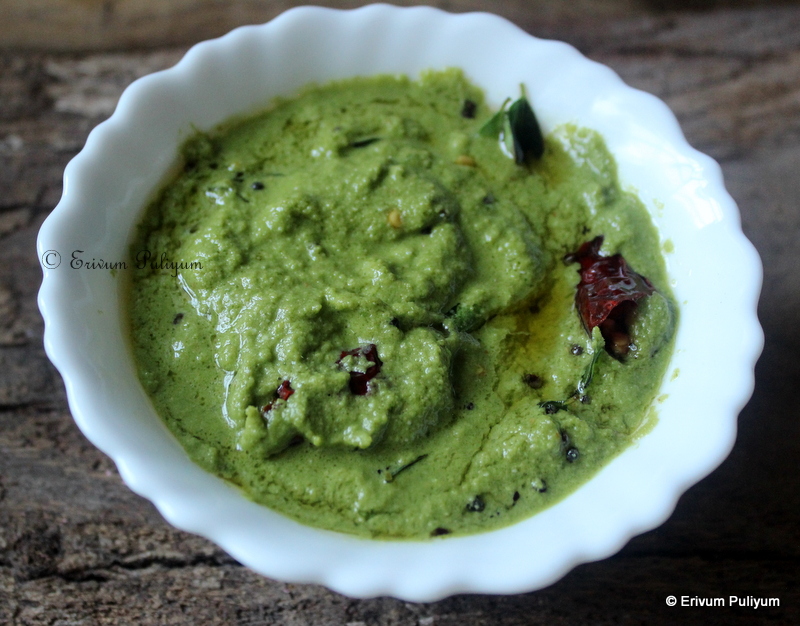
Amla(Nellika) is in season and there are numerous health benefits of this simple fruit. The vitamin C content in amla is so good that it boost the immunity. We should always try to incorporate this fruit as much as possible for the herbal uses.My kids are not fond of eating this fruit raw, and so I try to incorporate them in chutneys to sneak in the benefits.
These two chutneys are made without adding coconut and so can be made in a jiffy. Give these a try and serve with idli dosas or can be served as a diip with kachoris/ samosas/ beead pakoras. The spicy amla chutney can be served with steamed rice too. The spicy amla chutney is moderately hot and I have used beydagi chillies. Alter spice as per tolerance. The green chutney loses colour as it sits long, so make and use immediately, and this chutney is tart but compliments well when served with idlis or dosas. Tempering the chutney is totally optional and can be served without that too. Give it a try and enjoy !!
Preparation time ~ 10 minutes
Cooking time ~ 5 minutes
Author ~ Julie
Ingredients
For Dhaniya Amla Chutney
coriander (dhaniya leaves) 1 bunch
cashews 5 almonds 5 amla 2, deseeded and cut
green chilli 1 ginger 1/2’ piece hing (kayam podi) 1/8 tsp salt to taste
sugar 2 tsp
to temper
mustard seeds 1/2 tsp
red dry chilly 1 broken
curry leaves, a sprig
oil 1tbsp
For Spicy Amla Chutney
amla 3, deseeded & cut
shallots one handful
ginger 1 small piece
curry leaves 1 sprig
red dry chilly 4; broken
oil 2tbsp
salt
Watch on YouTube -
Method
FOR DHANIYA AMLA CHUTNEY(Malliyila Nellika Chammanthi)
Wash the dhaniya (coriander leaves), keep aside. To the blender jar, add the cut amla pieces, ginger, green chillies, almonds, cashews. Add hing, salt, sugar and pulse twice to crush the mix. Then add the washed coriander leaves. Add ice-cold water (2tbsp) and grind smooth. Transfer to a bowl.
To temper(optional step)-Heat oil in a wok and add oil. To this add mustard seeds, dry red chilly and curry leaves. Switch off and pour over the chutney, mix and serve. We had with pesarattu(moong dal dosa).
SPICY AMLA CHUTNEY-
Heat a pan and add oil. To this, add the broken red dry chilly. Sauté until crisp, add the shallots, ginger and curry leaves. Then fry until onions are translucent and lightly browned. Add the cut amla pieces and sauté until lightly browned, add salt. Switch off and cool lightly. Transfer to a blender jar and grind to a smooth paste without adding water.
NOTES
* Tempering the chutney is totally optional and can be served without that too.
* Adding sugar to green chutney balances the flavours.
* The spicy amla chutney is moderately hot and I have used beydagi chillies. Alter spice as per tolerance. You can even add 2tbsp grated coconut to reduce spice or reduce the chillies.
Gobi Manchurian needs no elaborate intro, and is a favourite among most of the people. This is a tasty appetizer if served dry, or a perfect side dish when served with fried rice for vegetarians. I have not made many changes in the recipe except that I have added Kashmiri chilli paste instead of red food colour. The florets are blanched and then coated with a marinade, deep-fried and then coated with sauces. I do make it often as kids love Gobi manchurian with fried rice and so, recipes that are made frequently always takes time to be on blog or videos as I always think to take pics or videos the next time which never happens. Finally, the day has come when I took up the video and is on blog too, check the recipe here and do comment if you make the same way. The veg fried rice without sauces is here, if you wish to try the recipe.
Preparation time ~ 20 minutes
Cooking time ~ 20 minutes
Serves ~ 5-6
Author ~ Julie
Ingredients
gobi/ cauliflower 1 medium-sized (450 g)
maida (all-purpose flour) 1/2 cup
corn flour 1/2 cup + 3tbsp
hot chilli powder, 1 tsp
turmeric powder 1/4 tsp
ginger paste 1 tsp
salt
oil for frying
for manchurian
garlic chopped fine 2 tbsp
capsicum/ green bell pepper 1/4 cup chopped
onion 1 small-sized, chopped
green onions/ spring onion 3 tbsp + 2 tbsp
tomato sauce 4 tbsp (1/4 cup)
dark soy sauce 2 tbsp
Kashmiri chilli powder paste 2 tsp
pepper powder 1/2 tsp (optional)
vinegar 1 tsp (optional)
corn flour 1 tbsp
water 1-1.5 cups
salt to taste
Watch on YouTube-
Method
Cut the cauliflower florets in bite size pieces and add to hot water mixed with salt. Leave the florets to blanch for 5 minutes so that the florets get cleaned. Rinse in cold water and drain water.
Add the florets to a plate and add maida, corn starch(1/2 cup), ginger-garlic paste, chilli powder and salt. Mix well to give a nice coating. The coating shouldn't be very thick and should be lightly covered on all sides.
Before frying, add the corn flour(3 tbsp) in a plate and roll each of the florets in the corn flour, shed off excess (helps retain the crunchiness for long after frying) and keep aside.
Heat oil in a pan and fry the florets by dropping one by one and in batches. Fry until crisp by flipping all sides, drain from oil and place on paper towels. Remove from paper towels when warm to retain the crunchiness of fried florets.
Then, heat oil (same oil can be used for frying) in a wok and add the chopped garlic and fry till light crisp. To this, add the chopped capsicum and onion, fry lightly along with chopped green onions (reserve the green tips for garnish). Then add the soy sauce, tomato sauce, chilli paste, vinegar, pepper powder, salt. Mix well.
Mix the corn starch with water (1/4 cup) without lumps. Bring to a boil and wait till the sauce thickens. Add half a cup more of water (total water used 1 cup) to adjust consistency.
Finally, add the fried florets and give a quick toss. Add cut green onions for garnish. Serve warm with fried rice.
NOTES
* You can omit adding Kashmiri chilli powder when frying. But I prefer adding, as I don't use red food colour.
* You can add chopped green chilli when making gravy. I omit that, as kids don't like biting green chillies in gravy.
* Add chilli sauce instead of chilli powder in the gravy. I generally add Kashmiri chilli powder only, which adds to the colour.
* Adding vinegar spikes up the flavours, but you can add or omit.
* You can use wheat flour instead of maida, doesn't retain crunch for long but otherwise is healthy.
* You can add 1/4 tsp sugar too to balance tastes.
Holi without gujiya is a big missing, and mawa gujiya tops this list. However, if you don't have access to mawa or if it's hard to get easily at your place, do you wish to celebrate a Holi without gujiya?? No !! This is an answer to all those who are looking for a quick gujiya that tastes almost similar to mawa gujiya and can be stored for longer days than mawa gujiya. Suji guijiya almost matches the mawa gujiya and I love the filling in these gujiya as it's very tasty in itself. The cover is crisp, flaky and delicious. Try these out and enjoy for this Holi.
Preparation time ~ 10 minutes
Resting time ~ 20–25 minutes
Cooking time ~ 20 minutes
Serves ~13-14
Author ~ Julie
Ingredients
for making cover
all-purpose flour(maida) 1.5 cups
ghee 3 tbsp
salt a pinch
water 1/3 cup(approx.)
for making filling
*suji (rava) 1/2 cup
dessicated coconut 1/3 cup
*granulated sugar 1/4 cup
almonds chopped 2 tbsp
cashews chopped 2 tbsp
raisins halved 2 tbsp
*cardamom pods 4-5
Watch on YouTube-
Method
MAKE COVER-
Sift the flour with a pinch of salt, I missed the video clip of adding salt. To this, add ghee and mix the flour like bread crumbs. Hold the flour together by pressing and check if the ghee is moistened the flour. Then add water little by little to make a stiff dough, use very little water each time. I used about -6 tbsp or 1/3 cup. Knead the dough another 5 minutes to make the dough pliable, cover and restore 20–25 minutes.
MAKE FILLING-
In a blender jar, add granulated sugar along with cardamom seeds and powder fine.Keep aside.
In another pan, heat ghee. To this add fine rava(suji). Roast the suji for about 5 minutes on low flame. Add the dessicated coconut then and give a quick mix. Continue to roast another 5 minutes until the suji looks nicely roasted and browned. The coconut gives out a nutty flavour. At this point, switch off the flame and add the chopped almonds and cashews. Add the cut raisins, to give a nice mix. Transfer to a bowl and cool. Then add the powdered sugar along with cardamom. Combine well.
Now, knead the dough another minute and pinch out small balls (around 12-14) of the prepared dough. Smoothen the ball and roll using a rolling pan in a 3' circle, no need to dust flour wile rolling.
Place 2tbsp of the prepared filling in the center. Moisten the sides using water and stick the edges by folding in semicircle. Then make designs of your choice by folding the edges or by pressing using a fork.
Place the prepared gujiya on a plate lined with clean cloth and cover with a clean cloth too. Prepare the rest of the gujiya similarly.
Heat oil in a wok and when the oil is hot, slide in the prepared gujiya one by one. Don't overcrowd the wok. Wait for a minute for the gujiya to puff up and float on the surface of the oil.
Then flip and fry all sides till golden frying. Similarly fry all gujiyas till done, its better not to place on paper towels as they lose crunch.
Cool completely and store in airtight containers. Enjoy with tea or as a sweet !!
NOTES
* You can use oil instead of ghee when making cover but ghee adds the flakiness.
* It's better to use fine suji for making gujiya than the coarse. If you don't have fine, then powder the coarse rava in mixer and use. I had fine rava with me so used that.
* Use 1/2 cup powdered sugar or powder 1/4 cup granulated sugar to get 1/2 cup powdered.
* I have powdered cardamom pods with sugar but you may use 1/2 tsp cardamom powder.
.png)


.png)
.png)