Print Friendly and PDF

Tuesday, February 22, 2022

Barnyard Neer Dosa (VIDEO)

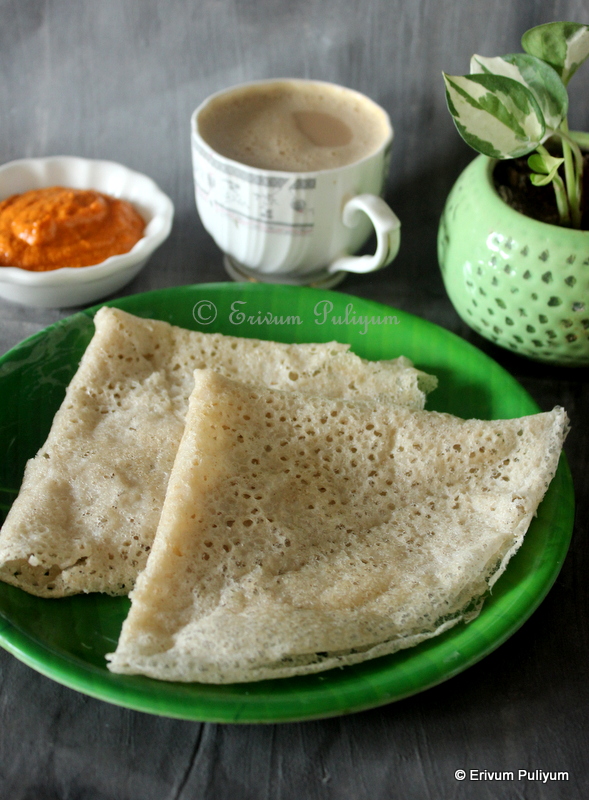
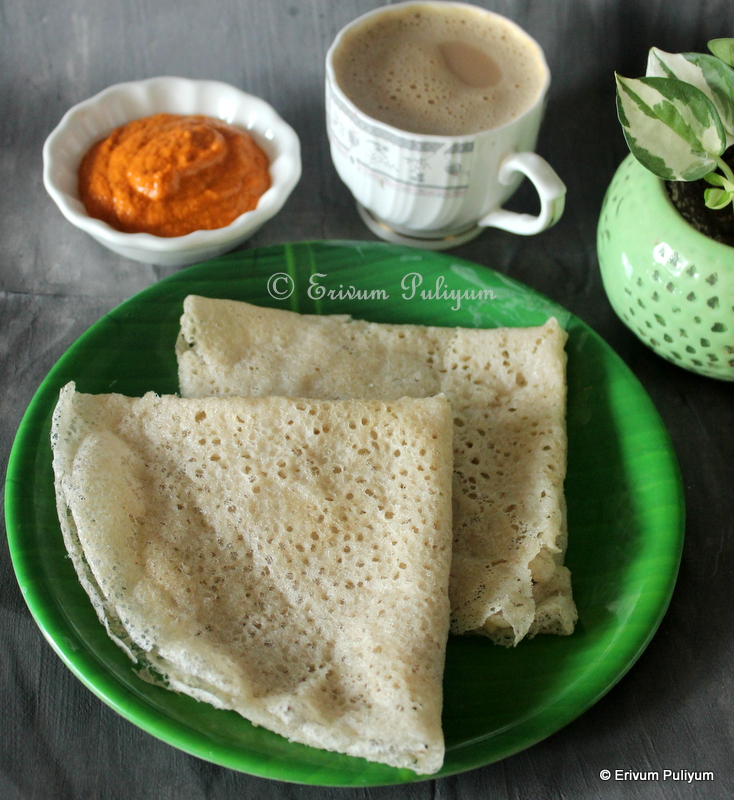
Barnyard neer dosa is an instant healthy dosa that can be quickly prepared without any fermentation. This dosa is a healthy breakfast option to all those who would like to avoid rice. Though you get store brought millet flours in stores, but I have used homemade millet flour that I prepare at home. The recipe link for making millet flour is already shared here. Taste wise these millets neer dosa don't taste anything obvious but the colour of these neer dosa is off-white than white. 

The only difference that I found in making these millets dosa is that it takes a little more time than usual neer dosa to cook. So wait patiently before you flip the dosa. Mangalorean neer dosa, the traditional one or millet neer dosa, I love them with a tangy chutney like tomato chutney, kunjulli chutney or mint chutney. How do you like to pair these crispy and light dosas ? You can even serve these with chicken sukka .Try these out and am sure you will love these.


Preparation time ~ 15 minutes
Cooking time ~ 10 minutes
Author ~ Julie
Serves ~ 4 neer dosa
Ingredients
barnyard flour 1/2 cup
cooked rice 3 tbsp
grated coconut 3 tbsp
salt to taste
water 1 cup


Method
  • Add the barnyard flour in a bowl. Add 1/2 cup water to this, mix well without lumps.
  • Take the cooked rice and grated coconut, add to a blender jar and add water. Grind till smooth and add to the barnyard batter. Combine well, add salt  and get a batter without any lumps. The batter shouldn't be very watery, but thinner than dosa batter.
  • Heat a non-stick pan and when the pan is really hot. Pour a ladleful of batter and swirl the pan to even out the batter. Cook till the sides are crisp and starts to leave the pan(may take longer than usual neer dosa batter). Add few drops of gingelly oil.
  • Flip the other side and cook for another 45 seconds. Repeat making the other barnyard neer dosa. Serve with tomato chutney or pudina chutney.


NOTES
* I have already posted the barnyard flour making from scratch, please refer the link.
* You can make this neer dosa using other millet flours too.

RELATED POSTS
* Barnyard Idlis

FOR MORE MILLET RECIPES, CLICK HERE.


Friday, February 18, 2022

Chocolate- Banana Cupcakes(Wheat Flour)

Chocolate and banana is a super hit combo at home for two good reasons. One, the final product is moist, soft and delicious cupcakes which none can resist. Second, the cocoa powder adds a special effect on these cupcakes that the banana flavour remains unnoticed. Had the kids known, the cupcakes were made of bananas, they would have turned down. I have already posted a chocolate banana pancake, which is again a great hit here. These cupcakes are made with wheat flour and so these can be a breakfast option if you are a busy person and have no time to prepare breakfast. You can always reduce or increase sweetness as per sweet tooth.


I have made this cupcake several times now and kids have happily devoured these cupcakes very happily till date. I can use up all over ripe bananas at home, disguising in a cocoa powder mix. The batter making for these yummy cupcakes is quite simple and all you need is a wire whisk. The batter is of running consistency, then puffs up well and bakes to set. The texture is soft, smooth and moist cupcakes. They can be enjoyed without any frosting too, or you may add a few white chocolate chips for an attractive look. This is a foolproof recipe, enjoy making these at home.
                                   

Preparation time ~ 10 minutes
Cooking time ~ 20 minutes
Author ~ Julie
Serves ~ 12 muffins
Ingredients
wheat flour 1 cup
baking powder 3/4 tsp 
baking soda 3/4 tsp
salt 1/4 tsp
powdered sugar 3/4 cup
cocoa powder 1/3 cup
oil 1/4 cup
milk 1/4 cup
warm water 1/2 cup
egg 1
banana 1/2 cup mashed (1 Robusta / Dolo or 4-5 small banana)
vanilla essence 3/4 tsp

for chocolate frosting
chopped dark chocolate compound 100 gms
whipping cream 1/2 cup


Method
  • Sift the flour, baking powder, baking soda, cocoa powder, powdered sugar and salt twice in a bowl. Keep aside.
  • Mash the bananas with a fork until nicely mashed (Don't worry if there are lumps in the mashed).
  • Now, add the egg in a bowl and add mashed bananas. Mix well using a wire whisk. To this add the oil, vanilla essence, combine well. 


  • Add the dry ingredients in batches and combine well. To this add milk and warm water in batches till fully incorporated. The batter may be running consistency, but don't worry it will get baked.
  • Pre-heat oven to 350 degrees F or 180 degrees C and line a cupcake  tray with cupcake liners(12). 


  • Scoop out the batter in cupcake cups upto 3/4 th full. Then, place in oven and bake for 18-20 minutes (I removed in 20 minutes). 
  • Remove from oven and cool on wire rack for 10-15 minutes. Enjoy or frost the cupcakes once cooled completely and enjoy!!


FOR CHOCOLATE FROSTING-
  • Melt the chocolate using a double boiler method and add the whipped cream to this. Smooth the chocolate till completely melted. Leave to cool completely.
  • Beat this ganache with a beater till the frosting looks smooth, light and glossy(2-3 minutes).
  • Pipe designs on muffins by transferring the frosting in piping bags. Draw patterns of your choice. Add silver pearls for garnish and enjoy.


NOTES
* You can use white chocolate chips (1/4 cup) if not in a mood to frost. This way the cupcakes look great too. I have prepared this way too.
* You can use upto 1 cup of powdered sugar if you are a very sweet person. Also, depending on the sweetness of bananas, alter the sugar quantity.
* I have used 5 njallipoovan (Kerala style small bananas). You can use 1 big robusta type or Dolo banana, or just make sure the mashed bananas is 1/2 cup.
* I have used Ashirwaad atta, you can use any wheat flour or use all-purpose flour(maida).
* These cupcakes rise up well, so pour batter accordingly in each cupcake liner.

Take a peek to see the texture of these cupcakes below-


Enjoy !!

RELATED POSTS
HEALTHY BAKES

CUPCAKES WITH EGG

EGGLESS CUPCAKES


Thursday, February 10, 2022

Quinoa Veg Khichadi (Step by Step Pics)

Quinoa (pronounced 'kinwa') is one of the healthiest foods, very rich in protein and is vegan.I have become a strong fan of this tiny seed with tail and have started incorporating this as much as possible to our tastes. Quinoa has a natural bitter coating of saponin which dissolves when quinoa is rinsed. The draining of water from quinoa reduces the nutty flavor. Quinoa flour can be easily added to many recipes like muffins, cakes, pancakes, crepes and much more. I have a few recipes that I tried with quinoa flour listed below and had been a hit at home. Please check at the end of this post for mor quinoa recipes, if interested.

This is a khichadi that I tried making with quinoa that you can prepare as a one pot meal, quick fixes. The paste that you make and add gives the extra punch to this khichadi unlike the veg pulao which has more of whole spices. Add your favorite veggies as per availability and make. The cooked quinoa has a cute tail which makes it distinct. There is nothing fancy about this khichadi,but the nutritive value is more than of a regular khichadi. You may not need any sides with this khichadi except for a papad or fryms. We paired this with raitha. Try and enjoy !!


Preparation time ~ 15 minutes
Cooking time ~ 30 minutes
Serves ~ 2
Author ~ Julie
Ingredients
to cook quinoa
quinoa 1/2 cup
water 3/4 cup
salt to taste

to make khichadi
ginger 1 tsp chopped
green chillies 2 chopped
onion 1 medium sized chopped
capsicum/ green bell pepper 1/3 cup chopped
tomato 1 chopped
green peas  2 tbsp 
carrot 1/4 cup cubed
cauliflower 1/4 cup cut small
potato 1 small cubed
beans 2 tbsp chopped
pav bhaji masala 1/2 tsp
coriander leaves 2 tbsp chopped
salt 
oil/ butter 2 tbsp

to make paste
kashmiri chilly powder1 tsp
cumin powder 1/4 tsp
garlic cloves 2


Method
  • Wash the quinoa in a strainer under running water, else the quinoa may drain out. Then add this to a pressure cooker and add salt lightly and water. Cook for one whistle and wait till the pressure is released.
  • Add the oil and add chopped ginger and green chillies. Saute for a minute. Then, toss in chopped onions and capsicum. Saute again for a minute.
                                                   

  • Prepare a smooth paste using kashmiri chilly powder, cumin powder and garlic cloves. Add the chopped tomato and add the paste(There is an error in pic editing, it's written tomato paste). Give a quick stir and mix well.Cook covered till tomatoes are cooked and mushy.
  • Then, add the chopped vegetables, combine well. Sprinkle few tbsp of water, add salt and cook covered for 5 minutes, check in between for moisture and drying up. Add water as needed to cook the veggies. 
  • Finally, add the cooked quinoa along(discard the cooked water to reduce the nutty flavor). Mix well and cook covered for another two minutes. Wait till the moisture is dried completely.
  • Garnish with  coriander leaves and serve warm with any of your fav sides or raitha & papad. I served with raitha.


NOTES
* You can add the cooked veg masala to the cooked quinoa in the cooker and cook for one more whistle too. Add half a cup of water too. But this gives a more flavourful taste than the cooker style.
* Add your desired vegetables as per availability and needs.


Thursday, February 03, 2022

Ragi Murukku | Finger Millet Chakli

What do you usually make for snacks?  I do make these snacks in rotation and kids do love munching them. They love all the south Indian style deep-fried snacks and so make it quite often. Do you love storing the oil fried snacks in airtight containers? Today's post is a murukku made with ragi flour. I have earlier posted  Ari Murukku (Mullu Murukku)Butter Murukku which are a super-duper hit at my home. Please check out a few ragi recipes that I tried in the past and have listed them below. 

RAGI RECIPES

Frankly speaking, ragi murukku has never been in my do list until late. I personally never liked the colour of these murukku as I thought it was over browned murukku, but then I tasted once the store brought packet and somehow liked it to some extent. Then the blogger in me thought to give this a try at home using the same procedure as making rice murukku and have been successful. I have tried this recipe a few times now, and it is foolproof. In this recipe, the urad dal is pressure cooked and ground to add to the rice flour and I have prepared the Ari Murukku (Mullu Murukku) in the same way that I posted long back. My mom used to make the rice murukku the same way and I just loved doing the same way. When added to ragi flour the same urad dal mix, and it worked. Kids loved these murukku just like the ari murukku and enjoyed it. Do give it a try and lemme know too.


Preparation time ~ 20 minutes
Cooking time ~ 30 minutes
Author ~ Julie
Serves ~ 20-22 murukku
Ingredients
ragi flour 1.5 cups
whole urad dal 1/4 cup
water 1/3 cup
salt 1/2 tsp
cumin seeds / jeerakam 1/2 tsp
white sesame seeds/ ellu 1 tbsp
asafoetida / hing / kayam a good pinch
oil 2 tsp

oil for deep-frying


Method

  • Wash the urad dal and add to the pressure cooker with enough water just above the dal to cook.Cook in pressure cooker for three whistles until the water is used, and the dal is cooked well.It shouldn't be overcooked and mushy, nor under cooked.Wait for the steam to release and then grind this dal using left over water and add more water if required to a smooth paste.
  • Roast the ragi flour on low to medium heat without browning the flour(takes about 3- 4 minutes on medium flame).Let it cool completely, add salt and asafoetida.Add 2-3 tbsp hot water to the flour along with the ground urad dal. Add the sesame seeds, cumin seeds and combine well (you may have to add extra water to knead the dough smooth, so keep a cup of boiling water ready to add in the dough.Add as needed, you may not require the entire amount of water)


  • Knead the dough smooth like for idiyappam. Scoop out small portions in the mould and close it tightly(use the star plate in the mould). Press down the mould by holding the mould on a banana leaf or parchment paper and make round concentric circles of 3 or 4 layers closely, cut the end and fix to the previous circle securely so that it doesn't open up when frying.
  • Repeat the same step and make more shapes. Heat oil in a deep wok/kadai up to 2" deep on medium flame. When the oil is sizzling hot, add a small portion of the dough and check if oil is ready.If the dough comes up immediately to the surface of oil, then oil is ready to fry. Slide in  the made murukku in oil with the help of a spatula and fry the murukku on medium flame.When one side is slightly done or browned, then flip the other side.Turn and fry both sides until slightly browned, drain using a slotted spoon and place on layers of paper towel (it's hard to understand the browning with ragi muruku, so keep a watch when the murukku starts to float on the surface of oil and the bubbles subsides then you can remove the murukku from oil).
  • Repeat the same steps of filling the dough in mould and making murukku.Fry them in oil in batches(don't overcrowd the wok when frying).


NOTES
*You can add 4 tbsp of urad dal flour to make this murukku too. 
*Adding boiled water to knead the dough makes smooth murukku.
*Don't leave the shaped murukku open. Leave them covered, as they may dry out and may separate from sticking. OR Make as much required for the next batch. Leave the unused dough covered at all times.
*Keep the oil on medium heat. Don't increase heat, as they may get browned faster on the outside and may not cook inside. Also, if you leave the oil too low, then the murukku drinks up more oil.
*Cool completely before storing in airtight containers. If you make bigger batches, then store the daily use one separately, as frequent opening the jar may make the left over murukku soft.

RELATED POSTS