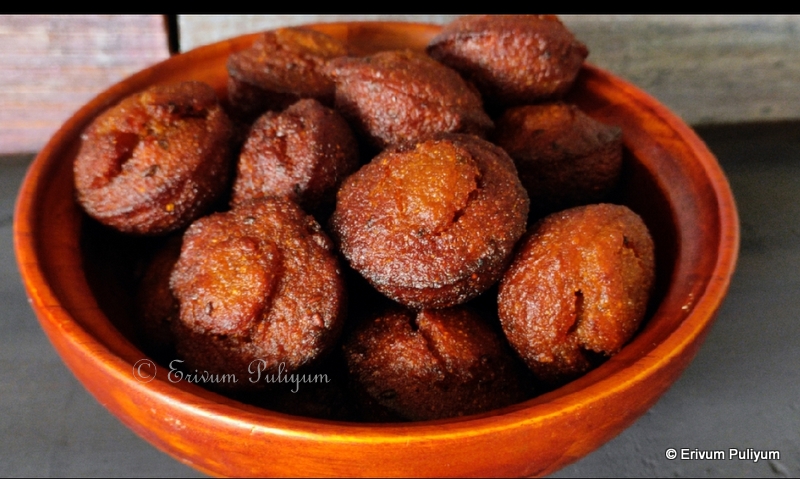
Ragi is a very popular millet in India and is very nutritious, healthy and apt for all age groups. What do you generally cook with ragi flour ? I generally make the steamed ada, roasted adas, kozhukatta , or the instant ragi dosas. This roasted ada uses mashed bananas that prevent the adas from drying out, as ragi in itself is a dry flour and adds the natural sweetness along with jaggery syrup. Check for alternate method, if you don't get fresh banana leaves. Quite easy to prepare, guilt free snack and enjoy with a cup of black tea !!
Purée the bananas in a blender jar. Add to the flour, add in grated coconut, pour jaggery syrup and get a dough of spreadable consistency.
Wet your hands and spread 2 tbsps of dough in a thin layer on a clean banana leaf. Fold the leaf and place in a clay pot.
Place the clay pot on flame and cook the ada, until the banana leaves get browned and charred. Flip and cook both sides for even cooking.
Enjoy with black tea !!
NOTES
* You can make the same ada without banana leaves too. In that case, heat an iron griddle. Wet your fingers and spread the dough on the iron tawa like chapathis without burning your hands. Cook both sides and enjoy.
* Alter sweetness as per sweet tooth. Add more than required in dough, then only the sweetness may turn correct when cooked.
Aval vada is a crispy snack that can be prepared instantly when you crave having some crisp tea time snacks, especially during monsoon. The thick variety poha is used to make this snacks as the thin poha absorbs moisture very much and so may drink up oil when frying. The other ingredients are easily available in the pantry and can be added. Add chilly flakes or chopped green chillies if you love the vadas spicy. Check the recipe and do give it a try !!
Preparation time ~ 10 minutes
Cooking time ~ 10 minutes
Serves ~ 12-14 vadas
Author ~ Julie
Ingredients
poha / aval (thick) 2 cups (300 gms)
onion 1/2 cup chopped
green chillies 2 chopped
ginger 1 tsp, fine chopped
yogurt 1/3-1/2 cup
rice flour 1/4 cup-1/8 cup
red dry chillies broken 2 tbsps
coriander leaves 2 tbsps
curry leaves torn 1 sprig
salt to taste
oil to fry
Watch on YouTube -
Method
Measure the poha(aval) and add enough water to soak the poha. Leave aside for 10 minutes. If you are using thin poha then soak only for 2–3 minutes. But it is better to use thick poha than the thin one as the thin ones absorbs a lot of water.
After 10 minutes, drain water and squeeze out excess water from the poha and keep aside. In that, add chopped onions, chopped ginger, dry red chillies, coriander leaves, curry leaves, salt.
Add yogurt (1/3 cup) if it's sour and mix well. To this, add rice flour little by little and give a quick mix. The amount of rice flour depends on the binding. I added only 2 -3 tbsps of rice flour.
Mix well to a dough that can be shaped like vadas. Pinch out lemon size balls and shape to form vadas. Wet your palms and fingers for easy vada shaping. Keep aside on a plate, and make only 4-5 vadas or as much as you can fry in one batch, or else the vadas dry out before frying and may not hold shape when dropping in oil.
Heat oil in a wok and wait till oil is hot. Slide the vadas in the hot oil and don't overcrowd the wok. Gently move the vadas to move and flip once it's lightly browned.
Flip and fry all sides till golden brown. It takes longer than the regular vadas to fry. Drain from the oil and place on paper towels.
Similarly shape and fry all the vadas till golden brown. Serve warm with tomato or coconut chutney.
Looking for some guilt free snacks ? Then go ahead and give this filling snacks a try. Jackfruits are in season in Kerala now, how about in other parts of the world?
This is a healthy quick fix snack that you can prepare on an iron griddle. I used my dosa griddle. Ripe jackfruits work best for this snack, however you can use over ripe plantains too. This is a simple Kerala style snack that you can prepare instantly and enjoy warm.
Remove the seeds from the jackfruit bulbs.Cut it small and keep aside.
Heat a pan and add the cut jackfruit bulbs. Cook the jackfruit until it's soft, switch off the flame and leave to cool. I cooked 2 cups of ripe jackfruit bulbs with 1/4 cup jaggery syrup. I removed half of this mix and made adas. Rest of the cooked jackfruit was frozen, made these adas again after two weeks.
Add the wheat flour, grated coconut, cardamom powder and give a quick mix. Prepare a loose dough, I haven't added any water as the cooked jackfruit mix was enough to make the dough.
Heat an iron griddle, I used my dosa tawa (you can use non-stick tawa too but may not get crisp adas). Scoop out a big lemon size dough and place on the hot griddle. Dip the fingers in water and spread the ada evenly to a round shape (don't touch the griddle at any point as it's very hot, spread over the dough).
Wait for the ada to lightly brown, add ghee on top and flip the ada. Cook evenly until crisp. Remove to a plate.
Repeat, making all the ada till the dough finishes. Makes 7-8 adas with this measure.
Enjoy with black coffee / black tea.
NOTES
* I cooked 2 cups of ripe jackfruit bulbs with 1/4 cup jaggery syrup. I removed half of this mix and made adas, rest of the adas was frozen and made these adas again after two weeks.
* I used my dosa tawa, but you can use non-stick tawa too (may not get crisp adas).
* Don't touch the griddle at any point as it's very hot, spread over the dough with wet fingers.
* Depending on the sweetness of the ripe jackfruit bulbs, alter the amount of jaggery. This was very sweet so added only little jaggery syrup.
Bread moong dals are quick snacks that you can prepare at home, and the protein packed filling of green moong dal with jaggery tastes delicious. If you are looking out ways to finish off left over bread slices, then this is a great option. The filling is similar to sukhiyan, but the cover is crispier than sukhiyan. Give this a try and enjoy !!
Preparation time ~ 10 minutes
Cooking time ~ 20 minutes
Serves ~ 12
Author ~ Julie
Ingredients
bread 12 slices
for filling
cherupayaru /whole moong /green gram 1 cup
grated coconut 3/4 cup jaggery 1/3-1/2 cup cardamom powder/elakka podi 1 tsp dry ginger powder/chukku podi a pinch (optional) salt a pinch
Watch on YouTube -
Method
Melt the jaggery with 1/ cup water and strain the impurities.
Wash the dal and add to the pressure cooker. Add a pinch of salt and pressure-cook on high for 2–3 whistles, depending on the quality of the dal.
After the pressure is released, add grated coconut, melted strained jaggery syrup. Cook again till the moisture is absorbed. Add in the cardamom powder, dry ginger powder (if using). Switch off flame and leave to cool lightly.
Make lemon size balls of the filling when warm and keep aside.
Trim the edges of the bread, dip the slice in water, and immediately remove the bread. Squeeze out all the excess water and place one ball of the filling, seal the edges of the bread making a ball shape.
Similarly, make all the balls and keep aside.
Heat oil in a wok and check if oil is hot enough to deep-fry the balls.
Drop in each of the balls and fry on medium flame till it's evenly browned on all sides.
Drain from the oil and place on paper towels. Similarly, fry all the balls and serve warm with black tea.
NOTES
* You can even make a thick batter with rice flour and water. Dip each of the balls and fry.
* Adding a pinch of salt to the dal enhances the sweetness.
* Don't overcook the dal else the balls may absorb more oil and the filling may not taste good.
Looking for a healthy after school snack??Then try this out healthy and simple snack with wheat flour, beets, cheese and some spices. They can be prepared much in advance and the final can be done just before serving so that you can enjoy crunchy triangles with some guacamole dip.
Baked Cheesy Spinach Triangles was posted by me sometime back, and so this beet triangles was quite similar and tried almost the same proportions. The acceptance of the cheesy spinach triangles was the much-needed boost to try out the beets version. Luckily, the beets triangles also finished in no time and I prepare these as an after school snack for kids, and they were totally mad over these. I served the cheesy triangles with guacamole dip, but you can always make mayonnaise dip or ranch.Spinach triangles give a green colour, and it's easy to include greens, esp for kids (which they otherwise wouldn't have eaten spinach) and beet triangles are pink which is very appealing to kids with all health benefits of beets.They taste similar to the tortilla chips and are very crisp.Try making these at home and enjoy with a spicy dip or a salsa !!
Preparation time ~ 10 minutes
Cooking time ~ 15 minutes
Serves ~ 4-5
Author ~ Julie
Ingredients
wheat flour 1 cup
fine semolina 1/2 cup
chilly powder/chilly flakes 1/2 tsp grated mozzarella cheese 1/2 cup beets purée 1/3 cup or 1 small beet + 1/3 cup water baking soda 1/4 tsp salt 1/3 tsp oil 2 tbsp
Method
In a bowl, add flour, semolina, chilly powder/flakes, salt and baking soda.Combine well.
Add the grated mozzarella cheese, mix well to get a crumbly mixture.
In a blender, add the peeled, washed beets and water 1/3 cup.Blend till smooth.
Add the purée little by little to the mixture until you get a stiff, firm dough.Semolina absorbs water and so wait till rest time is over.Leave to rest for 10-15 minutes.If the dough is very stiff, add a little more left over purée if any or water to get a pliable but firm dough. Add the oil and mix well.
Make 6-7 large balls of the dough and lightly dust each ball with flour and start rolling the dough in a very thin circle like chapthis. Be gentle when rolling out as beets dough will be thinner than usual chapathi dough.So, may be stickier too.
Heat a non-stick pan or tava.When hot, transfer the rolled chapathis/discs on to the tava.Fry both sides like you do for chapathis until you see brown spots here and there.
Brush little oil on the surface of beets chapathi and remove on a plate.Repeat the same step for all other balls/rolled chapathis.
Pre-heat oven to 400 degrees F and cut the discs in halves and then quarters, cut in triangles.
Place the cut triangles in a tray and bake in the oven for 5-6 minutes.Remove from oven and flip the other side, place again in oven for 3-4 minutes.Look for slightly brown edges, the chips are crisp and ready.
NOTES * If you wish to deep-fry them, then cut it in triangles soon after you make chapathis shapes.Deep-fry in hot oil on medium heat until crisp. * You can use all-purpose flour too.
* You can add 1/2 tsp cumin seeds or 1/2 tsp roasted cumin powder to the dough preparation. * You can use butter for added flavour instead of oil. * You can even cut out left over chapathis and bake them up for a quick snack the same way.
The traditional unniyappam as we know are made using rice flour, jaggery and palayamkodan or mysore banana. The batter is rested for 6-7 hours to ferment. I have also posted rava-dates unniyappam which is another intersting one, check out here if interested. Now there are instant unniyappams made using baking soda and so unniyappam making is no more fuss. But using baking soda adds to the taste as oil is more absorbed while frying. How about trying something different than the traditional one ? I have tried making unniyappams with rava and dates, which I have posted the link here.
I have posted chakka unniyappam by adding baking soda but this time I have made an instant version of the same unniyappams using very few basic ingredients available at home. I have not rested the batter more than 10 minutes and I have not used any leavening agents like baking soda, baking powder. The result is soft and delicious unniyappams and the best part is these can be prepared quickly without any resting. I have used puttu podi or coarsely powdered rice powder. I have used store brought packet puttu podi and maida is also added for the softness. The warm jaggery syrup is poured in the flours and a batter of flowing consistency is made. The coarse powder of my puttu podi was more than usual puttu podi (it was like upma rava) so I had to add more water to adjust consistency. Its better to use the less coarse puttu podi for making these unniyappams. Also, as I used the more coarse puttu podi, the unniyappams were very crisp like neyyappam on the outside and soft inside. If you like the crisp outer cover then go ahead and try making with the more coarse puttu podi. Enjoy with black coffee !!
Preparation time ~ 10 minutes
Cooking time ~20 minutes
Author ~ Julie
Serves ~ 20-24 unniyappams
Ingredients
ripe jackfruit bulbs 12-15 paste almost 1 cup
jaggery 3/4-1 cup
coarse rice flour / puttu podi 1 cup
all purpose flour / maida 1/2 cup
dry ginger powder / chukku podi 1/2 tsp
sesame seeds / ellu 1 tsp
cardamom powder / elakka podi 1/2 tsp
water 1 3/4 cup
salt a pinch
ghee 1 tbsp
coconut bits / thenga kothu 2 tbsp
cumin seeds / jeerakam 1 tsp
WATCH ON YOUTUBE-
Method
Use 3/4 cup water to melt the jaggery and strain the impurities.
Add the puttu podi, maida and salt in a bowl. Add the hot jaggery syrup to this. Mix and keep aside till the mix becomes slightly cold.
In the meantime, add ghee. Add the cumin seeds, when this sizzles add the coconut bits. Fry until golden brown. Add to the prepared batter.
Add the dry ginger powder(chukku podi),elakka podi(cardamom powder), sesame seeds.
Add the water(1 cup) to adjust the batter consistency. Depending on the coarse texture of puttu podi, reduce or increase the amount of water.
Heat a uniyyappam chatti and add oil 3/4 th of each cavity. When the oil is hot, pour spoonful of batter into each cavity almost full.
Wait till the bubbles subside a little and the sides of the unniyappam look slightly browned. It may take longer than usual unniyappam to cook as it has ripe jackfruit pulp. Flip the other side and fry again to get even browning.
Using a toothpick or fork, remove from oil. Place on paper towels and repeat making the unniyappams till you finish the batter.
NOTES
* I used a mix of idiyaapam podi and puttu podi to get the less coarse texture of puttu podi. Depending on the coarse texture of puttu podi, add idiyaapam podi or make without adding.
What do you usually make for snacks? I do make these snacks in rotation and kids do love munching them. They love all the south Indian style deep-fried snacks and so make it quite often. Do you love storing the oil fried snacks in airtight containers? Today's post is a murukku made with ragi flour. I have earlier posted Ari Murukku (Mullu Murukku), Butter Murukku which are a super-duper hit at my home. Please check out a few ragi recipes that I tried in the past and have listed them below.
Frankly speaking, ragi murukku has never been in my do list until late. I personally never liked the colour of these murukku as I thought it was over browned murukku, but then I tasted once the store brought packet and somehow liked it to some extent. Then the blogger in me thought to give this a try at home using the same procedure as making rice murukku and have been successful. I have tried this recipe a few times now, and it is foolproof. In this recipe, the urad dal is pressure cooked and ground to add to the rice flour and I have prepared the Ari Murukku (Mullu Murukku)in the same way that I posted long back. My mom used to make the rice murukku the same way and I just loved doing the same way. When added to ragi flour the same urad dal mix, and it worked. Kids loved these murukku just like the ari murukku and enjoyed it. Do give it a try and lemme know too.
Preparation time ~ 20 minutes
Cooking time ~ 30 minutes
Author ~ Julie
Serves ~ 20-22 murukku
Ingredients
ragi flour 1.5 cups
whole urad dal 1/4 cup
water 1/3 cup
salt 1/2 tsp
cumin seeds / jeerakam 1/2 tsp
white sesame seeds/ ellu 1 tbsp
asafoetida / hing / kayam a good pinch
oil 2 tsp
oil for deep-frying
Method
Wash the urad dal and add to the pressure cooker with enough water just above the dal to cook.Cook in pressure cooker for three whistles until the water is used, and the dal is cooked well.It shouldn't be overcooked and mushy, nor under cooked.Wait for the steam to release and then grind this dal using left over water and add more water if required to a smooth paste.
Roast the ragi flour on low to medium heat without browning the flour(takes about 3- 4 minutes on medium flame).Let it cool completely, add salt and asafoetida.Add 2-3 tbsp hot water to the flour along with the ground urad dal. Add the sesame seeds, cumin seeds and combine well (you may have to add extra water to knead the dough smooth, so keep a cup of boiling water ready to add in the dough.Add as needed, you may not require the entire amount of water)
Knead the dough smooth like for idiyappam. Scoop out small portions in the mould and close it tightly(use the star plate in the mould). Press down the mould by holding the mould on a banana leaf or parchment paper and make round concentric circles of 3 or 4 layers closely, cut the end and fix to the previous circle securely so that it doesn't open up when frying.
Repeat the same step and make more shapes. Heat oil in a deep wok/kadai up to 2" deep on medium flame. When the oil is sizzling hot, add a small portion of the dough and check if oil is ready.If the dough comes up immediately to the surface of oil, then oil is ready to fry. Slide in the made murukku in oil with the help of a spatula and fry the murukku on medium flame.When one side is slightly done or browned, then flip the other side.Turn and fry both sides until slightly browned, drain using a slotted spoon and place on layers of paper towel (it's hard to understand the browning with ragi muruku, so keep a watch when the murukku starts to float on the surface of oil and the bubbles subsides then you can remove the murukku from oil).
Repeat the same steps of filling the dough in mould and making murukku.Fry them in oil in batches(don't overcrowd the wok when frying).
NOTES *You can add 4 tbsp of urad dal flour to make this murukku too. *Adding boiled water to knead the dough makes smooth murukku. *Don't leave the shaped murukku open. Leave them covered, as they may dry out and may separate from sticking. OR Make as much required for the next batch. Leave the unused dough covered at all times. *Keep the oil on medium heat. Don't increase heat, as they may get browned faster on the outside and may not cook inside. Also, if you leave the oil too low, then the murukku drinks up more oil. *Cool completely before storing in airtight containers. If you make bigger batches, then store the daily use one separately, as frequent opening the jar may make the left over murukku soft.
I love savoury snacks the most however H has a sweet tooth and this goes to my kids as well, both have different tastes. In a way it's good to have mixed taste buds so that I try and showcase both sweet and savoury snacks. But both our taste buds enjoy sweets / payasam or love munching mixture/ samosas too in moderation.
I have already posted a few of the popular mixtures/ namkeen which are my favourites. But I love mutta mixture or dal moth namkeen too/ Bombay mixture. These are recipes that I love munching anytime, and I loved admiring the glass bottles in bakeries with different kind of mixtures as a child too. The dal moth mixture is prepared using whole masoor dal and green gram and sev is added to this mixture along with fried peanuts, cashews and almonds. The whole masoor dal and green gram has to be soaked nicely and dried under a fan to remove any moisture before frying in hot oil. Adding chilly powder is optional, you can even add black pepper powder as well. Do give these a try as its simple to make and enjoy at home.
Please check out more snack recipes that you can prepare and store in airtight containers- * Kerala Spicy Mixture
Wash and soak the whole masoor dal, green gram dal in enough water for 3-4 hours.
Drain the water completely in a strainer and spread on a clean cloth.
The dal should dry completely before frying, else may burst in oil. So, dry under a fan or air dry for 30 minutes- 2 hours. There shouldn't be any traces of water on dal or dry using layers of papr towel.
In the meantime, prepare the sev. Take the besan, hing, turmeric powder and salt. Combine well. To this add oil, rub the oil into the flour very well(important step). Add water little by little(needs 1/2 cup for this measure) and make a dough using a spoon. Beat the dough using a spoon for 45 seconds (It's better to use a spoon rather than hands, as it sticks to the hands very badly).
Take the idiyappam press or mould, apply a thin layer of oil in the inside of the mould (use the mould with the smallest holes to make the sev). Then dip your hands in water, scoop out the dough into the mould. Then close the mould.
Heat oil in a kadai up to 2' deep and then when the oil is hot, lower the flame and hold the mould over the oil to press the dough in concentric circles(don't overcrowd but just enough to cover the diameter of the kadai).
Increase the heat to medium once you finish pressing the mould over oil. Wait for the bubbles to settle and then flip the other side. When the bubbles reduce, then it's fried and can be removed using a slotted spoon(as in pic).
Next, fry the dried masoor dal and green gram. The dal takes almost 3–4 minutes to fry on high flame, the bubbles subsides is a indicator to drain the dal from oil. Use a strainer with smaller holes to remove the dal from oil easily. Drain on a paper towel and then fry the peanuts, cashews, almonds one by one. Drain on paper towel and keep aside.
Now add the sev in a bowl and crush gently to break the long strands. Then add the fried dals, peanuts, almonds, cashews, chilly powder, hing, amchur powder and salt.
NOTES
* Adding chilly powder at the end is optional, You can add black pepper powder to instead of red chilly powder or just leave without adding any of the two to yield a yellow colour Bombay mixture. The south Indian variety is yellow and doesn't have the red chilly powder added at the end.
* Adding amchur powder adds a nice tangy flavour to the mixture.
* You can add more fried nuts to the mixture, but these measures yield a good mix of nuts.
* It's better to prepare the dough with spoon, as the besan tens to stick to the hands very badly.
* Don't overcrowd the wok when pressing the sev for frying, else the sev may not fry properly and may remain soggy in places.
.png)


.png)
.png)