Print Friendly and PDF

Tuesday, April 26, 2022

Kunafa | Arabic Dessert ~ Ramzan Special

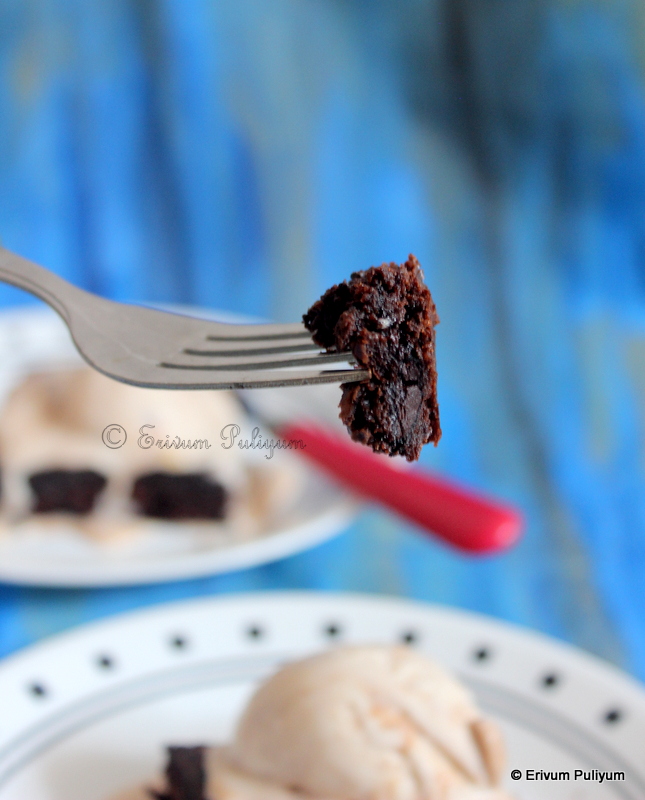
Kunafa / knafeh(arabic) is a Middle Eastern dessert made with a spun pastry called kataiffi (thin vermicelli) and soaked in a lightly scented sugar syrup called attar. This is a buttery, crunchy dessert with a layer of soft milk cheese pudding inside and garnished with chopped pistachios. Ideally, ghee is used to make the recipe, but butter can also be used to make this recipe. Kunafah can be served warm or cold, we liked the warm version as the cheese texture is enjoyed the best then. I had already shared the baklava rolls which is made with phyllo pastry sheets and Umm Ali, another Eyptian sweet dessert. Basbousa(Eggless) is also one of our favourite dessert made with sooji(semolina) and coconut. Each of thee desserts have a special taste and loved it. 

I wished to bake this pastry since long and was in my do list since long. There were many contradictions that I wished to clarify before I actually made the recipe. Ideally akkawi(nabulsi) is the sweet cheese used in this recipe which is not available in my part of the world. So mozzarella cheese comes closer to this and can be used. The sugar syrup and milk pudding can be prepared much in advance and refrigerated before use. Add rose water or orange blossom after cooling the sugar syrup. I haven't used any of them in my recipe. A bake time of 15-20 minutes is good enough to bake the kunafa.


Preparation time ~ 20 minutes
Baking time ~ 27-30 minutes
Serves ~ 4
Author ~ Julie
Ingredients
for dough
kunafa vermicelli (thin vermicelli) 150 gms
unsalted butter, 100 gms

for sugar syrup
granulated sugar 3/4 cup
water 1/2 cup
lemon juice 1/2 tsp

for filling
whole milk 1 cup
corn flour 2 tbsp
mozzarella cheese 1/2 cup grated

for topping
pistachios chopped 1/4 cup


Method
  • Boil the granulated sugar and water listed under sugar syrup till the syrup thickens to a one string consistency. Switch off flame and leave to cool. Add lemon juice and mix so that sugar doesn't crystallize.
  • Mix the corn flour with 2 tbsp milk and keep aside. Boil the remaining milk in another pan. Add the corn flour mixed milk to the boiling milk. Cook till the custard thickens and switch off flame.
  • Crumble the long strands of vermicelli. Mix the kunafa vermicelli with softened butter. Keep aside.

  • Prepare a baking tin 6' round by applying butter to the bottom and sides. Add half of the kunafa mixed butter to the pan (reserve the rest to cover after filling custard mixed cheese) and level this mixture using a katori or spatula. 
  • Pre-heat oven to 180 degrees C or 350 degrees F.
  • Add the custard to the top of the mixture, followed by grated cheese. Then add the remaining kunafa dough mixed butter mixture to cover the sides and top evenly. Using a spatula press down all the sides to get an even shape. 


  • Place in pre-heated oven and bake for 25-30 minutes. (I gave the bottom rod in the oven throughout, except the top rod for the last two minutes to get the golden brown on top too). Removed from oven at 30 minutes.
  • Cool the kunafa and invert on a plate. Pour the sugar syrup on top and garnish with chopped pistachios. The cheese hardens as it sits and cools, so serving warm is better.


NOTES
* You may not need to pour all the prepared syrup, I had 1/4 portion of the syrup remaining.
* Add any flavourful essence like rose water to spike the flavours. Add rose water or orange blossom after cooling the sugar syrup. I haven't used any of them in my recipe. A bake time of 15-20 minutes is good enough to bake the kunafa.
* The sugar syrup and milk pudding can be prepared much in advance and refrigerated before use. 
* You can refrigerate any left over kunafa in fridge and re heated before use. Microwave 20 seconds or bake in pre-heated oven (350 degrees F for 10 minutes) and enjoy.


Enjoy :)
 

Friday, April 22, 2022

Aam(Mango) Pappad | Manga Thera (Step by Step Pics)

Mangoes are back in season, do you love mangoes? Mangoes are one of our family favourite fruit and so enjoy as much as we can. As this is a seasonal produce, we have to wait another year to get them fresh again. This is one of the best ways that you can preserve mangoes for a year, and we did enjoy some mangoes this way. We had a lot of mangoes in our native backyard last year, and there was lockdown during summer as the second wave of corona was on. So, we utilized most of the time plucking mangoes and jackfruit(chakka). We enjoyed a lot of them every day, and then I thought to preserve them and check if it works out. There was immense sun as it was summer  and so, the drying process of these papad (thera) was easier


There are no chemicals used, nor any artifical colours and essence in this recipe. Cardamom is the only flavouring agent used. I preserved this in the fridge, and we enjoyed these almost a year. I had also prepared Jackfruit Preserve(Chakkapazham Thera) the same way, which was also good. But we liked the mango thera much better than jackfruit ones. Yet another season of the King of fruits is here and if you get hold of some fresh ripe mangoes, give this a try and enjoy all throughout the year.


Preparation time ~ 10 minutes
Cooking time ~ 20 minutes
Serves ~20 pieces
Author ~ Julie
Ingredients
mango 3 cups pulp (10-12 mangoes or 1.5 kg)
sugar 200 gms
cardamom powder 1/2 tsp
ghee 2 tsp 


Method
  • Wash and clean the mangoes well. Peel the skin and put the fleshy pieces in a mixer jar and make a smooth paste without adding any water. Please make sure that there are no pieces left in the pulp.
  • Transfer this pulp to a heavy bottomed pan and add the sugar. Heat this mixture on a low medium flame as the mixture starts to splatter if we do on a high flame. Continuous stirring  and use of a long handle spatula is needed to avoid hot splashes. You may require to stir this mixture for about 20 minutes till the consistency looks thick and starts to coat the stirring spoon. Add the cardamom powder and mix well.


  • Smear ghee in three steel plates preferably and pour the mango mixture in the plate as a thin layer.The thinner the layer, the faster will be the drying process. I could pour in three plates. 


  • Sun dry the prepared plates with the mixture for 2-4 days with a muslin cloth cover so that there is no dirt sticking to the top of the mixture when wet. Sun dry till the top of the mixture looks unstick. (The thinner the layer and the sun's strong heat decides the drying time). Mine was done in three days.Run a knife along the edges of the dried pappad and gently peel the pappad(thera) from the plate. Cut in strips and preserve as bars or roll them if possible.
  • Store in airtight containers for future use in refrigerator. I preserved for a year and had.


PRESERVE THE MANGOES :

Tuesday, April 12, 2022

Aam Ka Achar | Punjabi Style Mango Pickle (Step by Step Pics)

 Aam ka achar has so many fond memories attached to me, especially this recipe. Mom used to get raw mangoes from mandi(market) when we stayed in North India during summer season, and she used to get the raw mangoes cut at home after thorough washing. Though we can get the mangoes cut from the vendors itself, and so they cut it nicely with their sharp knives. But as the raw mangoes are not washed initially, mom used to bring it home and get it done at home. The sun dried pieces are then coated with powdered spices and bottled. These bottles are then left in the sun every day for another 3-4 days till the oil starts to float, and the mango pieces start shrinking and gets nicely coated with the masala. The achar can be had after two weeks of preparation, but I like it after a month.


We used to take this achar with chapathis for school lunch, and the best part of this achar(pickle) is chewing the hard portion attached to the shell. The hard shell part absorbs all the flavours and so can be chewed a little time longer. The longer you keep the achar in the sun, the faster the pieces become soft, and the oil starts to float on the top of the achar.  I have taken these pictures of mango pickle after a month. Mom's classic version is not bright red as she uses less of chilli powder and so has a dull green colour. However, I have added kashmiri chilli powder, so this looks bright red in colour. Omit adding chilli powder if you don't like that and use pepper corns instead. Give this pickle a try this mango season and enjoy!!


Preparation time ~ 30 minutes
Serves ~ a bottle
Author ~ Julie
Ingredients
raw mangoes 1 kg
mustard seeds 1/4 cup
fenugreek seeds 1/4 cup
fennel seeds (saunf) 1/4 cup
kashmiri chilli powder 25 gms or 5 tbsp
turmeric powder 2tbsp
salt  2 tbsp
mustard oil 1/2 cup (preferably)


Method
  • Wash and wipe dry the mangoes. Cut the mangoes with seeds, then remove the seeds off and a white layer struck to the hard coat of the cut mango pieces. It may be a little hard to cut the mangoes at home, so it's better to get cut in the shops where you buy. I did cut at home, but had a hard time cutting.
  • Spread the pieces on a plate or clean cloth and sun dry the mango pieces for 4-5 hours till all the moisture is dried. 
  • Dry roast the spices in a pan and add to a blender jar. Pulse twice or thrice to crush the spices. Let a few remain like that so that the spices plump up and tastes yummy with the pickle.


  •  Add the mango pieces in a bowl and add the crushed spices, chilli powder, turmeric powder and salt. Mix this well, the salt in the achar should be slightly more than required, then only the achar tastes good after two weeks.
  • Heat the oil in a sauce pan (about 1.5 minutes) and cool slightly before adding.  
  • Add the oil and give a quick mix. Transfer this to clean dry glass containers and keep in sun for the next few days(about 4-5 days). By this time, the oil starts to float on the surface of the achar bottle. 
  • By the fifth day, you can start using the pickle. But I personally prefer using after 2 weeks when the pieces are slightly softened and well coated with masala.
  • If at any point, the oil is not floating on the surface of the glass bottle, then heat 1/4 cup oil and cool the oil. Pour this over the pickle.

Aloo Paratha & Aam ka Achar

NOTES
* If you have nigella seeds, add 1 tbsp of that too. Adds a nice flavour.
* Some people do add carrom seeds(ajwain) too, I didn't wish to overpower the achar with strong flavours and so omitted that.
* You can add a tbsp of crushed pepper corns too.
* The pics are taken after three weeks of making achar. 
* Mustard oil is used in making north indian style pickle, but you can use sesame oil too, if you don't have mustard oil. Mustard oil has a unique flavour.

RELATED POSTS
Kerala Style Pickles

North Indian Style Pickles


Friday, April 08, 2022

Restaurant Style Mushroom Masala | Mushroom Curry (VIDEO)

Mushrooms are rich in so much nutrition that this is a great choice for vegetarians. But the meaty texture of mushrooms is not liked by all vegetarians. Back here, we all love mushrooms and so are the number of posts that I have listed justifies the same(check at the end of the post for more mushroom recipes). 

As we are observing lent, and so only vegetarian posts are posted now till Easter. Vegetarian meals are equally enjoyed at home in these times, and I do try out many forgotten veg recipes during this time. This is a restaurant style mushroom masala or curry that is very simple to prepare. Depending on the gravy consistency, you can classify this as curry or masala. I personally prefer the masala type, as the mushrooms get nicely coated with the spices and gravy. Cashews are added to elevate the richness and thickness of the gravy.This is a yummy curry to be served with naan, phulkas or any Indian staples. Do give this a try and enjoy !!


VIDEO LINK-


 Preparation time ~ 10 minutes
Cooking time ~ 15 minutes
Author ~ Julie
Serves ~ 4-5 
Ingredients
button mushrooms 200gm
onion 1, medium-sized chopped 
ginger-garlic paste 1 tbsp
tomatoes, 2 medium-sized
whole cashews 10-12
garam masala 1/2 tsp
coriander powder, 1 tsp
hot chilli powder 1/2 tsp
kashmiri chilly powder 1.5 tsp
turmeric powder 1/2 tsp
kasoori methi 1 tbsp crushed
whole spices cinnamon 1/2' pieces-2, cardamom-3, bay leaf-1, cloves -4
salt to taste
sugar a pinch
curry leaves, 2 sprigs
oil 2tbsp


Method
  • Soak the cashews for 30 minutes. Wash off any dirt from the mushrooms under running water, pat dry. Slice the mushrooms and keep aside. In the meantime, grind the tomatoes and soaked cashews to a smooth paste without adding any water.
  • Heat oil in a pan and add the whole spices, sauté. To this, add chopped onions with curry leaves and sauté until translucent, followed by ginger-garlic paste. Sauté until the onions are lightly browned and raw ginger garlic paste smell goes off.
  • To this, add the spice powders except garam masala on low flame and cook 30 seconds to get off the raw smell of spices.
  • Finally, add the tomato cashew paste and clean the jar using 1/4 cup water. Pour this too and cook. Add salt lightly and cook covered for 2-3 minutes until the mixture is cooked and oil starts to float on the surface.
  • Then, add the sliced mushrooms and mix well. Add 1/4 cup water and salt to taste. Mix well and cook covered on low flame for 5-7 minutes(mushrooms give out water, so don't worry).
  • Add the garam masala and pinch of sugar (if adding), taste test and check salt. Cook again a minute and finally add crushed kasoori methi. Switch off flame and leave covered for 5 minutes and then serve warm with chapathis / naan.


NOTES
* Adding both chilli powders gives a nice colour to the gravy.
* Preferably add natti tomato(nadan type) which has sour flavours. The taste is good then.
* Adding cashew paste adds richness and creaminess to the gravy.
* Add more water if you like a watery gravy, but this gravy nicely coats the mushroom slices.


Saturday, April 02, 2022

Wheat Flour Brownies ( Brown Butter Brownies) | Atta Brownies (VIDEO)

The classic brownies are rich, dark, chewy and fudgy, intensely rich with chocolate and a flaky top. That is what makes the brownies different from a cake or a fudge. This is what I was hunting down since long, and so I tried a lot of recipes, but those never matched my concept of a perfect brownie. This is one keeper recipe that I tried 3-4 times and each time, this has been so good that am in love with these flaky (crackly) top perfect brownies. The bake time is exact all the time and am so happy that these are made with atta (wheat flour). Also, wheat flour gets hidden in the amount of chocolate and you hardly make out the wheat flour in it.


These brownies are very rich with butter and chocolate but can't help it, if you would love to have a classic brownie at home. Any shortcut recipe to the original brownie never yields the same results and  kids aren't happy either as they don't get the same taste of shops. However, the store brought ones are not as healthy and I love these homemade wheat flour brownies. This recipe is very simple to put together, and you can try this anytime, referring to the video link below. Give this a try, am sure your kids will be more than happy !!


Preparation time ~ 20 minutes
Baking time ~ 20-25 minutes
Serves ~ 9 square pieces
Author ~ Julie
Ingredients
wheat flour 2/3 cups
baking powder 1/4 tsp  
cocoa powder dark 3/4 cup 
instant coffee powder 1/2 tsp
vanilla essence 1.5 tsp
coarsely powdered sugar, 1 1/4 cup
unsalted butter, 10 tbsp
eggs 2
salt 1/2 tsp
chopped dark chocolate 56 gms Or 2 ounce


VIDEO LINK- 


Method
  • Sift the flour with baking powder twice and keep aside.
  • In a pan, heat the butter until melted and lightly golden brown. Switch off flame and add salt, add coffee powder, add coarsely powdered sugar and cocoa powder. Mix well until the sugar looks dissolved and incorporated. Cool this mixture for 5 minutes.
  • Pre-heat oven to 350 degrees F and then line an 8' square tray with parchment paper criss-cross ways.
  • Then, crack one egg at a time in the butter mix. Whisk vigorously with a wooden spoon or spatula. Add vanilla extract,  mix. To this, add the flour in batches and combine well till you see no white streaks of flour in it. By now, the mixture should be only slightly warm. If not, cool slightly and fold in the chopped chocolate and mix well. 
  • Transfer the batter to the prepared tray and level with a spatula. 
  • Reduce oven temperature to 325 degrees F. Place the tray in oven and bake for 25 minutes. Check if done by inserting a toothpick and if come out mostly clean is done. A light crumb sticking is an indicator that brownies are perfectly baked, and the melted chocolate may also stick to the tooth pick. Don't wait for a clean toothpick when you bake brownies, it may be overbaked and anything that coats more than mostly clean on the tooth pick is under baked. Please refer to the video for the correct co relation of bake time.
  • Remove from oven and leave the pan to cool on a wire rack. Once completely cooled, lift the edges of the parchment paper, and you see the perfect crackly top then. Cut the brownies using a sharp knife in 9 or 16 square pieces. Enjoy !!


NOTES
* You can add 1 cup of chopped nuts instead of chopped chocolate. Pecan or walnuts can be used.
* You can omit the chopped chocolate for a less calorie version.
* You can use all purpose flour too instead of wheat flour. But let me tell you wheat flour gets hidden in the amount of chocolate and you hardly make out the wheat flour in it.
* For a cake like fluffy brownies, add another egg too and for a dense, fudge like brownies, cook the brownies less a minute or two.
* I have used dark cocoa powder, others may not yield the same colour.
* You can cut the ingredients in half and make 8 piece small brownies. In that case, use a bread pan.


Loving these ?? Go ahead and give a try!!