Print Friendly and PDF
Showing posts with label JAMS/ SAUCES/PRESERVES. Show all posts

Tuesday, April 01, 2025

Jackfruit-Grapes Jam | Chakkapazham Munthiri Jam

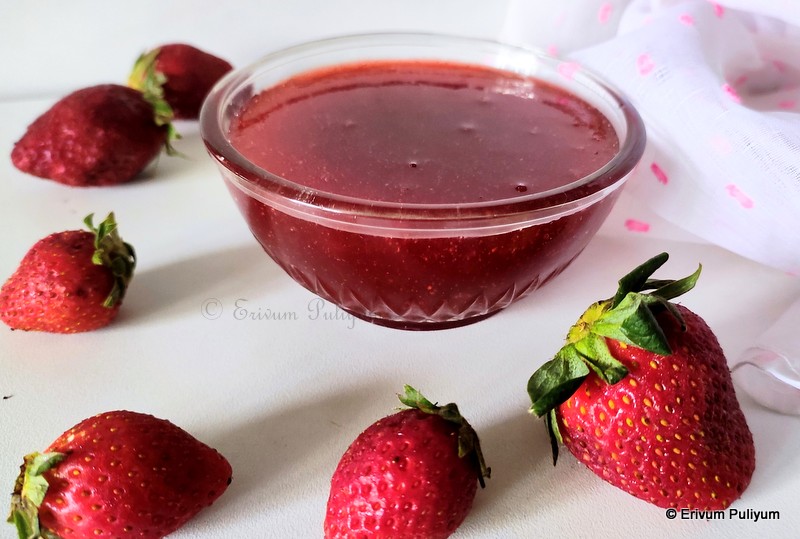
How do you generally preserve fruits that are seasonal, especially fruits like mango, jackfruit ? I usually make preserves like manga thera, chakka thera, mango jam, chakka varetti. All these process do require time and effort, but that fruit can be relished throughout the year eases the efforts. Chakka (Jackfruit) Jam is also one that I had been trying out frequently during jackfruit season, but jackfruit alone gives a dominant flavour of jackfruits, which kids were not liking. They say it tastes like eating chakka varetti instead of jam. Hence, the 'JAM' factor was missing. 

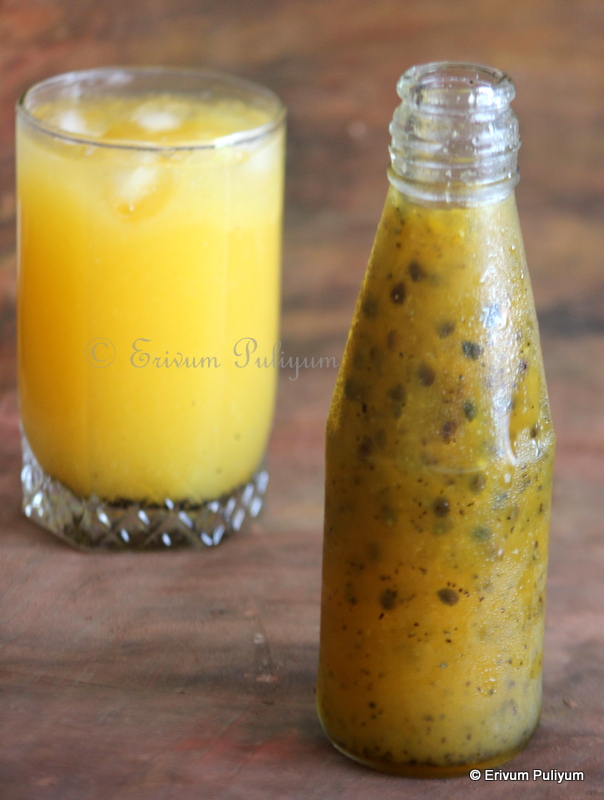
That is when I tried mixing a few fruits and making jackfruit jam.Jackfruit-Grapes Jam is a super combo, it really gives a distinct colour and tastes yum. When you have abundance of jackfruit in your backyard, then you must preserve them for a longer time after the season ends too. So do give it a try and enjoy with breads, parathas or any staples that you can spread it up.


Preparation time ~ 15 minutes
Cooking time ~ 25–30 mins
Serves ~ a bottle (approx. 300 gms)
Author ~ Julie
Ingredients 
ripe jackfruit bulbs, chopped 2.5 cups
black seedless grapes 1.5 cups
granulated sugar 3/4-1 cup
lemon juice 2 tbsps

Watch on YouTube-


Method 
  • Remove the ripe jackfruit bulbs, discard seed, clean and then chop the bulbs. Add the chopped jackfruit in a pressure cooker. Add a cup of water and pressure-cook for 2 whistles. Switch off the flame and wait for the pressure to release.
  • In the meantime, add the grapes, sugar to a blender jar. Blend the juice and then strain it into a pan. To the blender jar, add the cooked jackfruit and blend without adding any water. Purée it smooth and add to the grapes mixture. Mix well and bring to a boil.
  • If there are lumps in the mix, don't worry. They will go smooth once cooked. Keep stirring to avoid burning at the bottom and continue to cook.
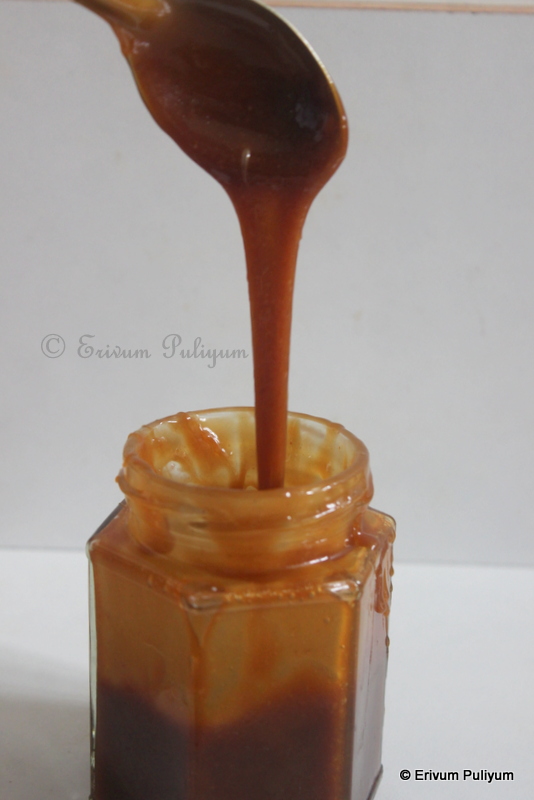
  • When the mix turns thick, pour a little in a dry plate. Wait for 30 seconds and tilt the plate. If the mix starts moving or flowing down, then it is not ready. Continue to cook for another 5 minutes and then test again.
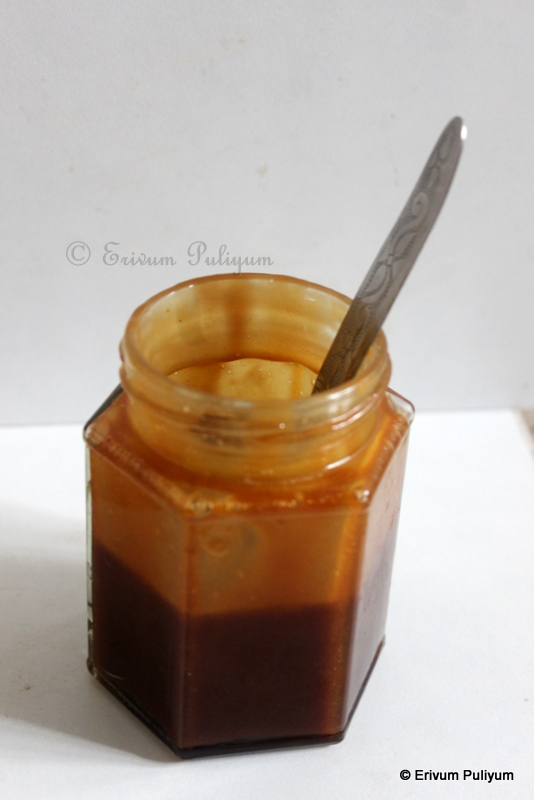
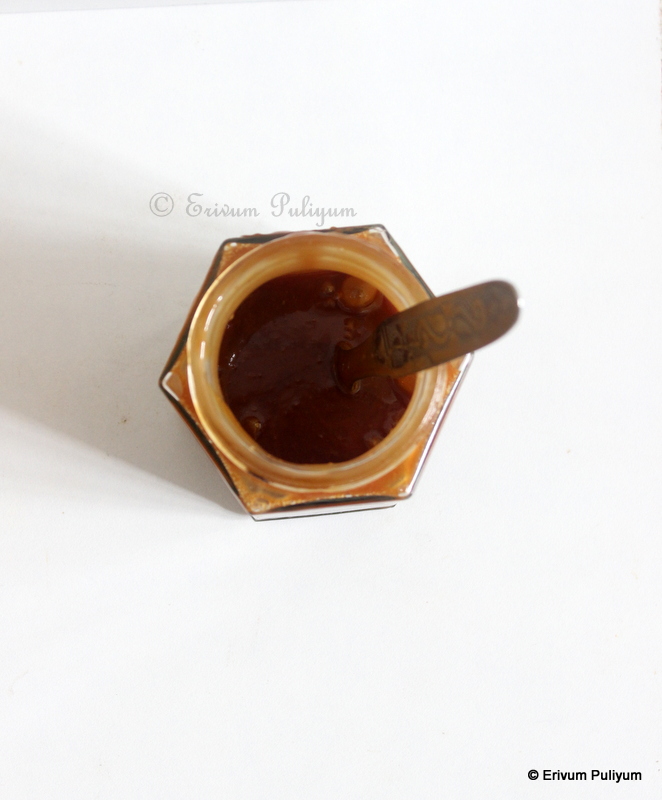
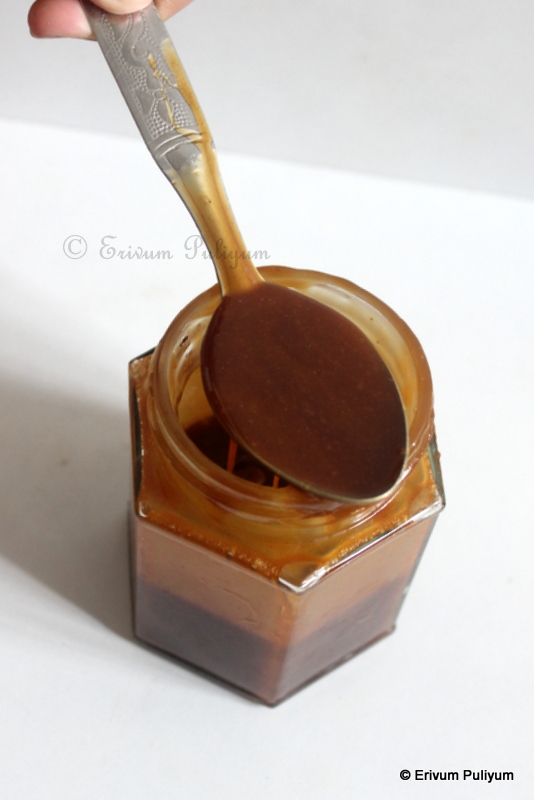
  • When the mix no longer moves when tested, then switch off OR when you can see the bottom of the pan when stirring, and it takes only seconds to come back together. Then it's ready. Add the lemon juice and give a quick stir. Switch off the flame and leave to cool completely.
  • Store in glass bottles and refrigerate, as there are no preservatives added other than lemon juice.


NOTES
* The amount of jackfruit is measured after cleaning and removing the seeds.(the chopped jackfruit is measured.
* Wash the grapes by soaking in vinegar and baking soda solution. Rinse thoroughly and then used to remove the excess pesticides.


Monday, February 17, 2025

Mooli Gajar Achar | Instant Radish-Carrot Pickle

Carrot-Radish pickle is a healthy instant pickle made with freshly roasted spices. I love this pickle as it has a crunch of the veggies unlike other pickle. This pickle is easy to make and can be put together instantly. Make sure to dry up the moisture after cutting the veggies to increase the shelf life of the pickle.  These are known as winter pickles, and I love relishing them with parathas, phulkas or even steamed rice. Check it out !!!


Preparation time ~ 15 minutes
Cooking time ~ 15 minutes
Serves ~ 2 bottles
Author ~ Julie
Ingredients
carrots (gajar) 3
radish (mooli) 5
green chillies 10
garlic cloves 2 Tbsp
ginger sliced 2 Tbsp
turmeric powder 1/2 tsp
Kashmiri chilli powder 2 tsp
hing (kayam podi) 1/2 tsp

for coarse grind (pickle masala)
mustard seeds 2 tbsps
yellow mustard 1 tbsp
fennel seeds 1 tbsp
whole peppercorns 1/2 tbsp
cumin seeds 1/2 tbsp
carom seeds 1/2 tbsp
fenugreek seeds 1 tsp

onion seeds (kalonji) 1 tsp
salt 1.5-2 tbsp
lemon juice 1/4 cup or amchur powder 1 tbsp
oil (mustard preferably) 1/2 cup


Watch on YouTube -


Method
  • Wash, peel and cut the veggies. Cut the green chillies in vertical slit. Cut the carrots and radish in thick strips lengthwise. Place the cut strips on paper towels and dab excess moisture if any.
  • In a pan, add the mustard seeds. Sauté for a minute and add the rest of the spices and sauté for 3–4 minutes until well roasted. Leave to cool and add to a blender jar. Coarsely powder the spices, keep aside.
  • Heat another pan and add oil. Add the sliced garlic, sliced ginger, cut green chillies and sauté for 3–4 minutes until lightly crisp.
  • Add the cut carrots, radish. Add salt and the coarsely powdered spice powder. Give a quick mix and cook for a minute.
  • Switch off the flame and make sure to retain the crunch of the veggies.
  • Finally, add the onion seeds and lemon juice. Mix well and taste test. 
  • Leave to cool completely and then store in dry glass bottles.


NOTES
* You can add amchur powder (1 tbsp) instead of lemon juice.
* I have used the whole of the coarsely powdered spice mix, but you can alter as per tastes.
* This pickle stays good for a month in the refrigerator. If storing more, then add vinegar instead of lemon juice.


Friday, April 22, 2022

Aam(Mango) Pappad | Manga Thera (Step by Step Pics)

Mangoes are back in season, do you love mangoes? Mangoes are one of our family favourite fruit and so enjoy as much as we can. As this is a seasonal produce, we have to wait another year to get them fresh again. This is one of the best ways that you can preserve mangoes for a year, and we did enjoy some mangoes this way. We had a lot of mangoes in our native backyard last year, and there was lockdown during summer as the second wave of corona was on. So, we utilized most of the time plucking mangoes and jackfruit(chakka). We enjoyed a lot of them every day, and then I thought to preserve them and check if it works out. There was immense sun as it was summer  and so, the drying process of these papad (thera) was easier


There are no chemicals used, nor any artifical colours and essence in this recipe. Cardamom is the only flavouring agent used. I preserved this in the fridge, and we enjoyed these almost a year. I had also prepared Jackfruit Preserve(Chakkapazham Thera) the same way, which was also good. But we liked the mango thera much better than jackfruit ones. Yet another season of the King of fruits is here and if you get hold of some fresh ripe mangoes, give this a try and enjoy all throughout the year.


Preparation time ~ 10 minutes
Cooking time ~ 20 minutes
Serves ~20 pieces
Author ~ Julie
Ingredients
mango 3 cups pulp (10-12 mangoes or 1.5 kg)
sugar 200 gms
cardamom powder 1/2 tsp
ghee 2 tsp 


Method
  • Wash and clean the mangoes well. Peel the skin and put the fleshy pieces in a mixer jar and make a smooth paste without adding any water. Please make sure that there are no pieces left in the pulp.
  • Transfer this pulp to a heavy bottomed pan and add the sugar. Heat this mixture on a low medium flame as the mixture starts to splatter if we do on a high flame. Continuous stirring  and use of a long handle spatula is needed to avoid hot splashes. You may require to stir this mixture for about 20 minutes till the consistency looks thick and starts to coat the stirring spoon. Add the cardamom powder and mix well.


  • Smear ghee in three steel plates preferably and pour the mango mixture in the plate as a thin layer.The thinner the layer, the faster will be the drying process. I could pour in three plates. 


  • Sun dry the prepared plates with the mixture for 2-4 days with a muslin cloth cover so that there is no dirt sticking to the top of the mixture when wet. Sun dry till the top of the mixture looks unstick. (The thinner the layer and the sun's strong heat decides the drying time). Mine was done in three days.Run a knife along the edges of the dried pappad and gently peel the pappad(thera) from the plate. Cut in strips and preserve as bars or roll them if possible.
  • Store in airtight containers for future use in refrigerator. I preserved for a year and had.


PRESERVE THE MANGOES :

Tuesday, April 12, 2022

Aam Ka Achar | Punjabi Style Mango Pickle (Step by Step Pics)

 Aam ka achar has so many fond memories attached to me, especially this recipe. Mom used to get raw mangoes from mandi(market) when we stayed in North India during summer season, and she used to get the raw mangoes cut at home after thorough washing. Though we can get the mangoes cut from the vendors itself, and so they cut it nicely with their sharp knives. But as the raw mangoes are not washed initially, mom used to bring it home and get it done at home. The sun dried pieces are then coated with powdered spices and bottled. These bottles are then left in the sun every day for another 3-4 days till the oil starts to float, and the mango pieces start shrinking and gets nicely coated with the masala. The achar can be had after two weeks of preparation, but I like it after a month.


We used to take this achar with chapathis for school lunch, and the best part of this achar(pickle) is chewing the hard portion attached to the shell. The hard shell part absorbs all the flavours and so can be chewed a little time longer. The longer you keep the achar in the sun, the faster the pieces become soft, and the oil starts to float on the top of the achar.  I have taken these pictures of mango pickle after a month. Mom's classic version is not bright red as she uses less of chilli powder and so has a dull green colour. However, I have added kashmiri chilli powder, so this looks bright red in colour. Omit adding chilli powder if you don't like that and use pepper corns instead. Give this pickle a try this mango season and enjoy!!


Preparation time ~ 30 minutes
Serves ~ a bottle
Author ~ Julie
Ingredients
raw mangoes 1 kg
mustard seeds 1/4 cup
fenugreek seeds 1/4 cup
fennel seeds (saunf) 1/4 cup
kashmiri chilli powder 25 gms or 5 tbsp
turmeric powder 2tbsp
salt  2 tbsp
mustard oil 1/2 cup (preferably)


Method
  • Wash and wipe dry the mangoes. Cut the mangoes with seeds, then remove the seeds off and a white layer struck to the hard coat of the cut mango pieces. It may be a little hard to cut the mangoes at home, so it's better to get cut in the shops where you buy. I did cut at home, but had a hard time cutting.
  • Spread the pieces on a plate or clean cloth and sun dry the mango pieces for 4-5 hours till all the moisture is dried. 
  • Dry roast the spices in a pan and add to a blender jar. Pulse twice or thrice to crush the spices. Let a few remain like that so that the spices plump up and tastes yummy with the pickle.


  •  Add the mango pieces in a bowl and add the crushed spices, chilli powder, turmeric powder and salt. Mix this well, the salt in the achar should be slightly more than required, then only the achar tastes good after two weeks.
  • Heat the oil in a sauce pan (about 1.5 minutes) and cool slightly before adding.  
  • Add the oil and give a quick mix. Transfer this to clean dry glass containers and keep in sun for the next few days(about 4-5 days). By this time, the oil starts to float on the surface of the achar bottle. 
  • By the fifth day, you can start using the pickle. But I personally prefer using after 2 weeks when the pieces are slightly softened and well coated with masala.
  • If at any point, the oil is not floating on the surface of the glass bottle, then heat 1/4 cup oil and cool the oil. Pour this over the pickle.

Aloo Paratha & Aam ka Achar

NOTES
* If you have nigella seeds, add 1 tbsp of that too. Adds a nice flavour.
* Some people do add carrom seeds(ajwain) too, I didn't wish to overpower the achar with strong flavours and so omitted that.
* You can add a tbsp of crushed pepper corns too.
* The pics are taken after three weeks of making achar. 
* Mustard oil is used in making north indian style pickle, but you can use sesame oil too, if you don't have mustard oil. Mustard oil has a unique flavour.

RELATED POSTS
Kerala Style Pickles

North Indian Style Pickles


Monday, March 28, 2022

Homemade Strawberry Crush (VIDEO)

Strawberry crush is a concentrate made with fresh strawberries and sugar. There are a good deal of crush available in markets like pineapple, mango and so on. These are used to make cake topping and poured over dessert and used as garnish in mocktails. The available ones in market use sodium benzoate, which is a chemical used to increase the shelf life of food. However, the one you make at home can be made without adding any such preservative and lemon can be use the natural preservative. This crush remains fresh for two weeks, and so I make small batches and refrigerate. 

There is hardly any cooking process and as it's strawberries there is no need to add any food colour. Strawberry has a natural colour and so looks excellent. I have used strawberry crush to prepare strawberry falooda which will be posted soon. Do give this a try and enjoy !!


Preparation time ~ 10 minutes
Cooking time ~ 10 minutes
Author ~ Julie
Serves ~ a small bottle 
Ingredients
hulled strawberries, 200 gms
granulated sugar 200 gms
lemon juice 1 tsp


Method 
  • Wash and hull the strawberries. Cut the strawberries in quarters and then, add to the jar with sugar, grind coarsely without adding any water.  
  • Heat a pan and add the ground mix. Bring to a  boil and continue to cook. The sauce gradually thickens (takes about 6-7 minutes). Add lemon juice at this point and then switch off flame. 
  • Cool completely, and you may find the texture of the sauce is nicely thickened to drizzle as garnish or used as topping. Store in clean dry glass containers and leave in refrigerator, stays good for two weeks. 

Video Link-


NOTES
*Lemon juice prevents sugar crystallized and preserves the crush. Leave refrigerated.

RELATED POSTS
* Cranberry Sauce


Monday, March 14, 2022

Coffee Caramel Sauce | Homemade Coffee Sauce ~ Great Topping for Dessert & Cakes

Today's post is a rich, creamy and delicious coffee sauce bursting with coffee flavours. I was planning to make a birthday cake for my son's birthday, and his requested flavour was coffee. For the cake, I needed a coffee sauce to make the whipped cream and to add as a topping in layers. Then I decided to give this sauce a try and use it in the cake. The cake post is coming up, and I have used the coffee sauce in the cake. We had some leftovers too which I used for topping ice creams, and they even poured over pancakes and had. Tastes delicious !!

I would say you must give this sauce a try for topping your favourite coffee pudding. If you are looking for a quick coffee pudding, then here is my post link. The sauce hardly takes any time to prepare, and you need to caramelize the sugar and then add the remaining ingredients. The sauce may thicken considerably on cooling. You can remove some amount in a bowl and add a little hot milk to get the consistency. Try making this sauce and enjoy !!


Preparation time ~ 10 minutes
Cooking time ~ 20 minutes
Serves ~ 150 ml sauce
Author ~ Julie
Ingredients 
instant coffee powder 2 tsp
*butter 2tbsp
milk 2tbsp
fresh cream or whipping cream 1 cup
granulated sugar 1 cup
salt 1/8 tsp


Method
  • Add the 2tbsp hot milk to the coffee powder and give a quick stir to dissolve the coffee powder. Keep aside.
  • Heat the granulated sugar 1 cup in a heavy bottomed pan and let it caramelize on low heat. Once the sugar is caramelized to golden brown, switch off the flame.
  • Add the butter immediately, give a quick stir. Then add the coffee mix. Give a mix again, the sauce may look getting thicker at this point.
  • Finally, add the heavy cream or whipping cream and give a mix. The cream may look curdled a bit, but don't worry. Keep mixing and put the pan back on low heat.
  • Stir for about 5-7 minutes until you see the sauce thickens. Switch off flame in a medium thick consistency as in video. The sauce thickens considerably as it thickens. 
  • Store in glass bottles and refrigerate. You can use for two weeks.

NOTES
* You can use salted or unsalted butter for this recipe. If using salted butter, then skip adding the salt in the recipe.
* If the coffee sauce is too thick after refrigeration, remove a part of the made sauce as needed and add a tbsp of hot milk to dilute and use.
* I used the sauce in this coffee cake here.


Wednesday, July 07, 2021

Chakkapazham Thera | Jackfruit Preserve | Homemade Jackfruit Pappad (Step by Step Pics)

Chakkapazham(jackfruit)season is almost to an end now and all Seasonal fruits like jackfruit or mango make us wait a year to enjoy them again. I know that many are in a rush to preserve the various edible parts of Keralites favourite fruit in whichever possible way they can, Right? The onset of monsoon is also delayed, giving us ample time to sun dry and preserve the jackfruit in whichever forms possible. Chakkapazham thera(pappad) is an age-old way of preserving fruits like mango, jackfruit and those days there was no cooking involved, it was just made into a paste and spread to dry on a panambu(bamboo ply). They can be then cut in thin strips or the strips can be rolled up, stored and  enjoyed thereafter throughout the year. This year I tried my hands on drying this fruit for the first time as pappad or thera, and it was a fruitful experience. The only concern to me was it shouldn't rain when it's sun drying and thankfully there wasn't any down pour. 


The chakkapazham thera takes around three days to sun dry at the most and the time totally depends on the heat of the sun too. The longer the drying time the darker the shades of the thera(pappad). I sun dried it for 4 -5 days and thee can be stored at room temperature in airtight containers. But I have stored in fridge as I didn't wish to take any risk and I thaw the pieces whenever we munch them on. The quantity of jackfruit will be reduced considerably once you make the thera(papad)form. One whole jackfruit may yield only twenty pieces of the sun dried fruit. I was very happy with the outcome that kids can munch the preservative free fruit year long and we have maximum utilized the jackfruits when in season. As the season is getting over in most places and I got a little late to post this but do bookmark this recipe and try in the next season!!

 MORE PRESERVE RECIPES :


Preparation time ~ 10 minutes
Cooking time ~ 20 minutes
Serves ~20 pieces
Author ~ Julie
Ingredients
chakka chula (jackfruit) 20 ripe bulbs / 3 cups pulp 
granulated sugar 100 gms
cardamom powder / elakka podi 1/2 tsp
ghee/ neyyu 2 tsp 


Method
  • Remove the ripe bulbs from the jackfruit and deseed. Chop the jackfruit pieces and add in a mixer jar, make a smooth paste without adding any water. Please make sure that there are no solid pieces left out in the pulp or else strain the pulp if possible but straining looks a tedious task as the pulp is thick and so grind it very smooth without any pieces.

  • Transfer this pulp to a heavy bottomed pan and add the sugar. Heat this mixture on a low medium flame as the mixture starts to splatter (if we do on a high flame). Continuous stirring is needed to avoid hot splashes. You may require to stir this mixture for about 10-15 minutes till the consistency looks thick and starts to coat the stirring spoon. Add the cardamom powder and mix well (The longer cooking time reduces the sun dry time but if the mixture is very thick then it becomes hard to spread on a plate).
  • Smear ghee in steel plates preferably and pour the mango mixture in the plate as a thin layer(spread using a spatula).The thinner the layer, the faster will be the drying process(I could pour in three plates)
  • Sun dry the plates with the mixture for 2-4 days(cover the top of the plate with a muslin cloth or paper towel as there are chances of fly attracting or dirt getting sticked on top of the mixture especially in the initial two days till the top looks unsticky. (The thinner the layer and the sun's strong heat decides the drying time). Mine was done in three days. 
  • Run a knife along the edges of the dried pappad(thera) and peel the pappad from the plate. Cut in strips and preserve as bars or roll the thin strips if possible. Store in airtight containers for future use in refrigerator.


NOTES
* Unlike the mango pappad this mixture is thick and so the cooking time is reduced compared to mango pappad.
* The measure of sugar can be altered as per tastes and sweetness of chakka but you should definitely add sugar as it acts as a preservative too.
* You can even add a pinch of salt to balance the flavours.
* If the sunlight option doesn't work, you may even try baking the mixture by pouring in trays. But I haven't tried that yet.


Wednesday, January 29, 2020

Passion Fruit Squash

Passion fruit has enormous health benefits, the highlight of them is that it improves insulin sensitivity and boosts the immune system as it is packed of vitamin C. The rich content of riboflavin(Vit B6) and niacin(Vit B3) in passion fruit helps regulate the thyroid activity(source: google). There are two seasons of fruiting- August to December and March to May. When the fruits are not available,we can definitely preserve this fruit in the form of squash. I have tried preserving this fruit squash for over a month and has stayed good without any added preservatives like citric acid. Try preserving the pulp together in a bottle in freezer and make squash as and when required so that I don't need to make large batches as storage becomes an issue in fridge at my home. One bottle of squash gets over by one month at home as everyone loves passion fruit.

Though many other citrus fruits like moosambi and lemon doesn't suit me but this fruit is better tolerated and so I have become a die hard fan of passion fruit.I started seeing this fruit in US first and then once we moved back to Kerala, this climber was seen in the backyards of many home. My mom also planted one plant in her backyard. Initially it was only one plant but now there are both varieties of passion fruit. The yellow coloured one is more citrus and the purple coloured is known to be more sweeter. And we had lot of fruits on them for the past two seasons. I hope my source of passion fruit is understood now and when we have these in abundance at home, What do you do? You try preserving this for long term use, right ? I asked mom to store the pulp in freezer and then bought here to make passion fruit squash. Here everyone loves passion fruit juice so whenever they feel like sipping passion fruit, I just mix with water and serve. This squash has been preserved in refrigerator and stayed good for over a month after making squash.


Preparation time ~ 10 minutes
Cooking time ~ 5 minutes
Author ~ Julie
Yields ~ 3.5 cups squash

Ingredients 
passion fruit 15-20(1 cup juice) or 2 cups scooped out pulp
sugar 2 cups
water 1 cup


Method

  • Wash the passion fruits under running water and cut them in halves. Scoop out the pulp using a fork in a bowl. Add to a bowl, repeat till you finish scooping out all.
  • Transfer this pulp to a blender(reserving 1/2 cup of pulp in the bowl). Blend the transferred mix and run the mixer or blender twice for 5 secs each, carefully taking care not to break the seeds finely.
  • Strain the juice in a strainer by holding above a bowl( I have skipped straining as the crushed seeds sink to the bottom once you make juice out of the concentrate like you see in pics). Add the reserved pulp to this strained mixture (you can blend this two but I love biting the seeds) and with the help of a fork or hand whisk, whisk gently to separate the pulp from seeds.
  • In the mean time, boil the water and sugar mentioned to a syrup consistency until sugar is well dissolved. No need to get one string consistency. Switch off flame and leave to cool.
  • Once the syrup is completely cool, add the passion fruit juice and mix well. Leave to cool completely before storing in bottles.


USE: Add 1.5- 2 tbsp of passion fruit squash to one glass of water to make one serving of squash. Add more to make in larger batches in the same ratio. No need to add any sugar, just mix with water and serve. Quite simple, right? Go ahead and give this a try !!


NOTES
* I have used both yellow and light red (hybrid variety), so have added 2 cups of sugar. If you use yellow variety alone, may need to add more sweetness as it is tangy. If you use the hybrid variety alone its more of a sweeter variety,so alter accordingly. Anyways a minimum of 2 cups is definitely needed for this measure of pulp to add sweetness and preservation.
* As the syrup is rich in citrus flavor, it is better to store in glass bottles rather than plastic bottles.
* No need to add citric acid if you refrigerate the syrup. I haven't stored out so have no clues about the shelf life. I have stored the squash for over a month and have had good results.
* If you stay in a place where you have frequent power cuts then this squash may not stay good for long. There has been incidences when this fruit pulp alone when kept in fridge turned sour and fermented like wine. So be extra vigilant to dispose off in that case.
* I have had good results when mixed with sugar syrup and preserved in fridge.

Thursday, November 14, 2019

Loovika(Lololikka) Achar | Indian Coffee Plum Pickle

Loovika or Lololikka are in season now and last day when I visited home, got a few from our good neighbors.There are many seasonal plants which you get to see them fruit once in a year and then will have to wiat the whole year for the next season to arrive. Loovika happened to be one such fruit and in the past 2-3 years didn't get hold of any as am away from home in the season time. This time luckily was there. This fruit has a sour taste and has soft pink flesh in with two small seeds. I have always loved putting these in salt brine which I have already posted a recipe here in this link, loovikka uppilitathu. I didn't know the English name of this is Indian Coffee plum when some of the readers commented on that post, anyways happy to know.


Each time I run out of pickles, I do get hold of some seasonal veggies and make one. Having said that let me may say am not a big fan of pickles neither does anyone at home is so. But at times when there is curd rice or khichadi we do love having a piece. I hardly buy any store brought pickles as its high in vinegar and salt. This time when I got these lovikka I had no clues to make this pickle as I hadn't made the pickle version before. But definitely thought to give a try and ended up making this. Happy to have made the pickle as everyone loved these small cutees with steamed rice. The tangy spicy pikle tastes best on the second or third day after making and the sad part is will finish soon too. Give this a try if you get hold of some fresh loovikka(indian coffee plum).

Please check out this page for more pickle recipes.
LOOVIKA (INDIAN COFFEE PLUM)

Preparation time~ 15 minutes
Cooking time ~ 10 minutes
Serves ~ a small bottle
Ingredients
loovika / lololikka 15-20
garlic chopped 1tbsp
kashmiri chilly powder 2tbsp
turmeric powder 1/3 tsp
fenugreek powder / uluva podi 1/2 tsp
asafoetida / kayam podi/ hing 1/2 tsp
mustard seeds 3/4 tsp
salt as needed
curry leaves 2 sprig
oil(preferably gingelly) 2 tbsp


Method

  • Wash the lovikka nicely under running water, remove any stalks. Wipe with a paper towel or kitchen towel.
  • Heat a pan and add oil. Splutter mustard seeds and then add in the chopped garlic along with curry leaves.
  • Add in the chilly powder, turmeric powder, fenugreek powder and asafoetida on low flame. Add 3 tbsp of water. Bring this mixture to a boil and add salt.
  • Add in the washed loovikka and mix well for another 3-4 mins. Switch off flame. 
  • Cool completely before storing in clean dry glass bottles. Start using the pickle after 3 days for best results.

Can you see the pink flesh inside ?

NOTES
* Gingelly oil tastes best for these type of pickles and for storing pickles this oil is best. But you can use any oil as per preference.
* Kashmiri chilly powder adds volume and colour to the pickle. However you can use any other chilly powder as per tolerance.
* I haven't added any vinegar but if you would like to store for more days then you can always 2 tbsp of vinegar. I usually store in refrigerator and stays good without adding vinegar. Always make sure that there is a layer of oil on top of the pickle if you prefer storing without vinegar.
* Pick up the ripe loovikka for best results. The inside looks pink in color.


Wednesday, January 16, 2019

Amla (Nellikka) Jam | Indian Gooseberry- Mango Jam (Step by Step Pics)

Indian Gooseberries or popularly known as amla (nellikka) in India is a powerful package of nutrients supporting the immune system and lowers blood glucose levels. But I would not say that having amla jam would be beneficial to lower blood glucose as it contains added sugar. However, kids indulge in junk foods and prefer processed foods over healthy homely meals and for them, this jam may bring down a bit of caloric intake of sugar compared to the store brought jams. However, jam making is a tedious process and may be tiring for hands but I do make sometimes especially when fruits go low priced and are in season. Gooseberries were in season in November and December and kids take a back seat to have the nellikka(amla) raw and  just to ensure they get the benefits of amla, I made the jam. They did happily devour it too.The list of ingredients is short but the continuous work to biceps may be lengthy and overworking. I am not discouraging you to try but just a word of caution.

Gooseberry- Mango Jam
Kids who otherwise may not like amla (nellikka) may love smearing amla (nellikka) jam. I have been making this jam since  three years (during season) and have preserved for almost an year. The first year I made this jam, I made it with gooseberries alone and that's given in the pictures below(first pic below). Though the jam tasted good,it had a dominant tart flavor of amlas (nellikka) which was overpowering the kids tastebuds. For us the tart flavor was just ok and we just enjoyed like orange marmalade. In the following years after that, I added a fruit like apple or mango to reduce the tartness which worked really well. The ones now in pic is the ones I made with mango.You may try with gooseberries alone but with another added fruit the tartness of amla (nellikka) is considerably reduced. Enjoy making this at home !!


Gooseberry Jam

Preparation time ~ 20 minutes

Cooking time ~ 45 minutes
Serves ~ 2 jam bottles
Author ~ Julie
Ingredients
amla/ goose berry 550 gms
mango 350 gms
*sugar 500 gms -600 gms ( I used 500 gms)

Gooseberry - Mango Jam

Method

  • Wash the nellikka(amla) and then steam cook the nellika(amla) for 3-4 minutes. 

  •  Remove and de seed the amla,chop this small and blend in a blender without adding water(it will be a coarse mixture). Keep aside.

  • Wash and chop mango in small pieces. Heat a thick bottomed pan and add the mango pieces along with add half of the sugar mentioned and cook till it’s half cooked(about 5 minutes).
  • Add the coarse mix of amla to the half cooked mango mix. Add the remaining sugar  and give a quick stir.

  • Continue to cook this mixture,the mix may turn watery once the sugar is dissolved. Keep stirring so that the mix doesn't stick to the bottom of the pan and get burnt. It may take around 40-45 minutes to get the jam consistency. Unlike other jams, this jam is thicker.
  • Cool completely before storing in bottles. Can be stored for a year in refrigerator,stays good.

NOTES
* I went a little low on sugar but you can use more 600-650 gms if you wish to reduce the tartness completely.
* I haven't added any citric acid for preservation as amla itself is a citrus fruit.

RELATED POSTS
Apple Jam
Mango Jam
Grape Jam
Mixed Fruit jam
Berry Jam
Jackfruit(chakka) Jam

Gooseberry -Mango Jam

Wednesday, July 25, 2018

Amla Murabba | Maduramulla Nellikka | Gooseberry Sweet Preserve ~ Step by Step Pics

Though amla has so many nutritional health benefits but hardly anyone fondly consumes them raw at home. Have you tried sipping a glass of water after eating a nellikka (amla)? The water tastes so sweet that you forget all the tart taste of amla,that's the magic of amla. Kids eat one for the sake of the pull and push of mom and then its done. So I need to think ways to sneak this wonder fruit. I remember my mom making murabba when we were small kids(probably we also rejected to eat raw). She learnt the recipe from our neighbour aunty when we stayed in Delhi. My usual ways of using up amlas was limited to amla pickle(nellikka achar) or nellikka uppilitathu. The murabba part though known was conveniently forgotten as it requires pricking with forks and so looked tedious. However,I gained up the energy to finally give this a try last year and made a small batch of half kilo amlas. I bought the bottle to limelight only after a month of preserving and to my surprise it just got over in 2-3 days. By then the season of nellikka also had come to an end and had no scope of trying again. This year I made a larger batch as soon as I got hold of some big plump ones which were easy to prick and were nicely juicy.And these pictures are taken after 15 days of soaking in sugar syrup. As the nellikka soaks in this sugar syrup it is succulent and sweet, the more you can preserve the better it is. Do try these out in this amla season, am sure kids would love to have it !

PS: These pics are taken one month after making murabba, as the amla/nellikka is preserved longer the sugar syrup and amlas color turn deeper ( more of a caramelized ) .


Preparation time ~ 2 days
Cooking time ~ 15 minutes
Serves ~ 12 amlas 
Author ~ Julie

Ingredients
nellikka/amla / gooseberry 500 gms
sugar 500 -700 gms
*fitkari/alum powder 1/2tsp(optional)


Method
  • Wash and *soak amla for 2 days in fresh water.Then remove from water and start pricking each amla with a fork as much as possible.Add this in another bowl with fresh water with fitkari/alum powder (if using). Leave again overnight.

  •  Next day,boil a pan with water.When the water reaches boil,slide in the amla/gooseberries. Leave for two to three minutes.Drain from water and leave to cool.

  •  Add in the sugar mentioned on top of the amlas/gooseberries.Mix well and keep aside for half an hour. The liquid from the amlas / goosebeeries start to ooze out.Boil only the sugar syrup in a pan till it reaches two string consistency.Switch off flame and add the gooseberries.Cover and leave for 2 days( There may be a possibility of water oozing out from the gooseberries and amlas shrink in size.In that case,remove the gooseberries from the syrup and boil the syrup again in a pan and thicken the syrup).

  • Add the gooseberries,leave to cool. Transfer to air tight containers preferably glass containers and can be stored upto a year.


NOTES
* Soak amla /gooseberry in a glass or ceramic jar as there are chances of citrus fruits reacting to other utensils esp plastic and steel.
* I didn't get fitkari(alum) to buy here and moreover my mom made murabbas without using alum.So I was confident to do.If you can access fitkari,better to add to purify amla.
* I have adapted the recipe from here and has worked out good.

SIMILAR RECIPES
* Nellikka Achar
* Nellikka Chammanthi
* Nellikka Uppilitathu
* Nellikka Syrup
* Amla Candy (Nellikka Mittai)