Print Friendly and PDF

Wednesday, January 29, 2020

Passion Fruit Squash

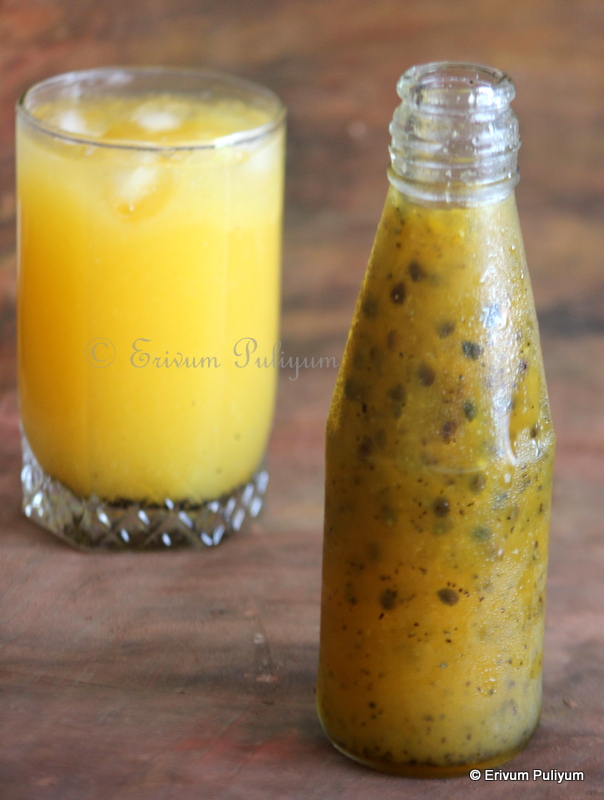
Passion fruit has enormous health benefits, the highlight of them is that it improves insulin sensitivity and boosts the immune system as it is packed of vitamin C. The rich content of riboflavin(Vit B6) and niacin(Vit B3) in passion fruit helps regulate the thyroid activity(source: google). There are two seasons of fruiting- August to December and March to May. When the fruits are not available,we can definitely preserve this fruit in the form of squash. I have tried preserving this fruit squash for over a month and has stayed good without any added preservatives like citric acid. Try preserving the pulp together in a bottle in freezer and make squash as and when required so that I don't need to make large batches as storage becomes an issue in fridge at my home. One bottle of squash gets over by one month at home as everyone loves passion fruit.

Though many other citrus fruits like moosambi and lemon doesn't suit me but this fruit is better tolerated and so I have become a die hard fan of passion fruit.I started seeing this fruit in US first and then once we moved back to Kerala, this climber was seen in the backyards of many home. My mom also planted one plant in her backyard. Initially it was only one plant but now there are both varieties of passion fruit. The yellow coloured one is more citrus and the purple coloured is known to be more sweeter. And we had lot of fruits on them for the past two seasons. I hope my source of passion fruit is understood now and when we have these in abundance at home, What do you do? You try preserving this for long term use, right ? I asked mom to store the pulp in freezer and then bought here to make passion fruit squash. Here everyone loves passion fruit juice so whenever they feel like sipping passion fruit, I just mix with water and serve. This squash has been preserved in refrigerator and stayed good for over a month after making squash.


Preparation time ~ 10 minutes
Cooking time ~ 5 minutes
Author ~ Julie
Yields ~ 3.5 cups squash

Ingredients 
passion fruit 15-20(1 cup juice) or 2 cups scooped out pulp
sugar 2 cups
water 1 cup


Method

  • Wash the passion fruits under running water and cut them in halves. Scoop out the pulp using a fork in a bowl. Add to a bowl, repeat till you finish scooping out all.
  • Transfer this pulp to a blender(reserving 1/2 cup of pulp in the bowl). Blend the transferred mix and run the mixer or blender twice for 5 secs each, carefully taking care not to break the seeds finely.
  • Strain the juice in a strainer by holding above a bowl( I have skipped straining as the crushed seeds sink to the bottom once you make juice out of the concentrate like you see in pics). Add the reserved pulp to this strained mixture (you can blend this two but I love biting the seeds) and with the help of a fork or hand whisk, whisk gently to separate the pulp from seeds.
  • In the mean time, boil the water and sugar mentioned to a syrup consistency until sugar is well dissolved. No need to get one string consistency. Switch off flame and leave to cool.
  • Once the syrup is completely cool, add the passion fruit juice and mix well. Leave to cool completely before storing in bottles.


USE: Add 1.5- 2 tbsp of passion fruit squash to one glass of water to make one serving of squash. Add more to make in larger batches in the same ratio. No need to add any sugar, just mix with water and serve. Quite simple, right? Go ahead and give this a try !!


NOTES
* I have used both yellow and light red (hybrid variety), so have added 2 cups of sugar. If you use yellow variety alone, may need to add more sweetness as it is tangy. If you use the hybrid variety alone its more of a sweeter variety,so alter accordingly. Anyways a minimum of 2 cups is definitely needed for this measure of pulp to add sweetness and preservation.
* As the syrup is rich in citrus flavor, it is better to store in glass bottles rather than plastic bottles.
* No need to add citric acid if you refrigerate the syrup. I haven't stored out so have no clues about the shelf life. I have stored the squash for over a month and have had good results.
* If you stay in a place where you have frequent power cuts then this squash may not stay good for long. There has been incidences when this fruit pulp alone when kept in fridge turned sour and fermented like wine. So be extra vigilant to dispose off in that case.
* I have had good results when mixed with sugar syrup and preserved in fridge.

Sunday, January 26, 2020

Tricolor Sandwich | Chutney Sandwich

India celebrates its 71 st Republic day on this day with great fervour and zeal. Republic day always reminds me of the republic day parade and am happy that I could once attend the parade when we resided in New Delhi. The chill mornings of January in Delhi is hard to sit out but people from all over the country line up early in the morning to witness the parade wearing sweaters, jackets, caps and wrapped in shawls. If we think of the soldiers patrolling at the borders in Siachen , the freezing temperatures they handle then the winters of Delhi is nothing. Now, I love watching the Republic day parade every year in TV showcasing our Indian Military might which is one of the important events of the year. There are also tableaus, folk dances representing different states, bike stunts and air shows during the parade. I feel proud to be a part of this rich heritage and culture. Proud to be an Indian !!

Today's recipe is a simple sandwich that you can make in no time but these chutneys represent a foody representation of our flag colours. Hope you like it. The sandwich uses both green chutney and tomato chutney. If you have both ready at hand this sandwich can be prepared in no time. Enjoy making these any time for snacks or if you love sandwiches for breakfast.


Preparation time~ 10 minutes
Cooking time ~ nil
Serves ~ 2
Author ~ Julie

Ingredients
bread slices 6
spicy green chutney 3 tbsp
tomato chutney 3 tbsp


Method
  • Prepare the chutneys or use store brought spicy green chutney and make the tomato chutney as in the link.
  • Cut the sides of the bread (I have used regular bread but its better to use sandwich bread).
  • Now spread the tomato chutney(1.5 tbsp) on one layer and then place a bread. Then apply the spicy green chutney on the second bread and finish by placing a third slice on top.
  • Lightly press by placing a small weight on the bread for 5 minutes. Then cut diagonally and serve.
NOTES
* You can butter the inside of each slice of bread and lightly toast them to add more flavor. I did this for kids but for us kept it plain.


MORE TRICOLOR RECIPES FROM THIS SPACE- 
*Tricolor Puttu
*Tricolor Suji Cookies
*Tricolor Idlis


Thursday, January 23, 2020

Meen Roast | Fish Roast ~ Step by Step Pics

Fish is an inevitable item in majority of the Keralite menu. And there is always abundance of fish in Kerala markets. Most of us malayalees are more than happy to devour a fish curry meal. Back home, I regularly prepare the Meen muakittathu or Meen Manga curry, sometimes its fish fry which kids love the most. But these days, fish available from markets are packed with chemicals especially formalin. The authorities have waken up now to get the issue corrected, there are squads deployed at check posts, railway stations to curb the defaulters. Hope these corrective measures would be fruitful. Its hard and paining to know that each of the food item whether its fish, chicken, fruits or vegetables including milk is adulterated. Where are we heading to ? Are we aiming to bring up an unhealthy generation? Are we going to make pharmaceuticals companies / hospitals profitable ? So many q's come up in my mind with 'no' straight answers.


Anyway, back to today's recipe, it's a different recipe than the usual curry or fry that we make. Fish roast somewhat tastes like a fish curry dried up, but it has some more uniqueness to this. Roasted fennel powder is added to this fish roast. The kokum / fish tamarind adds the richness of this roast. H is not a big fan of fish recipes, but my elder son loves fish in any form. The younger chap is a fan of fried fish only. This roast tastes best after 4–5 hours of resting time, as the masala seeps well in the fish pieces. We enjoyed with pathiris , but am sure it tastes good with idiyappam as well. Give it a try if you get hold of some firm fish.


Preparation time ~ 15 mins
Cooking time ~ 25 minutes
Author~ Julie
Serves ~ 4-5
Ingredients
to marinate
fish like tuna, 500 gms
hot chili powder 1/2 tsp
salt to taste

for masala
onion medium-sized, 2 sliced
shallots 1/2 cup sliced
ginger garlic paste 1 tsp
tomato 2 chopped
fennel seeds 3/4 tsp
turmeric powder 1/2 tsp
kashmiri chilly powder 2 tsp
coriander powder, 2 tsp
kokum /gamboojia / fish tamarind 3–4 pieces
water 1/2 cup
salt to taste
curry leaves
oil (preferably coconut) 2 tbsp


Watch on YouTube -


Method

  • Wash and clean the fish into pieces. Cut the fillet in small pieces and marinate using the ingredients listed under marination and keep for half an hour. Soak the fish tamarind /kokum after tearing the big pieces in small in another bowl of water (1/4 cup) and leave aside.
(the kokum here may look more than required for this recipe, as I had soaked the tamarind for another recipe as well)

  • Heat oil in a thick bottomed pan and add the fennel seeds. Add in the ginger garlic paste. Sauté till the raw smell of ginger-garlic paste disappears. Add in the onion, shallots and curry leaves. Sauté till the onion and shallots mixture is wilted and slightly browned. Add in the spice powders on low flame and then add in the chopped tomatoes. Add in the fish tamarind with water. Cook covered for a minute till the tomatoes turn mushy.  

  • Slide in the fish pieces, add in 1/4 cup water and cook covered for 5–7 minutes on low medium flame. Uncover the lid and check if the fish is cooked, if not add another 1/4 cup water and adjust salt if needed. 

  • Dry up all the moisture left in the masala and cook open on high flame for another minute. Switch off flame and keep covered for half an hour minimum before serving so that the fish gets coated well with the masala.

NOTES
* You can even use the regular tamarind instead of fish tamarind, but I feel fish tamarind adds more flavour to the fish recipes.
* Remove the kokum pieces when you feel the fish is cooked nice and good. In the pics, I haven't removed, but in video I have removed.
* Adding fennel powder remove any bad odour of fish and adds a nice flavour to the roast.
* You can use any firm, boneless pieces of fish or fillets to make this recipe.
* Add more oil if needed to get the masala form and if you wish the onion mixture to be fully wilted.
* You can add 1/2 tsp garam masala too.

Please check out a few more roast recipes, if interested-
* Kada Mutta Roast
Chicken Sukka
* Egg Pepper Roast
* Special Chicken Ularthiyathu
* Beef Ularthiyathu
* Chemmeen(Prawns) roast
* Kanava (Squid) Roast
* Clams(kakkairachi)  Roast
* Chicken kerala style roast


Monday, January 20, 2020

Ragi Chocolate Cupcakes | Panjipullu(Finger Millet) Choco Cupcakes ~ Step by Step Pics

As we all know ragi or finger millet is a power pack of energy and is much needed for all age groups esp growing children. Ragi is one of the best non diary sources of calcium. Regular consumption of ragi is beneficial for bone health and keeps osteoporosis at bay and reduces risk of fracture. The phytochemicals in ragi slows the digestive process and so its highly benefical to patients with diabetes, controls blood sugar effectively. Ragi is also beneficial to relax, reduce stress and reduce migraine attacks. These tiny seeds are good source of natural iron and so helps maintain the overall health. I use finger millet to prepare puttu,ada, peechappam, porridge, laddus and many other kids friendly recipes that are devoured happily without much fuss.


Honestly speaking, I have never tried ragi in bakes until recently. The reason being very obvious that whole ragi flour is gluten free like rice flour and so tends to remain very dry in most recipes. The right mixing of the ragi flour with any of the gluten flours gives you excellent results too. Also when baking with whole flours, you  must be careful when beating the wet ingredients. Off late, I learnt a few tricks and tips to get the whole flours in baking. The eggs shouldn't be beaten very fluffy and light when mixing to whole flours as the whole flour like wheat or ragi tends to flatten the aeration in the beaten egg. The resultant product will be a hard dense mass of cake/ cupcake. Lightly beating the eggs gives better results. Fat content is an important constituent when baking with ragi as it reduces the dryness of gluten free flour. I have used oil here in this bake but you can replace the same amount with butter. Milk is used too to get the right texture of the cupcake batter and the batter is of flowing consistency like dosa batter. Baking tie may vary as per ovens so keep a watch after the first 15 minutes of bake.
These cupcakes can be made before hand and can be sent to school for snacks or can be served to kids as quick breakfast with a cup of hot milk. One cupcake is good enough for a filling snack as its made with whole flours. There are no fancy gadgets needed to bake these little cutees and you will definitely get good results. Adding cocoa powder to these cupcakes was to mask any trace of ragi if felt in flavors and to my surprise even the grown up adult couldn't recognize the secret ingredient ;) Cocoa definitely gave that chocolaty flavor and kids were insisting on adding an extra dollop of whipped cream on top for added tastes. Do give this a try and am sure you will love these !!


Preparation time ~ 10 mins
Baking time ~ 20-25 mins
Serves ~ 8 cupcakes
Author ~ Julie
Ingredients
dry ingredients
ragi flour 1/2 cup
wheat flour 1/2 cup
cocoa powder 1/4 cup
baking powder 1 tsp
salt a pinch

wet ingredients
eggs 2
oil (any neutral oil like sunflower, vegetable, canola) 1/3 cup
milk 1/3 cup
powdered sugar 3/4 cup
vanilla essence 1 tsp


Method

  • Sift the flours twice with baking powder, cocoa powder and salt.
  • Beat the eggs lightly, add in the powdered sugar. Add in the oil, milk and vanilla essence.
  • Add the flour in three batches to the wet mix and combine until incorporated well. 


  • Pre heat oven to 350 degrees F or 180 degrees C. Pour the batter in the prepared cupcake pan. Bake in the pre heated pan for 20- 25 mins.

  • Cool on wire rack and serve at room temperature with a cup of milk.
NOTES
* If you wish to try a non diary version, then replace whole milk with almond/ soy milk.
* You may also use powdered organic jaggery or good quality brown sugar instead of granulated white sugar.
* Replace oil to butter if you wish to have a more richer taste.


Just a peek into the cupcake ;)


MORE RAGI RECIPES FROM THIS SPACE, PLEASE TRY OUT IF YOU LiKE ANY:)

Check this link here for all ragi recipes in one page.


Tuesday, January 14, 2020

Pineapple Jam (Homemade)

Jams and preserves are always good to try if you have time and have seasonal fruits ready at hand. Buying fruits for high price and preparing jams may not be cost effective at all when compared to store brought jams. The store brought jams have less fiber, less fruit in them and its more of artificial flavors and loads of sugar. However, jam making in large batches at home puts your biceps at work. I generally make smaller batches and try out all seasonal fruits when they are low priced or are easily available at home.


It may be well known to many of my readers of my strong liking towards home made preserves may that be pickles or jams or squashes. Store brought jams is not a frequent item bought at my home because I try to reduce the amount of processed sugars in diet as much as possible. But at times when you don't have a stock of homemade ones or you want to try some unique jam flavors then we definitely do. However, homemade jams is served most of the time. Do give this a try if you love putting an extra effort to make this jam. Enjoy !!


Preparation time ~ 20 mins
Cooking time ~ 30 mins
Serves ~ a small bottle 
Author ~ Julie 
Ingredients
pineapple 2 medium sized or 5 cups diced
sugar 5- 6 tbsp
lemon juice 1 tbsp or citric acid 1/2 tsp


Method

  • Peel the skin  of pineapple and remove the eyes using a sharp pointed knife wherever possiblechop them in chunks. Add this in a cooker with half cup water. Pressure cook the pineapple pieces until cooked for two whistles.
  • Add in the sugar once the pressure is released and grind to a smooth paste in a mixer jar once its cooled.
  • Heat a heavy bottomed pan and add the mixture. Keep stirring the mixture using a wooden spatula. Use a clean dry wooden spatula which you don't use for making curries.


  • Initially the mixture splashes if its left at high temperature so reduce flame to a low medium and stir in between (it may take roughly 30-35 minutes). 
  • The pectin in the fruit thickens up the jam and at one point during cooking,you can see the base of the pan when stirring. Add in the lemon juice and mix well.
  • Place a plate in the freezer beforehand to check the consistency of the jam till you use (To check the consistency of jam-Drop a little on the plate placed in the freezer.Wait for 45 secs and then tilt the plate to check if the jam is flowing down.If it stays in place then,the jam is ready.).
  • Switch off flame,move the pan away from residual heat and leave to cool.


NOTES
* I usually store my homemade preserves in refrigerator as I hardly use any sort of preservatives like vinegar to pickles or citric acid to jams. So refrigeration is important to increase the shelf life of the preserves. Stays good for a year in fridge.
* If you use citric acid,you can even store outside at cool dry place.
* Please feel free to alter the amount of sugar as per the sweetness of pineapple and your taste buds.

You may be interested to try these homemade jams too-
* Mango jam
* Grape Jam
* Mixed Fruit Jam
* Jackfruit(chakka) Jam
* Mixed Berry jam
* Amla(Nellikka) jam
* Apple Jam

Add caption

Thursday, January 09, 2020

Mangalore Buns | Banana Puris ~ Step by Step Pics

2020 is just begun and I hope everyone had a great start. This is my first post after New year and so here's wishing all a happy and prosperous New Year !!
We too started off with a busy week and schools are re open. Kids were feeling lazy to kick start after a long break, I must say. they had almost three weeks vacation and they totally blasted. And one happy moment on 1st Jan was meeting a good friend after almost 6 years. She is still the same person after so many years. Thanks S for coming by, it was so good to catch up.

Mangalore buns are the breakfast or tea time snack in the Udupi- Mangalore region of Karnataka. We get introduced to so many good recipes all near and around us.My sis stays in Bengaluru and she is the one who introduced me to this snack. She started making and then I got the recipe from her and made these puris aka buns. A perfect Mangalore bun puffs up like puris and stays puffed even when its cold. They are usually made with maida kneaded with mashed banana. I have used 1:1 ratio of wheat flour and maida which worked fine too to make these buns and they retained the shape even after cooling.Use overripe bananas to knead the dough which ferments very good too. These puris are mildly sweet and spongy. The shape of these look like buns but unlike buns the inside is hollow. So its more like a thicker puri. They are usually served with coconut chutney and some even serve with sambar too. But my kids loved it without any sides and we had with coconut chutney.


This time I had loads of banana from home and kids don't like eating ripe bananas once they have  brown spots on them. And that's when I decide to finish them off in bakes which works better to feed them overripe bananas. Sissy was mentioning to try these buns since long and I keep postponing for one or the other reasons. However when I tried these finally, kids wish is to make them frequently. Green lights are on for another after school snack for them and the best part is that the dough can be prepared, left for fermentation in the morning after they leave and can be made by the time they are back from school. I must try the healthier version of these buns too without maida and using only wheat flour too if I plan to make them frequently. The only drawback of trying them out with wheat flour is they don't stay puffed up and become soft soon. If you have a better idea without adding maida do lemme know too. In the mean time, enjoy making at home !!


Preparation time ~ 10 mins
Cooking time ~ 10 mins
Serves ~ 13-14 buns
Author ~ Julie
Ingredients
wheat flour 1 cup
maida (all purpose flour) 1 cup
salt 1/2 tsp
*pazham / banana 4 small or 2 big (check notes)
sugar 2 tbsp
cumin seeds 1 tsp
yogurt 2 tbsp (not sour)
baking soda 1/8 tsp
oil to fry


Method

  • Peel and mash the bananas using a fork, add the sugar, baking soda and salt. Mix well with the yogurt.
  • Add the flours in a bowl and add this banana- yogurt mixture. Start kneading, you may not need any extra water to knead the dough. Make a dough like we do for making chapathis but a little stiffer. As the dough rests it will soften. Knead and keep covered for 5-6 hours.


  • Heat oil in a kadai after resting the dough for 5-6 hours. Pinch out small balls (slightly lesser than a chapathi ball). Roll the ball like we make puris but little thicker than puris(see pics).
  • Make 5-6 of the puris/ buns and then slide each of them in the hot oil. Wait for 20 seconds before you actually see them puffing up and floating in oil. Then flip the other side, reduce heat and evenly brown up all sides.

  • Drain on a paper towel and repeat the same steps till you finish making all. Serve with coconut chutney / pottukadala chutney or some vegetable curry(saagu).

NOTES
* If you plan to take robusta banana or dole banana then use two only for the above measures. If its palayamkodan / njalli poovan or rasathali or any of the smaller types, then use four.
* These buns are not very sweet and are mildly sweet that pairs good with coconut chutney.
* The original version is made using all purpose flour (maida) alone but here I used both wheat flour and maida.
* The resting time of the dough is important else they don't puff up good.