Print Friendly and PDF
Showing posts with label BAKING / BROIL. Show all posts

Friday, February 07, 2025

Strawberry Upside Down Cake ~ Easy Cake

When strawberries are in season, I can't resist trying out a few recipes, though am not a big fan of munching fresh strawberries. Last year I had made a batch of homemade strawberry crush and before that I have tried these recipes, do check out if you are interested in any-  strawberry pudding, strawberry rasam, strawberry apple milk shake, strawberry faloodastrawberry beet juice

Cakes are one of my first learnt bake lessons, and so I keep trying different types of cake with confidence. This is one such trial and error cake, which I initially tried as upside down muffins and then recreated this cake. The vibrant colour of the strawberries makes this cake stand out and so you don't need any additional frostings. You can always make this cake for small kitty parties or even serve as a dessert with a dollop of vanilla ice cream. So check it out !!


Preparation time ~ 10 minutes
Baking time ~ 35–40 minutes
Author ~ Julie
Serves ~ a 6' cake
Ingredients 
strawberry 1 pack (200g)
corn starch 1 tbsp
granulated sugar 1/4 cup

all-purpose flour(maida) 3/4 cup
baking powder 1/2 tsp
baking soda 1/4 tsp
salt 1/8 tsp

unsalted butter 55 g (1/2 stick)
granulated sugar 1/2 cup
egg 1
vanilla extract 1 tsp
milk 1/4-1/3 cup


Watch on YouTube -


Method
  • Wash the strawberries by adding 1/2 tsp baking soda and 1 tsp vinegar. Add enough water and soak the strawberries for 15–20 minutes. Discard the dirty water and rinse the strawberries well. Drain water and hull the strawberries. Slice each strawberry in 3–4 slices and keep aside.
  • Add 1. tbsp corn starch and sugar to the sliced strawberries. Mix and keep aside. The strawberries will ooze out liquid and sugar will dissolve. Keep aside.
  • Pre heat oven to 350 degrees F or 180 degrees C for 10 minutes. Line a 6' tray with parchment paper at the bottom and apply oil on the sides and dust with flour. Keep aside.
  • In a bowl, add the all-purpose flour(maida), baking soda, salt and baking powder. Give a thorough mix and keep aside.
  • In another bowl, add the softened butter with granulated sugar and beat for a minute. Add the egg and vanilla extract. Beat until light and fluffy.
  • To this, add the dry ingredients in batches and mix. Add milk as needed to loosen the batter. Get a ribbon consistency batter. I have used 1/4 cup + 1 tbsp milk.
  • Spread the strawberries with the liquid in the base of the tray and then pour the prepared batter over it. Level it up with a spatula.
  • Place the tray into the pre-heated oven and bake for 35–40 minutes. Remove from oven and cool in the tray for 15 minutes. Then invert the cake and leave to cool completely.
  • Drizzle powdered sugar on top (optional step). Cool completely and then slice, enjoy !!
                                         

NOTES
* You can omit adding the powdered sugar at the end as topping. The toping is thick and juicy, so you can skip the powdered sugar.
* You can use oil instead of butter. Use 1/4 cup oil for this measure.


Friday, May 27, 2022

Chocolate Stuffed Muffins | Double Chocolate Muffins (VIDEO)

Chocolate muffin lovers ?? How about having a melting chocolate to bite in the muffins ?? 

Am double excited and so are my kids !!

My kids are crazy about chocolates in any form, and so I didn't have to think twice before trying out this recipe. If you have kids who love chocolate muffins, then go ahead and make these. Am sure you'll thank me for this. 

These are simple muffins to make using very basic ingredients and as you all know, am always in look for simple but satisfying baking recipes. I have placed white chocolate pieces and milk chocolate pieces in these muffins, but you can always add alternatives like peanut butter, Nutella or almond spreads instead of chocolate pieces. Also, you may add chocolate chips too in the batter for the extra chocolaty flavour. Do give these a try and enjoy !!


Preparation time ~ 10 minutes
Cooking time ~ 20 minutes
Serves ~ 6 muffins
Author ~ Julie
Ingredients
all-purpose flour (maida)1 1/4 cups
dark cocoa powder 1/4 cup
baking powder 1 tsp
salt 1/8 tsp
egg 1
powdered sugar 3/4 cup
buttermilk 1/2 cup
vanilla essence 1 tsp
vegetable oil 1/3 cup
white chocolate pieces 6 (or any chocolate pieces)


YouTube Link-


Method
  • Sift the dry ingredients- maida, cocoa, baking powder and salt twice. Keep aside.
  • In another bowl, beat an egg with a whisk and add powdered sugar. Combine well. Add the vegetable oil, butter milk, vanilla essence and give a quick mix.
  • Add the dry ingredients in three batches, little by little. Don't overmix.The batter shouldn't be very thick neither be very watery as it has to hold the chocolate pieces in place or else the chocolate pieces will sink down in the muffin.
  • Pre-heat the oven to 180 degrees F for 10 minutes. Line a muffin tray with liners.
  • Scoop a tbsp of batter in the muffin liners. Then place a piece of white chocolate. Cover the top of the chocolate with remaining batter. Tap the tray at least 4-5 times to release air bubbles.
  • Place in pre-heated oven and bake for 18-20 minutes. Check using a toothpick by inserting slightly off the centre, as the centre may be wet due to the melted chocolate.
  • Allow to cool in the pan for 5-10 minutes and remove, cool on a wire rack and serve warm. Enjoy !!


NOTES
* You can use chocolate chips in the batter to make it more chocolaty.
* You can keep it at room temperature for 4-5 days if you have leftovers. Microwave 30 second before serving so that the chocolate is melted.
* You can add nutella or peanut butter instead of the chocolate pieces.


Friday, February 18, 2022

Chocolate Banana Muffins (Wheat Flour)

Chocolate and banana is a super hit combo at home for two good reasons. One, the final product is moist, soft and delicious muffins which none can resist. Second, the cocoa powder adds a special effect on these cupcakes that the banana flavour remains unnoticed. Had the kids known, the muffins were made of bananas, they would have turned down. I have already posted a chocolate banana pancake, which is again a great hit here. These muffins are made with wheat flour and so these can be a breakfast option if you are a busy person and have no time to prepare breakfast. You can always reduce or increase sweetness as per sweet tooth.


I have made this muffins several times now and kids have happily devoured these cupcakes very happily till date. I can use up all over ripe bananas at home, disguising in a cocoa powder mix. The batter making for these yummy muffins is quite simple and all you need is a wire whisk. The batter is of running consistency, then puffs up well and bakes to set. The texture is soft, smooth and moist cupcakes. They can be enjoyed without any frosting too, or you may add a few white chocolate chips for an attractive look. This is a foolproof recipe, enjoy making these at home.
                                   

Preparation time ~ 10 minutes
Cooking time ~ 20 minutes
Author ~ Julie
Serves ~ 12 muffins
Ingredients
wheat flour 1 cup
baking powder 3/4 tsp 
baking soda 3/4 tsp
salt 1/4 tsp
powdered sugar 3/4 cup
cocoa powder 1/3 cup
oil 1/3 cup
milk 1/4 cup
warm water 1/2 cup
egg 1
banana 1/2 cup mashed (1 Robusta / Dolo or 4-5 small banana)
vanilla essence 3/4 tsp

for chocolate frosting
chopped dark chocolate compound 100 gms
whipping cream 1/2 cup

Watch on YouTube- 


Method
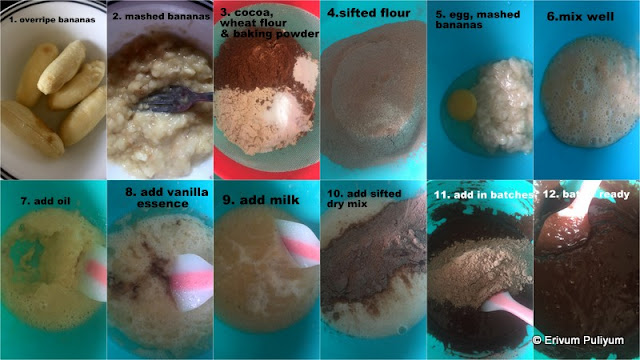
  • Sift the flour, baking powder, baking soda, cocoa powder, powdered sugar and salt twice in a bowl. Keep aside.
  • Mash the bananas with a fork until nicely mashed (Don't worry if there are lumps in the mashed).
  • Now, add the egg in a bowl and add mashed bananas. Mix well using a wire whisk. To this add the oil, vanilla essence, combine well. 


  • Add the dry ingredients in batches and combine well. To this add milk and warm water in batches till fully incorporated. The batter may be running consistency, but don't worry it will get baked.
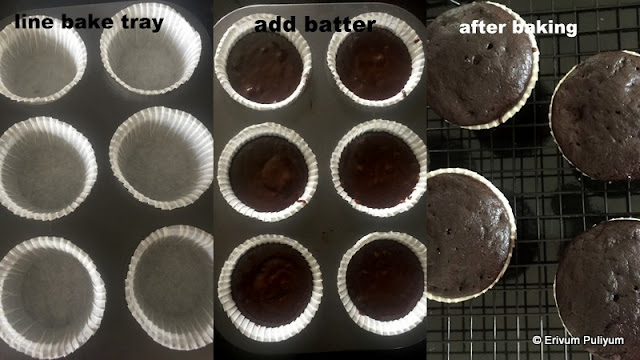
  • Pre-heat oven to 350 degrees F or 180 degrees C and line a cupcake  tray with cupcake liners(12). 


  • Scoop out the batter in cupcake cups upto 3/4 th full. Then, place in oven and bake for 18-20 minutes (I removed in 20 minutes). 
  • Remove from oven and cool on wire rack for 10-15 minutes. Enjoy or frost the cupcakes once cooled completely and enjoy!!


FOR CHOCOLATE FROSTING-
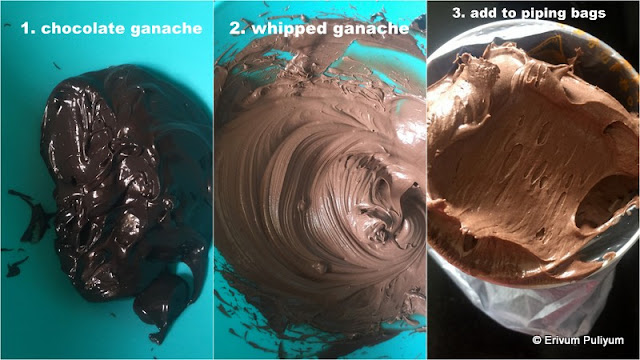
  • Melt the chocolate using a double boiler method and add the whipped cream to this. Smooth the chocolate till completely melted. Leave to cool completely.
  • Beat this ganache with a beater till the frosting looks smooth, light and glossy(2-3 minutes).
  • Pipe designs on muffins by transferring the frosting in piping bags. Draw patterns of your choice. Add silver pearls for garnish and enjoy.


NOTES
* You can use white chocolate chips (1/4 cup) if not in a mood to frost. This way the cupcakes look great too. I have prepared this way too.
* You can use upto 1 cup of powdered sugar if you are a very sweet person. Also, depending on the sweetness of bananas, alter the sugar quantity.
* I have used 5 njallipoovan (Kerala style small bananas). You can use 1 big robusta type or Dolo banana, or just make sure the mashed bananas is 1/2 cup.
* I have used Ashirwaad atta, you can use any wheat flour or use all-purpose flour(maida).
* These cupcakes rise up well, so pour batter accordingly in each cupcake liner.

Take a peek to see the texture of these cupcakes below-


Enjoy !!

RELATED POSTS
HEALTHY BAKES

CUPCAKES WITH EGG

EGGLESS CUPCAKES


Monday, January 10, 2022

Baked Round Doughnuts(Donuts) with Jam Filling

After all the holiday chaos, am still not in a mood to bake or try some newer recipes? How about you?  How did your Christmas and holidays go on? Enjoyed ? We had a joyful one with family at home, and we did enjoy the get together but had no big holiday plans. Kids started offline classes soon after coming back, and they are happy to go to schools. Though, the covid cases are rising, and I think restrictions are going to be imposed in the coming days. Anyway, I think we should get used to the fact that life has to move on with the virus for the next  few years, and we should take all precautions to keep the virus at bay. 

Anyway, coming back to today's post- It's baked doughnuts. Kids love doughnuts, but I take a back seat to try it out, as it's deep-fried. However, this is a cute baked version of the doughnuts and have a jam filling in them without much chocolaty cover. These are soft, pillowy ones with a golden crust on top. These are muffin sized doughnuts and are easy to make with no much fuss like baking bread. I dusted the top with confectioners sugar and filled with pineapple jam. Kids loved them, and I was happy to that it has less oil. Do give this a try and enjoy !!


Preparation time ~ 10 minutes
Baking time ~ 10-12 minutes
Serves ~ 15 doughnuts
Author ~ Julie
Ingredients
all-purpose flour(maida) 1.5 cups
granulated sugar 2 tbsp
melted butter 2 tbsp
yeast 1 tsp
egg yolk 1
vanila extract 1/2 tsp
milk 1/3 cup
salt 1/4 tsp

topping
melted butter, 3 tbsp
confectioner's sugar, 2 tbsp
jam 3-4 tbsp


Method
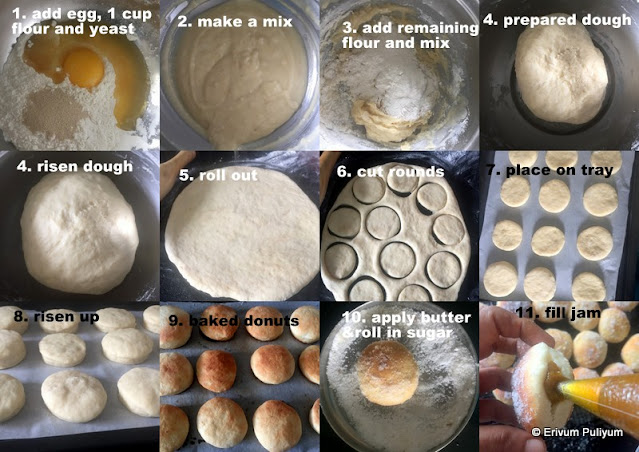
  • Mix the maida(1 cup), granulated sugar, salt and yeast. Add in the melted butter, leuk warm milk, egg yolk, vanilla extract. Combine well. Leave for 10 minutes till you see bubbles on the surface of the batter(the batter will be liquid).
  • Add the remaining maida(all-purpose flour) little by little to make a sticky yet smooth dough. Leave in an oil smeared bowl to rise. Apply a little oil on top too. Keep covered for 1 hour or till it doubles in volume.
  • Punch down the air then and roll this dough over a lightly floured surface to a rectangle of 1/2' thickness.


  • Using a cookie cutter (2'), cut out rounds and place these rounds on a parchment paper lined tray. Collect the scraps and re roll to make a couple more doughnuts, you finish the dough. Cover the tray with a towel and leave the doughnuts to rise again for 45 minutes.
  • In the last 10 minutes of resting, pre-heat the oven to 375 degrees F and brush the top of the doughnut with melted butter.
  • Place in pre-heated oven  and bake for 10 minutes -12 minutes until the top looks golden brown. Remove from oven and brush the top with some melted butter. Dust the top with confectioners sugar and leave to cool completely on a wire rack before filling jam.
  • Add the jam in a piping bag and using a round tip nozzle, poke at one of the sides and pipe the jam in these doughnuts. OR you can make a slit with a serrated knife at the side and push the jam through this hole using the piping bag. When jam pushes out of the doughnuts, stop filling and repeat the same step for filling other doughnuts too. Enjoy !!

NOTES
* I have used mango jam, but you can use any jam.
* These tastes good without any filling too.

RELATED POSTS


Friday, December 24, 2021

Vancho Cake ~ Merry Christmas 2021!!

Wishing all a very Merry Christmas !!
Hope all are enjoying the holidays with your dear ones.

As a child, Christmas is the time when I waited to have my mom's freshly baked plum cake. And mom used to bake so many cakes that I actually had it for my birthday too, which falls in January. Just recollecting those fond memories and those days cakes were very special because we got to see plum cakes only once a year, especially if you stay in a place away from Kerala. These days, cakes are so easily baked at home, available in bakeries and served, that you get to devour plum cake every other day if you wish to. Did you bake your plum cakes this year? My elder one is not a big fan of plum cake, and so I always bake lighter fruit cakes for him. He does have a piece of plum cake just for the namesake. 

Do you wish to try something different this Christmas than plum cake? Then, this is the best choice to try out-Vancho cake. 'VAN' refers to vanilla and 'CHO' refers to chocolate. This is the new super hit at home as you get to taste both chocolate and vanilla flavours infused in one cake topped with both white chocolate and dark chocolate ganache. This is a simple cake to frost as it involves pouring of the chocolate ganache on top and doesn't require many expert hands to pipe out designs, especially to people like me 😛 (am a novice in piping out patterns). I just created few patterns using dark and white chocolate, broke in pieces and decorated the top design. Placed a few wafer sticks to add on to the deco. I have used the same vanilla sponge recipe that I used to make the white chocolate cake and chiffon cake recipe to bake the chocolate sponge, so I haven't shared the step by step pics here as it's already listed in the respective posts already. I have shared the making of ganache and assembling of the cake in step by step pics. Do give this simple cake a try and enjoy!!


Preparation time ~ 20 minutes
Baking time ~ 1 hour for 2 cakes
Author ~ Julie
Serves ~ 1200 gm cake
Ingredients
for sponge cake
all-purpose flour (maida) 3/4 cup
corn flour 1 tbsp
baking powder 3/4 tsp
baking soda 1/4 tsp
salt a pinch
powdered sugar 3/4 cup
eggs 3
vanilla essence 1 tsp
any neutral oil 2 tbsp

for chocolate cake
cake flour 3/4 cup
cocoa powder 1.5 tbsp
baking powder 3/4 tsp
baking soda, a pinch
salt 1/8 tsp
vanilla extract 3/4 tsp
eggs  3
brewed coffee  2 tbsp
oil 1tbsp

for sugar syrup
granulated sugar 1/2 cup
water 1 cup

for frosting
whipping cream, 2 cups

for ganache
white chocolate compound 150 gms
dark chocolate compound 100 gms
fresh cream 1 cup(used 2/3 for white and 1/3 for dark)


Method

How to make the sponge cake ? Refer the detailed pics here in this post on sponge cake.
  • Sift the flours with baking powder, baking soda, salt thrice and keep aside. In another bowl, add the eggs and powdered sugar, beat until creamy and pale (may take around 5 minutes). Add in the oil and vanilla essence, mix well.
  • Pre-heat oven to 325 degrees F and line a 6' tray with parchment paper and oil the sides, dust with flour and keep ready.
  • To this add the sifted flour mixture in three to four batches and combine well using a spatula without much deflating the air from beaten egg mixture. 


  • Transfer the batter to the prepared cake tin and tap the cake tin several times(20-25) to release the trapped air bubbles. Then place in oven and bake for 25-30 minutes. Insert a tooth pick in the centre of the pan and check if done (Mine was done in 25 minutes, I pre-heat the oven by using the both rods on. Initial bake time was changed to lower rod along for 5 minutes and then changed back to both rods on).
  • Cool the cake on a wire rack and transfer out from the pan. Cover with a parchment paper once cooled completely and then wrap with a cling wrap or aluminium foil. I left overnight before frosting.
How to make chocolate sponge cake ? Refer to detailed recipe here on step by step pics.

  • Separate the egg yolk and egg whites in two bowls when cold. Leave at room temperature for 30 minutes.
  • Preheat oven to 325 degrees F and line a round 9" cake pan(I used Wilton's  6' cake pan as I halved the original recipe) with parchment paper at the bottom and lightly butter the sides. Ideally a tube pan should be used for chiffon type cakes as the cake needs to be inverted soon after bake when hot as the cake tends to shrink and lose its volume when cooled, but a round pan also worked fine.
  • Sift the cake flour in a bowl and then measure 3/4 cup (If making cake flour by substituting, then add 2 tbsp of corn flour in a cup and then add the rest all-purpose flour to fill one cup).
  • Sift together cake flour, cocoa, baking powder, baking soda, granulated white sugar and salt twice in a bowl. Beat the egg yolk in a bowl using a hand whisk. Add in the oil, vanilla extract. Mix well. Pour the brewed coffee and stir well.
  • Add this mixture to the sifted flour mix and gently stir using a wire whisk to combine well. Add a tbsp more coffee according to the consistency of the batter so that it's well combined, don't get it watery as when we add the meringue the consistency will thin out and be correct.
  • In the meantime, beat the egg whites in a grease free oil free bowl using an electric hand whisker or stand mixer. Beat until soft peaks form or when you see streaks with your whisker. Gradually add in the granulated white sugar and beat until almost stiff peaks form. Fold in this meringue in the combined batter using a wire whisk or spatula until just blended(don't over mix to deflate the batter).
  • Pour the batter in the prepared pan and run a knife through the batter to get rid of air bubbles. I gently tapped the tray on the table 2-3 times to get rid of the air bubbles. Place in oven and bake for 30-32 minutes or until when the skewer inserted in the centre comes out clean.
  • Immediately after removing the cake from the oven, run a knife through the sides and invert the cake on a buttered wire rack. Remove the parchment paper and leave to cool completely before frosting the cake or serving.


How to make ganache?
  • Heat the cream in a pan and don't boil. Chop the dark compound in small bits and keep in a bowl. Similarly, add the white chocolate compound to another bowl. Divide the cream mixture in 2/3 and 1/3. Add 2/3rd mixture to white chocolate and 1/3rd to dark chocolate. Let it stand for 5 minutes and then mix to a smooth ganache. Cover and keep aside till use.


How to make whipped cream and chocolate cream? I have shared the detailed step by step pics of making whipping cream here in this recipe, pls refer.

  • I chilled the beater blades and bowl in the fridge overnight and thawed the cream in the fridge overnight(earlier it was in the freezer). Remove the blades, bowl and cream from the fridge. Pour the cream to the bowl. 
  • With the beater blades attached, beat the cream for 4-5 minutes until it turns stiff peaks (Remove 1/3rd of the cream when there are soft peaks to mix with 2tbsp of chocolate ganache. Incorporate the dark chocolate ganache in the whipping cream first and then beat. Beat this mix separately in another bowl). Both creams should be beaten to stiff peaks. The test to make sure it's done is by tilting the bowl upside down and find that the cream doesn't move at all and stays stiff. Immediately transfer the cream to the refrigerator till use by covering with a lid or cling wrap.

How to make sugar syrup?
  • Make a sugar syrup using 1/2 cup sugar and 1 cup water. Put this on a stove and heat till the sugar is dissolved. Put off stove and leave to cool completely.

How to assemble the cake?
  • Once the cake is cooled, the cake can be cut in two or three layers as per the height of the cake. My cake was best for a two layer cake, but my kids wanted to make it a three layer, so I somehow managed to cut it in three. Use a serrated bread knife or twine to cut the layers. I used a serrated knife. Be very careful when you cut the cake in layers, as the cake is very soft and delicate.
  • Then place a dollop of cream on the cake base and place the base on the turn table. Place the first layer of the cake. Add pieces of parchment paper over the sides of the cake all around to get a neat finish at the end. Add sugar syrup on the first layer and then place the chocolate whipped cream on top of this layer and spread using an offset spatula. 


  • Add the second layer and pour sugar syrup on this layer. Add the plain whipped cream and  finally place the third layer, add the sugar syrup and spread the cream on the sides. Spread gently because you may get crumbs on the offset spatula. 
  • Once you have finished a crumb coat, refrigerate the cake for half to an hour before you add more layers of frosting.


  • Add more whipping cream to give the finished look, make designs on the side. Pour the white chocolate ganache on top. Then pipe the dark chocolate ganache on half side of the cake and using a tooth pick make designs. Then added chocolate wafers and chocolate designs(that I made earlier but forgot to click pics, will share sometime later) on top with a cake topper. Refrigerate to two hours to set and enjoy !!


NOTES
*  If making cake flour by substituting, then add 2 TBS of corn flour in a cup and then add the rest all-purpose flour to fill one cup.
* I used whipping cream to make ganache too so didn't add any sugar to the cream but if using fresh cream add powdered sugar or icing sugar.


Tuesday, November 30, 2021

Chewy Oats- Coconut Cookies

Do your kids love oats?? I don't have much oat fans here at home and so whenever I get a pack of oats,  everyone eats it as porridge sweet or salty for the initial few days but later on, it's just kept in the shelf till the expiry date gets over. This repeated a few times earlier, and so I stopped waiting for the expiry date and tried finishing much before by making some cookies. This idea was appreciated and accepted by all age groups here, and so now oats cookies are the great choice that kids love too instead of porridge.

Oats Coconut cookie is so simple to put together, and the nutty taste of coconut and vanilla extract alleviates to a much higher level. These cookies have no leavening agents in them and tastes delicious. They are chewy and stays good for a week in airtight containers. Honey is the sweetener used in these cookies. I have added powdered brown sugar, but this can be skipped if you like it mildly sweet. The remaining ingredients are available in the pantry and so can be made anytime. Use dry dessicated coconut, but you can use fresh grated coconut too. Roast slightly and coarsely grind the long strands of coconut. I have used instant oats, but coarsely powdered. If you like your cookie crispier, then powder the oats and use. These can be baked in no time and these don't spread much, so you can place them closely. Please do try if you like the recipe and leave me a feedback comment too!!


Preparation time ~ 10 minutes
Baking time ~ 14-16 minutes
Serves ~ 8-10 cookies
Author ~ Julie
Ingredients 
instant oats 1 cup
dessicated coconut 1/2 cup
vanilla extract 3/4 tsp
water warm 1/4 cup
brown sugar, 2 tbsp (optional)
honey 2 tbsp
salt a pinch
oil 2 tbsp


Method
  • Grind the oats coarsely in a blender jar (if you like the cookies crisp, then powder it fine). Grind the dessicated coconut to shred the long strands of coconut. Add the dessicated coconut to the oats bowl and add a pinch of salt.
  • Heat water in a pan, add brown sugar and stir until dissolved. To this, add honey. Then, add oil and mix. 


  • Add the liquid mix to the coarsely ground oats and dessicated coconut. Leave for 10 minutes and make lemon size balls (8-10). Line a tray with silicon mat or parchment paper. Flatten the cookie balls on the bake sheet to a cookie shape. Repeat doing all the balls and pre-heat oven to 180 degrees C or 350 degrees F.
  • Place the tray in preheated oven and bake for 12-14 mins or till the underside and sides looks lightly browned. Remove from oven and wait for 5 minutes as its soft and then transfer the cookies from the tray, else the moisture from the parchment paper may make the cookie soggy and soft.
  • Place the cookies on a wire rack and cool completely before storing in airtight containers.


NOTES
* Powder the oats smooth if you like the cookies more crisp.
* These cookies don't spread much as there is no leavening agents.
* There is no need to add sugar too if you like it mildly sweet. Honey alone is good enough.


Tuesday, November 09, 2021

Chakka Varetti Cups | Jackfruit Tarts (Step By Step Pics)

Fusion recipes are a trend these days, and you get to see a lot of good fusion delicacies that are a super hit. Fusion recipes have its own advantages and drawbacks as well. There are many who don't like playing around with the traditional recipes and that the new fusion recipe spoils the exact flavours of the original, but there are many such good recipes too where you actually are exposed to a totally different experience tasting the fusion item. Fusion foods are usually an end result of cookery shows or often created by chefs or sometimes accidentally created. I, too, tried giving a novel look and taste to our traditional chakka varetti(jackfruit preserve) by using this in a British style Jam tarts.

Jam tarts are my kid's favourite, and so this time I thought to fill these cute buttery cups with a healthier option of chakka varetti(jackfruit preserve). Did you like this innovation ?? My kids definitely loved this idea and am sure if you try these for your kids they would be pleased too. I have already shared many recipes that I made using chakka varetti listed below at the end of this post, and this gets added as well to the collection. You can even use fresh puréed jackfruit or jackfruit jam (Chakka Jam) instead of chakka varetti. These tart cups have a buttery flavour mixed with the jackfruit flavour in every bite, with bits of chopped nuts here and there. The cups are a bit delicate to scoop out from the muffin tray and so be an extra careful, slightly cool down before demoulding. Add an egg to the dough if you feel you aren't comfortable handling the tart cups delicately. You can make this as a single tart in a tart pan, but I love the cute small cups so made in a muffin tray. Use a silicon mould or silicon muffin cup for a designed edge. Do give these a try and enjoy !!


Preparation time ~ 15 minutes
Baking time ~ 15 minutes
Author ~ Julie
Serves ~ 10 
Ingredients
for making tart/ cups
cold butter, 70 gms(5tbsp)
sugar granulated 1/4 cup
all-purpose flour / maida  1 cup
baking powder 1/4 tsp
vanilla extract 1/2 tsp
cold water 1tbsp
salt a pinch

for the filling
chakka varetti 3/4- 1 cup


Method
  • Sift the flour with baking powder and salt twice. Add powdered sugar to this. Cut the butter in cubes and mix in the flour using your hands such that the butter is rubbed evenly in the flour. Add a TBS of cold water and vanilla extract, try to bring the dough together. If needed, add more cold water.
  • Take two parchment sheet paper. Place the dough in the centre of the paper and cover with another parchment paper. Roll out the dough evenly to make a 1/8' thick sheet. Cut rounds using a 2.5' cutter or bottle lid. If you have leftovers, re roll the dough and make roundels.


  • Smear oil in the muffin cups and place the rounds in the cup, gently press inside the cups. If at all the dough tears, place a small patch of dough to cover the tear. 
  • Now refrigerate the made cups with the tray for half an hour. In the meantime, preheat oven to 375 degrees F or 190 degrees C. 

  • I heated the filling to melt down the ghee in it and added a TBS of water to make it a little flow like consistency so that it can be easily scooped in tart cups. Heating the chakka varetti is strictly optional.
  • Remove the tray from oven and fill the chakka varetti about 2/3rd cup full.
  • Bake in preheated oven for 12-14 mins until the top edges look slightly browned. Remove from oven and cool on a wire rack completely. Run an offset spatula across the borders to remove from each muffin cup. Enjoy !


NOTES
* You can even use fresh puréed jackfruit or jackfruit jam for this recipe. But it's hard to find fresh jackfruit in this season.
* You can use half an egg to give more stability to the tart cups, else they are very soft to touch and are delicate, easily breakable. I haven't used the egg, though.
* You can refrigerate the rolled dough by wrapping in the same parchment paper and then cut rounds. Place in muffin cups. Then there is no need to refrigerate after placing the roundels in muffin cups. I have tried both ways and I personally feel, it was hard to place the cut roundels after refrigeration as described in this method and there were more chances of breaking.
* You can make the same tarts by filling any jam with your choice too.

Thursday, September 30, 2021

Pull Me Up Cake | Eggless Devil's Food Cake (Step by Step Pics)

Baking has been my favourite piece of cooking, but I was always a little apprehensive on my frosting skills. However, when all were confined at home due to covid lockdown, many new home bakers popped up in Kerala and this gave me a confidence to try out my hands in frosting too. My kids gave me the extra boost to prepare their birthday cakes, and so I started to bake for our birthdays and am really enjoying the baking and frosting melas. And believe me, the cake tastes super yummy 😋 than store brought. The other advantages that I noticed is that we can always alter the amount of sugar that goes in a cake, and you definitely get to know the amount of sugar that adds up in each cake. I have baked the White Forest Cake,  Spanish Delight Cake(San Marcos Cake) and Vancho cake (recipe coming soon). 


My younger son's birthday was two weeks back and my H's was a week before that (both in September). I made the Vancho cake for H's birthday and pull me up cake for son's birthday. Both cakes came out perfect. Pull me up cake is a trending cake these days. The cake is layered with whipped cream and is covered snugly with a OHP sheet. Chocolate ganache is poured on top over the cake and this plastic sheet is pulled up to get a chocolate explosion all over. It's a very nice experience to enjoy the melted ganache flowing out through the sides and getting covered on the sides of the half frosted cake. My son totally loved the experience and was very happy, but at the same time was a little nervous before pulling up. Pull me up cake can be tried out for rasmalai cake or any other chocolate ganache type cake. I have made an eggless devil's food cake to layer with whipped cream but you can use any chocolate cake.This is a perfect chocolate bomb for all chocolate lovers and do give this a try for any specific occasions , enjoy !!!


 Preparation time ~ 30 minutes
Baking time ~ 35 mins
Assembling ~ 30 minutes
Author ~ Julie
Serves ~ 700 gms cake
Ingredients
for cake 
dry ingredients
maida /all-purpose flour 3/4 cup
cocoa powder 1/3 cup
baking powder 1/2 tsp
baking soda 1/4 tsp

wet ingredients
granulated white sugar 3/4 cup
milk 1/4 cup + 2 tbsp
vinegar 1/2 tsp
curd 1/4 cup
oil 1/3 cup
vanilla 1/2 tsp

for sugar syrup
water 1 cup
granulated sugar 1/2 cup

for frosting
whipping cream 3/4 cup

for chocolate ganache
dark chocolate compound 200 gms
fresh cream 1 cup(240 ml)

for assembling
OHP sheet 2
cake board 1
dark chocolate chips 2 tbsp
white chocolate chips 2 tbsp 


Method 
FOR MAKING CAKE
  • Sift all the dry ingredients twice and keep aside. Mix milk and vinegar first, keep aside for 10 mins.
  • Mix oil and granulated sugar in a bowl, beat well. Add the yogurt, milk mixed with vinegar. Add vanilla essence and combine.


  • Line a 6’ cake pan with parchment paper and line the sides with oil and flour. Pre-heat oven to 350 degrees F or 180 degrees C.
                                                 
  • Add the dry ingredient mix in three batches and combine well. The batter is of ribbon consistency and then pour this in the prepared cake tin.
  • Place in oven and bake for 30-35 minutes(mine took 35 mins to be precise). Remove cake from oven and cool for 10 minutes. Invert on a wire rack from pan to cool completely.
FOR FROSTING 
  • Pour the cream in a glass bowl and beat with a beater for 4-5 minutes until stiff peaks. Invert the bowl gently, and see if cream flows. If it stays, it's ready. Refrigerate by covering with a cling wrap or lid until use.

FOR MAKING SUGAR SYRUP
  • Heat the sugar and water in a pan. Boil till the sugar is dissolved completely.
FOR ASSEMBLING
  • Cut the cake in three equal layers using serrated knife. 
  • Place a dab of whipped cream on the cake board and place the first layer of the cake. Apply sugar syrup on the cake.
                                                
  • Then add the whipped cream frosting, add the dark chocolate chips. Place the second layer of cake, add sugar syrup.
  • Then place another layer of whipped cream frosting. Add in chocolate chips and finally place the top layer cake. Soak the syrup and place the frosting and chocolate chips. Refrigerate the cake till cutting.
FOR MAKING GANACHE

  • Prepare the ganache half an hour before pouring in the cake.
  • Chop the dark chocolate compound in bite size pieces. 
  • Heat the cream in a bowl on medium heat. Don't wait to boil the cream, when 2 or 3 bubbles start appearing on the surface, remove from flame and pour over the chopped chocolate.
  • Wait for 5 minutes and then gently mix to get a smooth ganache. Keep mixing until all the chocolate is melted. Cool completely before pouring on top of the cake.
                                             
  • Stick two OHP sheets together and place around the cake. Place a cello tape and stick the ends.
  • Place the cake on a deep bowl or deep plate to collect the excess ganache if any flowing out once you pull the OHP sheet. Now pour the chocolate ganache on top of the frosted cake and add the decorations if using any. I added white chocolate chips, wafer sticks, silver pearls and cake topper. Wait till the cake is  pulled up to enjoy the magic of flowing ganache. Don't wait too long to pull the cake after pouring ganache as ganache may stick to the OHP sheet and may not pull well. Also, don't refrigerate after pouring the ganache. My kid loved to pull, and it did properly dribble all around the cake. Cut and enjoy the cake. Remaining can  be refrigerated in airtight bowls; and believe me, the cake tastes best the next day.
Here is a glimpse of the birthday boy with the pull me up cake experience 😊


NOTES
* You can make any frosting cake this way, whichever uses ganache or rabdi in case of rasmalai cakes.
* Don't make the cake much in advance, as the cake gets moist as it sits in cling wrap and the top gets sticky. One day before is good enough.
* Please don't refrigerate after pouring the ganache. 

Enjoy the slice 😉
                                                         

Few of my frosting creations that may be helpful for any occasions. Am not a pro in frosting, but you'll definitely get ideas -
* Fondant Cake