Print Friendly and PDF

Friday, October 21, 2022

Besan Burfi | No Milk Powder, No Mawa Barfi ~ Diwali 2022

Wishing all my friends a Happy and Prosperous Deepavali :)

How are your last minute preparations going on?
Though we don't celebrate Diwali, I love this festival very much because of the positive vibes. The lighting, decluttering and paintings done at home, everything everywhere looks neat and tidy, a lot of variety sweets at Halwai shops and the fire crackers all create a great mood. 

I personally don't like the fire crackers, thinking of the impact this causes on our air. It would have been nice, if the crackers are lit at one place for a community or for a housing society which will lessen the quantity of crackers burnt compared to what each individual homes burn every year. This is just an opinion of how we can help the environment and no hard feelings against Diwali. Anyway, that's each person's decision to help the air for the upcoming generations.

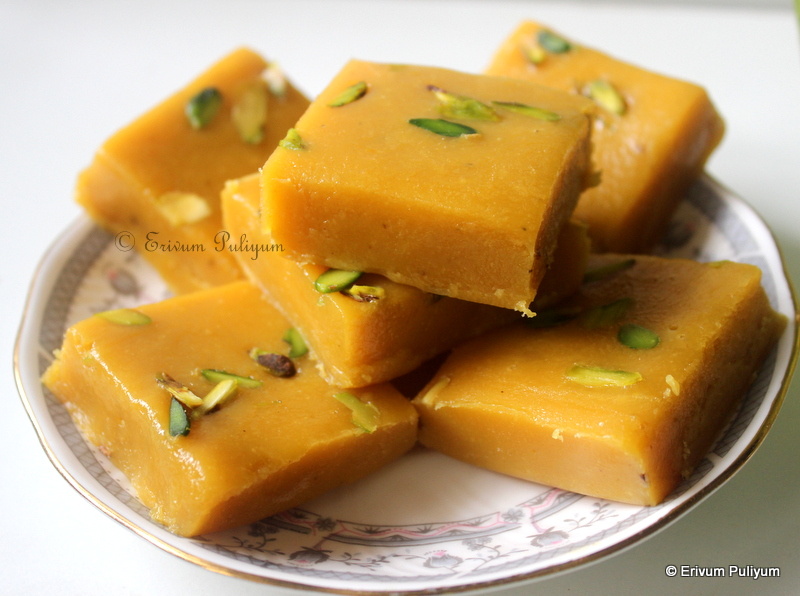
Let's get back to today's recipe - another simple one, but a little tricky. I have been struggling to get a perfect besan barfi for the past 4-5 trials. But am happy that I learnt finally and this is so simple to make as it hardly takes any time. Roasting the besan and getting the sugar syrup to one string consistency is IMPORTANT, no shortcuts. I really loved the beautiful colour of the barfi because of the pinch of yellow colour added, which was lacking in my previous trials. This really gives the exact colour like halwai shops. Do read below and start off making the recipe. Enjoy !!


There are many lesson learnt during this experimentation which are shared below-
1. Use a non-stick pan and a spatula for easy mixing.
2. Use melted ghee for correct measurements. The bowl in which you measure the besan can be used to measure the other ingredients, that means the besan: sugar : ghee ratio will be 1:1:1/2. 
3. Roast the besan excellent for the correct texture and taste. Roast on low flame without changing colour for about 6-7 minutes for 1 cup besan with ghee. This is important else the besan will have raw taste. The besan may not cook properly. Sprinkle few drops of water on the surface to check, if it sizzles then besan is well roasted.
4. Get the sugar syrup to one string consistency and mix this well with besan mixture.
5. Check if the besan, sugar mixture together is leaving the sides of the pan like a mass. Cook till you achieve this stage because the barfi may turn chewy otherwise.


Preparation time ~ 20 minutes
Cooking time ~ 20 minutes
Author ~ Julie
Serves ~ 9-10 pieces barfi
Ingredients
besan/ kadalamavu 1 cup (120 gms)
melted ghee / neyyu 1/2 cup
granulated white sugar 1 cup (200 gms)
water 1/2 cup
cardamom powder 1/2 tsp
yellow food colour, a pinch


Watch on YouTube -


 Method
  • Sift the besan without any lumps. Keep aside, this helps to yield a smooth burfi.
  • Heat a pan on low heat and add the sifted besan.To this, add the melted ghee. 
  • Then, mix the besan with ghee. Initially the ghee and besan mixture will tun lumpy but as besan gets roasted, the ghee will float on top. It may take 6-7 minutes on low flame to reach that stage. (Sprinkle few drops of water on the surface of besan, if it sizzles then the besan is well roasted) Switch off flame and move from heat or keep mixing few more minutes, else the besan may change colour due to residual heat. Add the pinch of food colour and give a quick stir. The colour may not show up now in the besan, but as you add the sugar syrup, the colour becomes prominent.
  • Heat another pan and add the sugar. To this, add 1/2 cup water and bring this to a boil. Let the syrup get to a one string consistency. Add cardamom powder, mix well. Check the sugar syrup by pressing the syrup between your thumb and index finger, this should form one string. Switch off flame and add the sugar syrup to the warm besan mix little by little and combine well.
  • If the besan mix becomes a little watery, then place on low heat and continue to cook till the mix starts to leave the sides of the pan.
  • Line a tray with parchment paper and apply oil/ ghee on the sides. Transfer the burfi mix to the pan and tap the tray a few times to release any trapped air bubbles.
  • Garnish with sliced pistachios. Leave to cool in tray for 15- 30 minutes at room temperature.
  • Then pull out the barfi mix with the parchment paper. Cut in desired shapes and enjoy !!

NOTES
* Roast on low flame only else the besan gets burnt.
* Once sugar syrup reaches on string consistency, switch off flame and add little by little in the besan mix. Give a quick stir.

MORE BESAN SWEETS AND SNACKS DIWALI RECIPES


Thursday, October 20, 2022

Baked Cheesy Beet Triangles

Looking for a healthy after school snack??Then try this out healthy and simple snack with wheat flour, beets, cheese and some spices. They can be prepared much in advance and the final can be done just before serving so that you can enjoy crunchy triangles with some guacamole dip. 

I have shared an Insta reel and YouTube shorts on the recipe, please check that out.

Baked Cheesy Spinach Triangles was posted by me sometime back, and so this beet triangles was quite similar and tried almost the same proportions. The acceptance of the cheesy spinach triangles was the much-needed boost to try out the beets version. Luckily, the beets triangles also finished in no time and I prepare these as an after school snack for kids, and they were totally mad over these. I served the cheesy triangles with guacamole dip, but you can always make mayonnaise dip or ranch.Spinach triangles give a green colour, and it's easy to include greens, esp for kids (which they otherwise wouldn't have eaten spinach) and beet triangles are pink which is very appealing to kids with all health benefits of beets.They taste similar to the tortilla chips and are very crisp.Try making these at home and enjoy with a spicy dip or a salsa !!


Preparation time ~ 10 minutes
Cooking time ~ 15 minutes
Serves ~ 4-5
Author ~ Julie
Ingredients
wheat flour 1 cup
fine semolina 1/2 cup
chilly powder/chilly flakes 1/2 tsp
grated mozzarella cheese 1/2 cup
beets purée 1/3 cup or 1 small beet + 1/3 cup water
baking soda 1/4 tsp
salt 1/3 tsp
oil 2 tbsp


Method
  • In a bowl, add flour, semolina, chilly powder/flakes, salt and baking soda.Combine well.
  • Add the grated mozzarella cheese, mix well to get a crumbly mixture.
  • In a blender, add the peeled, washed beets and water 1/3 cup.Blend till smooth.
  • Add the purée little by little to the mixture until you get a stiff, firm dough.Semolina absorbs water and so wait till rest time is over.Leave to rest for 10-15 minutes.If the dough is very stiff, add a little more left over purée if any or water to get a pliable but firm dough. Add the oil and mix well.
  • Make 6-7 large balls of the dough and lightly dust each ball with flour and start rolling the dough in a very thin circle like chapthis. Be gentle when rolling out as beets dough will be thinner than usual chapathi dough.So, may be stickier too.
  • Heat a non-stick pan or tava.When hot, transfer the rolled chapathis/discs on to the tava.Fry both sides like you do for chapathis until you see brown spots here and there.
  • Brush little oil on the surface of beets chapathi and remove on a plate.Repeat the same step for all other balls/rolled chapathis.
  • Pre-heat oven to 400 degrees F and cut the discs in halves and then quarters, cut in triangles.
  • Place the cut triangles in a tray and bake in the oven for 5-6 minutes.Remove from oven and flip the other side, place again in oven for 3-4 minutes.Look for slightly brown edges, the chips are crisp and ready.
  • Serve with some guacamole or ranch dip !!


NOTES
* If you wish to deep-fry them, then cut it in triangles soon after you make chapathis shapes.Deep-fry in hot oil on medium heat until crisp.
* You can use all-purpose flour too.
* You can add 1/2 tsp cumin seeds or 1/2 tsp roasted cumin powder to the dough preparation.
* You can use butter for added flavour instead of oil.
* You can even cut out left over chapathis and bake them up for a quick snack the same way.


Friday, October 14, 2022

Mushroom Pepper Roast | Koon Kurumulakittathu

Did you know mushrooms are the only source of vitamin D in the produce aisle? These are the only exceptional one to the rule that plants don't naturally contain vitamin D (read it here).They also are a rich source of many antioxidants, minerals and has beta glucans (an important factor for immunity stimulating there by reducing chances of allergies). What more are you looking for in such healthy mushrooms, go ahead and try out your favorite recipes. Also, please scroll down the page for more mushroom recipes as well.

Mushroom Pepper Roast is one of the quickest stir-fry that you can try using button mushrooms. This can be served with chapathis or hot steamed rice. Mushrooms shouldn't be left in water when washing, as they tend to absorb water. Mushrooms leave out water and shrink on cooking, they cook faster than other veggies. This is a yummy stir-fry with shallots, ginger-garlic paste, green chillies and spices. Whole peppercorns are crushed and added for that crunchy bites in the mushroom roast. Give this a try and enjoy !!


Preparation time ~ 15 minutes
Cooking time ~ 15 minutes
Author ~ Julie
Serves ~ 4
Ingredients
button mushrooms 200 g
onion 1 medium-sized, diced
shallots, 1 handful crushed
ginger-garlic paste 1 tsp
green chillies 2 vertical slit
fennel powder (perumjeerakam) 1/2 tsp
whole peppercorns crushed 1.5 tsp
coriander powder 1.5 tsp
hot chilli powder 1/2 tsp
turmeric powder 1/4 tsp
salt to taste
oil 2tbsp + 1 tsp(garnish)
curry leaves, a sprig
coriander leaves chopped 2 tbsp


Watch on YouTube -


Method
  • Wash under running water and drain immediately. Clean the mushrooms by peeling the outer skin of the mushrooms if soiled. Cut in halves and quarters if very big.
  • Add oil to a pan and add the ginger garlic paste. Sauté until raw smell disappears.Add the crushed shallots and sauté until translucent. Slide in the diced onions and green chillies. Sauté till light brown.
  • Add the spice powders on low flame and sauté. To this, add curry leaves. Add 1/2 cup water and cook covered for 2 minutes until onions become soft.
  • To this, add the cut mushrooms. Mix well and add salt. Cook covered for 5 minutes on medium flame. Then, add crushed pepper corns and fennel powder. Mix and simmer covered again for 2 minutes.
  • Adjust salt if needed. Finally, add in chopped coriander leaves. Dry up all moisture left on high flame and add a tsp of coconut oil to finish. Leave covered for 5 minutes and mix. Serve warm.


NOTES
* Mushrooms will leave out water, so don't add too much water.
* Adding coconut oil at the end is optional, just enhances the nutty flavour of coconut oil.


Wednesday, October 12, 2022

Avil Milk (Poha Milk Shake) ~ Malabar Delicacy

Avil Milk shake is a refreshing, healthy milk shake from Malabar or North Kerala. This is available at various street stalls, especially during summer. But these days, many milk shake shops in Kerala serve avil milk and so it's not just confined to Malabar any more. Avil milk is nothing but adding roasted poha, mashed bananas, roasted peanuts to chilled milk. Poha or beaten rice is known as 'Avil' in Malayalam, and so is the name of this milk shake.

Avil milk shakes are available in many different variations and flavours. I prefer using the thin version matta aval or Kerala type red aval. But you can always use thick or thin white poha as well. Local shops used bournvita or boost for an added flavour, but you can always skip that part. You can use coconut milk, almond milk or soy milk for a vegan version. Use roasted cashews or almonds for a peanut free version. Use any ripe bananas for this recipe, but usually mysuru or palayamkodan pazham is used. I used njallipoovan(elakki banana). Also, you can add a scoop of vanilla ice cream topping for added richness. This is quite simple to prepare at home, and you can enjoy anytime. The best part of this drink unlike other milk shakes is that you can eat as well as drink this, the soaked poha puffs up and the roasted peanuts along with tutty fruity adds a nice crunch. Enjoy !!

Please check out my insta handle  for an avil milk reel 😍 Also, on YouTube #shorts.


Preparation time ~ 10 minutes
Cooking time ~ nil
Author ~ Julie
Serves ~ 2 glasses
Ingredients
beaten rice / avil roasted 1/2 cup
roasted peanuts 2-3 tbsp
small banana (njallipoovan / mysuru) 3-4
chilled milk 1.5 cups
granulated sugar 2tbsp
tutty fruity 2tbsp
boost/ bournvita, 1 small sachet


Method
  • Chill the milk before use. You can use pasteurized or boiled whole milk.
  • Dry roast the avil(poha) in a pan until it's nice and crisp without adding any oil or ghee. May take 2-3 minutes on low flame, keep aside.
  • Peel and mash the ripe bananas in a bowl with a fork. Add granulated sugar and mix well.
  • Dry roast the peanuts and peel the skin off once cooled. 
  • To a tall glass, add 2-3 tbsp of mashed banana mix, add roasted avil and roasted peanuts. To this add tutty fruity. Finally, pour in chilled milk. Add again the roasted avil and peanuts. Add tutty fruity for garnish and sprinkle half of a sachet of boost powder.
  • Serve immediately. Mix with a spoon and enjoy.

NOTES
* You can use coconut milk, almond milk or soy milk for a vegan version.
* Use roasted cashews or almonds for a peanut free version.
* Use any ripe bananas for this recipe, but usually mysuru or palayamkodan pazham is used. I used njallipoovan(elakki banana).
* You can add a scoop of vanilla ice cream topping for added richness.
* Use bournvita or boost or horlicks or any other energy powders, or just omit that too.
* You can use chopped cherries or add condensed milk instead of granulated sugar.
* I prefer using the thin version matta aval or Kerala type red aval. But you can always use thick or thin white poha as well.


Thursday, October 06, 2022

Yakhni Mutton Pulao | Kashmiri Yakhni Pulao | Potli Pulao

 Yakhni's history dates back to Akbar's ruling, Persian based cuisines had the yogurt based meat curries and this was introduced in India by the Mughal. Yakhni is part of Greek and Turkish cuisines too, but what makes the Kashmiri Yakhni different from that of theirs is the absence of tomatoes and there is no usage of turmeric powder too. Kashmiris make the best yakhni curry or the slow cooked meat. This is an absolute treat for non vegetarians. The Kashmiri pundit version is without onions and garlic, and so can be made without that too. Yakhni means the cooked stock or broth that has two more ingredients in it other than the meat, yogurt and saffron. The yogurt adds to the richness of the gravy, and the saffron adds a lemon hue to the cooked rice. The pulao made in this stock is the yakhni mutton pulao. 


How is Yakhni made?? The meat is slow cooked with the equal amount of water with some whole spices and a flavourful broth is acquired. Then the meat pieces are removed, and the broth is again cooked with yogurt, fried onions and whole spices when the meat is added again to get a delectable gravy. Yakhni curry is a curry in itself and this pulao is made using this curry. Soaked rice is added to the cooked meat and fried. Then the rice is cooked in the broth and saffron infused milk is added to get the light colour. Finally, garnish with some fried onions and serve. Mutton meat is usually used to make yakhni pulao, but you can always make with chicken as well, but the fat content infused from mutton meat along with ghee gives the pulao the richer taste. 

Also, This pulao is also known as potli pulao, as the whole spices are tied in a muslin cloth and added to the mutton to cook. Once the mutton is cooked, the potli is removed and discarded after squeezing out the juices as much as possible. These are the pics from my first trial when I added the spices directly into the pulao, but in that method, the spices gets in the broth, and it's hard to remove them once mutton is cooked. Those spices get mixed in the rice and may not taste very good, especially the whole spices like coriander seeds, whole peppercorns. Watch the YouTube video on making the potli and making the pulao. I have used pressure cooker to fasten the process of slow cooked meat, which you can slow cook in a pan too. This is a mildly spiced pulao with a great richness of ghee, saffron and mutton. Give this a try !


Preparation time ~ 20 minutes
Cooking time ~ 45 minutes
Serves ~ 5-6 
Author ~ Julie
Ingredients
for yakhni
mutton 750 gms
bay leaves 2
whole peppercorns 10-15
nutmeg (jathikka)1/4 tsp grated
mace (pathri) 1 flower
cardamom 5-6
black cardamom 2
shahjeera 1/2 tsp
cumin seeds 1/2 tsp
coriander seeds 1 tbsp
cloves 5-6
cinnamon 2" piece
fennel seeds 2 tbsp
crushed ginger 1' piece
crushed garlic with skin 5-6
green chilli vertical slit 2
onion 1 medium-sized
salt to taste
water 2.5 cups

for pulao
basmati rice 2.5 cups(500 gms)
crushed ginger 1 tbsp
crushed garlic 1 tbsp
green chillies crushed 1 tbsp or 2
mint leaves half a handful
garam masala 1 tsp
yogurt 4-5 tbsp
salt to taste
onion medium-sized 4 or 2 large sliced
ghee 4 tbsp
broth(yakhni) 4 cups


Watch on YouTube- 


 Method
  • Wash the meat, rinse under running water and drain. Keep aside. Wash and soak the basmati rice separately in water for 15-20 minutes.


  •  Lightly crush the onion, garlic and ginger in the yakhni list. In a muslin cloth, add all the ingredients listed above except mutton. Make a potli or closed pouch. In a cooker, add the mutton pieces and the potli.Mix well, add 2.5 cups water and cover the cooker  to make broth (yakhni). Pressure-cook on high for one whistle and then slow cook for another 2 whistles depending on your meat, or for 7-8 minutes on low flame. (Wait for the pressure to release and then check if the meat is nicely cooked and the broth is flavourful). Separate the broth and meat (remove the potli with spices by gently squeezing the juices). Measure the broth and add more water if needed to make 4 cups.

  • In another pan, add ghee. Fry the onion in batches until lightly browned and crisp (I fried in two batches and remember to remove the fried onions slightly earlier than it looks fried as the onions turn to a deeper colour once it's drained too). Add a pinch of salt to speed up the frying process. Drain and keep on a plate. 
  • In the remaining ghee, add the crushed ginger- garlic and green chillies. Sauté until the raw smell disappears. Then add in the mint leaves and to this add the fried onions(Reserve 2 TBS for garnish and add the rest), add 2 TBS of water just to help the onions soften. To this, add the meat along with yogurt and garam masala powder. Give a quick stir and add salt. Cook covered for 7-8 minutes on medium flame until oil separates. 


  • To this add the drained rice. Fry lightly until nicely coated in the masala. Then add the broth(yakhni) 4 cups to the pan and bring to a rolling boil (If your measured broth is less, add water and make 4 cups). Add salt as needed. Cover and cook on medium flame for 10-14 minutes until the rice looks cooked and broth is evaporated. Garnish with remaining fried onions and serve warm.

NOTES

* You can use ghee and oil or use oil alone too, but the authentic version uses ghee alone. So use ghee if possible. I have used ghee.

* Add fried nuts and raisins for a richer variation. I haven't added.

* Add the whole peppercorns in the mutton just like that and not in the potli if you like to bite up a few in the rice.
* The pulao is not very spicy, you can always increase the use of green chillies to spice it up or use pepper powder.
* You can add few drops of kewra essence too. I haven't added.
* If you want to try the kashmiri pundit version, then omit adding the onions and garlic.


Saturday, October 01, 2022

Moth Sprouts Tikki | Shallow Fried Sprout Cutlets | How to make Moth bean sprouts??

Moth beans are great protein source compared to all the other legumes. They are good for heart health, lowers blood pressure. It has high antioxidants, rich in magnesium, potassium and calcium.As it is rich in fibre, reduces gut issues and regulates bowel movements. Moth beans contain phosphorous other than calcium, which strengthens the bones. The presence of zinc in moth beans help prevent frequent infections and enhances immunity.

Sprouted moth beans are very nutritious, and so I tried making a healthy tikki chaat with the sprouts. I haven't used chopped onions in this recipe as I have not added any other binding agents like boiled potato and only used rice flour to bind. I have shallow fried the tikkis. I had earlier tried the Maharashtra misal pav with moth beans  which is also very healthy, you can try that out too. Enjoy !!


Preparation time ~ 20 minutes
Cooking time ~ 20 minutes
Serves ~ 7 tikki
Author ~ Julie
Ingredients
to make sprouts
moth beans 1/2 cup
water

to make tikkis
moth sprouts 2 cups (check video)
ginger-garlic paste 1 tbsp
salt 1/2 tsp
hot chilly powder 1/2 tsp
coriander powder 3/4 tsp
lemon 1/2 of 1
rice flour / ari podi 2 tbsp-3 tbsp
coriander leaves/ cilantro 2 tbsp
oil for shallow frying


Watch on YouTube-


Method
HOW TO MAKE SPROUTS??
  • Wash and add enough water to the moth beans. Soak the beans for 5-6 hours until the outer bean skin starts to split. Discard the water and add the soaked moth beans to a muslin cloth. Tie the ends of the cloth like a potli and wet the cloth lightly. Place in a bowl and keep in a casserole for 24-48 hours. After about 36 hours, the moth beans are sprouted well. Remove from cloth and refrigerate covered till use. 
  • NB: You may have to drizzle a few drops of water when the beans are sprouting if the cloth looks dry. Don't drench in water, else the sprouts go bad.
HOW TO MAKE SPROUT TIKKIS??
  • Heat water in a sauce pan and add salt. Add the sprouts to the boiling water. Boil for 3 minutes. Remove the sprouts from water and discard the water. OR You can even steam cook the sprouts.
  • Cool the sprouts lightly and then add to a blender jar. Pulse once or twice to crush the mix. 
  • Transfer to a bowl, add the ginger-garlic paste, chopped coriander leaves, chilly powder, salt and lemon juice. Mix this well with a spoon.
  • Add rice flour for binding, and with your clean hands, knead the mix to make a dough.
  • Apply a little oil in your hands and pinch out small lemon size portions of the dough. Make the tikki shapes and place on a plate. Repeat until you finish all the mix.
  • Heat oil in a pan and place the tikis one by one.  Shallow fry and flip the tikkis only when the sides look lightly browned. Flip and cook both sides till crisp and browned.
  • Repeat frying all tikkis. Don't place on paper towels as they tend to become soft and not have the crunch. Serve as listed below for optimal tastes.

HOW TO SERVE ?? 
  • Sweeten the curd by adding a little sugar, beat well and keep aside.
  • Add two tikkis in a bowl, press the tikkis. Add sweetened curd and sweet tamarind chutney, followed by spicy green chutney. Garnish with sev and serve.


NOTES
* I haven't added onions. But you can add 1 medium-sized onion, finely chopped.
* These tikkis are very delicate as they don't have any binding agents like boiled potatoes or bread crumbs other than rice flour. So flip gently when frying.


Few more recipes using sprouts-