Ragi is a very popular millet in India and is very nutritious, healthy and apt for all age groups. What do you generally cook with ragi flour ? I generally make the steamed ada, roasted adas, kozhukatta , or the instant ragi dosas. This roasted ada uses mashed bananas that prevent the adas from drying out, as ragi in itself is a dry flour and adds the natural sweetness along with jaggery syrup. Check for alternate method, if you don't get fresh banana leaves. Quite easy to prepare, guilt free snack and enjoy with a cup of black tea !!
Purée the bananas in a blender jar. Add to the flour, add in grated coconut, pour jaggery syrup and get a dough of spreadable consistency.
Wet your hands and spread 2 tbsps of dough in a thin layer on a clean banana leaf. Fold the leaf and place in a clay pot.
Place the clay pot on flame and cook the ada, until the banana leaves get browned and charred. Flip and cook both sides for even cooking.
Enjoy with black tea !!
NOTES
* You can make the same ada without banana leaves too. In that case, heat an iron griddle. Wet your fingers and spread the dough on the iron tawa like chapathis without burning your hands. Cook both sides and enjoy.
* Alter sweetness as per sweet tooth. Add more than required in dough, then only the sweetness may turn correct when cooked.
Aval vada is a crispy snack that can be prepared instantly when you crave having some crisp tea time snacks, especially during monsoon. The thick variety poha is used to make this snacks as the thin poha absorbs moisture very much and so may drink up oil when frying. The other ingredients are easily available in the pantry and can be added. Add chilly flakes or chopped green chillies if you love the vadas spicy. Check the recipe and do give it a try !!
Preparation time ~ 10 minutes
Cooking time ~ 10 minutes
Serves ~ 12-14 vadas
Author ~ Julie
Ingredients
poha / aval (thick) 2 cups (300 gms)
onion 1/2 cup chopped
green chillies 2 chopped
ginger 1 tsp, fine chopped
yogurt 1/3-1/2 cup
rice flour 1/4 cup-1/8 cup
red dry chillies broken 2 tbsps
coriander leaves 2 tbsps
curry leaves torn 1 sprig
salt to taste
oil to fry
Watch on YouTube -
Method
Measure the poha(aval) and add enough water to soak the poha. Leave aside for 10 minutes. If you are using thin poha then soak only for 2–3 minutes. But it is better to use thick poha than the thin one as the thin ones absorbs a lot of water.
After 10 minutes, drain water and squeeze out excess water from the poha and keep aside. In that, add chopped onions, chopped ginger, dry red chillies, coriander leaves, curry leaves, salt.
Add yogurt (1/3 cup) if it's sour and mix well. To this, add rice flour little by little and give a quick mix. The amount of rice flour depends on the binding. I added only 2 -3 tbsps of rice flour.
Mix well to a dough that can be shaped like vadas. Pinch out lemon size balls and shape to form vadas. Wet your palms and fingers for easy vada shaping. Keep aside on a plate, and make only 4-5 vadas or as much as you can fry in one batch, or else the vadas dry out before frying and may not hold shape when dropping in oil.
Heat oil in a wok and wait till oil is hot. Slide the vadas in the hot oil and don't overcrowd the wok. Gently move the vadas to move and flip once it's lightly browned.
Flip and fry all sides till golden brown. It takes longer than the regular vadas to fry. Drain from the oil and place on paper towels.
Similarly shape and fry all the vadas till golden brown. Serve warm with tomato or coconut chutney.
Moong dal is one of the best available vegetable protein sources that can be sneaked in a lot of ways in our diet. This is a healthy breakfast option or an after school snacks. The only time taken is to soak the dal, and then it's quite easy to put together. As dals are hard to digest and so eno is added to make it light and fluffy. You can use a tsp of baking powder or baking soda instead of eno, but in that case add 2tbsp of curd to the batter. Butter is added to enhance the flavours and gets a crispy top. You can use oil instead if you are allergic to butter or health conscious. But do try one with butter to know the difference. Check this out and enjoy if you are looking for a healthy protein alternative.
Preparation time ~ 10 minutes
Soaking time ~ 2 hours
Cooking time ~ 15 minutes
Serves ~ 2 pancakes (6" size)
Author ~ Julie
Ingredients
split moong dal 1 cup
hing (asafoetida/kayam) 1/4 tsp
turmeric powder 1/4 tsp
salt to taste
butter, unsalted 2-4 tbsp
onion 1, fine chopped
corn 1/2 cup
capsicum or green bell pepper 1 fine chopped
carrot 1 small grated
eno 1 tsp
ginger 1 tsp, fine chopped
green chillies 2 fine chopped
for garnish
ginger julienned 1 tsp
beetroot julienned 1/4 cup
Watch on YouTube-
Method
Wash and soak the split moong dal for 2–3 hours.
Add the soaked dal to a blender jar and little water, grind to a smooth paste. Pour in a bowl and add salt, hing, turmeric powder. Add the chopped ginger, chopped green chillies, chopped coriander leaves.
Add the corn, green bell pepper, grated carrot and little water to adjust the consistency.
Add the eno just before making pancakes. Give a gentle mix and don't overdo the mixing.
Heat a pan and add the butter. Add 3 ladleful of batter when hot. Add julienned ginger, beetroot and coriander leaves.
Cover & cook for 5 minutes, or till the edges look browned. Flip and cook on the other side for 2 minutes. Cut in quarters to cook the inside better, add butter as topping. Remove to a plate and make all other pancakes till the batter finishes.
Enjoy warm with the green chutney or tamarind chutney.
NOTES
* Ginger can be added to the moong dal and ground.
* Butter adds flavour and crispiness to the pancakes. You can use oil instead for a low fat version.
* You can add any vegetables of your choice. Don't add more water while grinding, as the vegetables leave out water when mixed.
* Use small round pans so that the cooking takes less time.
* You can use a tsp of baking powder or baking soda instead of eno, but in that case add 2tbsp of curd to the batter.
Bread moong dals are quick snacks that you can prepare at home, and the protein packed filling of green moong dal with jaggery tastes delicious. If you are looking out ways to finish off left over bread slices, then this is a great option. The filling is similar to sukhiyan, but the cover is crispier than sukhiyan. Give this a try and enjoy !!
Preparation time ~ 10 minutes
Cooking time ~ 20 minutes
Serves ~ 12
Author ~ Julie
Ingredients
bread 12 slices
for filling
cherupayaru /whole moong /green gram 1 cup
grated coconut 3/4 cup jaggery 1/3-1/2 cup cardamom powder/elakka podi 1 tsp dry ginger powder/chukku podi a pinch (optional) salt a pinch
Watch on YouTube -
Method
Melt the jaggery with 1/ cup water and strain the impurities.
Wash the dal and add to the pressure cooker. Add a pinch of salt and pressure-cook on high for 2–3 whistles, depending on the quality of the dal.
After the pressure is released, add grated coconut, melted strained jaggery syrup. Cook again till the moisture is absorbed. Add in the cardamom powder, dry ginger powder (if using). Switch off flame and leave to cool lightly.
Make lemon size balls of the filling when warm and keep aside.
Trim the edges of the bread, dip the slice in water, and immediately remove the bread. Squeeze out all the excess water and place one ball of the filling, seal the edges of the bread making a ball shape.
Similarly, make all the balls and keep aside.
Heat oil in a wok and check if oil is hot enough to deep-fry the balls.
Drop in each of the balls and fry on medium flame till it's evenly browned on all sides.
Drain from the oil and place on paper towels. Similarly, fry all the balls and serve warm with black tea.
NOTES
* You can even make a thick batter with rice flour and water. Dip each of the balls and fry.
* Adding a pinch of salt to the dal enhances the sweetness.
* Don't overcook the dal else the balls may absorb more oil and the filling may not taste good.
Do you love fruit flavoured yogurt? This is quite simple to make at home. The other day I got some fresh blueberries so used them to make blueberry yogurt. My kids love blueberry yogurt very much, and that's when I started making my own homemade batch at home. You can use any fruits like mango, grapes, peach, bananas for making this yogurt. Give this quick no cooking recipe a try and am sure kids would love this.
Wash the blueberries under running water and mash them nicely using a masher. Add sugar to this and mix until dissolved.
Whisk the thick yogurt until smooth in consistency. To this add the mashed blueberry mix. Combine well and refrigerate for two hours until the colour and flavours of the blueberries seep in.
Remove from refrigerator and enjoy the tasty blueberry yogurt.
NOTES
* You can use any fruit of your choice especially mango, peach, banana can be used.
* You can use honey instead of sugar. Or use brown sugar instead of regular granulated sugar.
* Use greek yogurt if you love the yogurt really thick.
Granola bars and granola are regarded one of the quick and healthy snack option on a day-to-day run that can be had without much guilt. Little did I know initially, when I used to grab a box of granola bars from Costco. and other outlets, thinking they make up a good midday snack for my kids. However, when I started reading the ingredients, the whole story changed. All these store bought granola bars had corn syrup, sugar and other sweeteners to bind it up. Then, I gave up buying the ready-made packs unless there is an emergency call. I started trying out granola and granola bars at home, which seemed quite easy to prepare and can be stored for a week at room temperature and upto 2 weeks in the refrigerator (haven't stored more than that as I make smaller batches).
The best thing about homemade granola or granola bars is that you can always play up with different grains, seeds, dry fruits and nuts. Check out this no sweetner banana oats bar which is a very healthy guilt free snack, it is more of a chewy kind. I have also posted a fruit and nut bars made with whole wheat flour, jaggery and dry fruits. Check that out here. Today's recipe is another simple granola bars made with dates paste, and this whole recipe depends on the type of dates used. Dates are not fondly eaten by my kids unless I sneak dates in any form of snacks and so I have used dates here in this recipe. Medjool or sukkari dates work best for this recipe as the dates should be very soft, pliable and sweet. These dry fruit energy bars are crisp on the outside and chewy inside. Give this a try and am sure all will love this recipe.
Preparation time ~ 10 minutes
Cooking time ~ 10–15 minutes
Serves ~ 12 rectangular bars
Author ~ Julie
Ingredients
oats 1 cup
almonds 1/2 cup
cashews 1/2 cup
pistachio 1/4 cup
sunflower seeds 2 tbsp
flax seeds 2 tbsp
sesame seeds 2 tbsp
dessicated coconut 1/2 cup
dates(pitted & cleaned) 1+ 1/4 cups
salt a pinch
Method
In a mixer jar, add the pitted, cleaned dates and grind to a smooth paste without adding any water. If you are using hard dates, then soak the dates in hot water for 20 minutes. Drain water and grind without adding water. Keep aside.
Dry roast almonds in a pan for 3–4 minutes until nicely toasted. Remove to a plate.
Similarly, toast the cashews followed by sunflower seeds, flax seeds. Add the sesame seeds when the other two seeds are toasted half way. Sesame seeds starts to pop up, indicating it's nicely toasted. Remove to a plate.
Add the oats and roast until it's fragrant. Add the dessicated coconut along and toast another two minutes till it's crisp. Remove to a bowl.
Roughly chop the almond, cashews and pistachios. Add to the bowl with oats, add a pinch of salt.
Watch on YouTube -
Add the sunflower seeds, flax seeds and sesame seeds followed by dried cranberries.
Add the date paste and using clean hands mix it thoroughly. The mix will be sticky.
Pre-heat oven to 350 degrees F or 180 degrees C for 10 minutes. Line an 8*8 square tray with parchment paper on all sides.
Transfer the mix to the tray and level it up with a spatula. Apply a little ghee on the back of a lid and press down the mix, applying pressure to fill in any gaps or air pockets. Apply pressure to get a uniform, smooth surface.
Mark up the mix with lines so that it becomes easy to cut once baked. You can mark rectangular or square lines as you desire.
Place in oven and bake for 17–20 minutes until the sides and top look crisp and done.
Cool for 5 minutes and then remove the bars from the tray. Cool completely and then cut along with markings. Roll in parchment papers or line up and then stack up the snack in airtight containers. Enjoy !!
NOTES
* You can add 2 tbsp honey if the dates used is not very sticky and doesn't hold the mix together.
* I have used sukkari dates, but medjool dates work fine. Use soft type dates so that you don't have to soak the dates and can be used just like that.
* If you are using harder dates, soak the dates in hot water for 15–20 minutes. Discard the water and grind to a smooth paste.
* You can use peanut butter instead of dessicated coconut.
* Use black raisins instead of cranberries or any other dried berries.
* Rolled oats adds more fiber and crunch to the granola bars, but quick oats also works fine.
* Use any other melon seeds instead of sunflower, flax and sesame seeds, the measure remains the same.
* Adding cashew & pistachios is optional, use walnut instead.
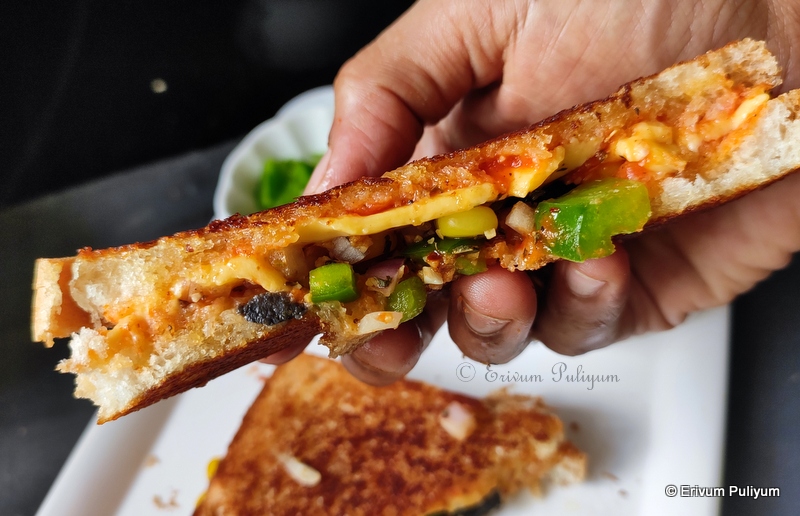
Pizza flavours are liked by all kids, but making pizza from scratch takes a lot of time. Moreover, pizza base may not be readily available at all times at home.Then, this sandwich becomes a great choice that can be prepared quickly if you have some bread slices. Kids would love to have a snack with pizza flavours and this can be served warm. Do give this a try and enjoy !!
Preparation time ~ 10 minutes
Cooking time ~ 10 minutes
Author ~ Julie
Serves ~ 5 sandwiches
Ingredients
bread slices 8-10
chopped capsicum 3 tbsp
corn kernels 3 tbsp
black olives 3 tbsp
chopped onion 3tbsp
pizza sauce 3-4 tbsp
pizza seasoning 2 tsp
cheese slices 5
unsalted butter 2 tbsp
Watch on YouTube -
Method
Take two bread slices. Apply softened butter on one, then spread pizza sauce.
Add a cheese slice and place the toppings one by one-chopped capsicum, chopped onion, black olives and corn kernels. Sprinkle the pizza seasoning on top.
Apply the softened butter on other slice and apply pizza sauce. Cover this slice on top of the toppings.
Finally, apply softened butter on the top slice.
Heat a non-stick tava and place the prepare sandwich with buttered side down, touching the tava. Press with a spatula to melt the cheese slice and to keep the toppings intact. Apply butter on the top side and flip. Cook this side another 45 seconds. Remove from tava and cut in desired shapes and enjoy.
Repeat the same steps of making the sandwich and cook on tava until toasted.
NOTES
* Buttering the underside of bread before applying pizza sauce is to prevent seepage of pizza sauce in the bread slices and prevents bread soggy.
Looking for a healthy after school snack??Then try this out healthy and simple snack with wheat flour, beets, cheese and some spices. They can be prepared much in advance and the final can be done just before serving so that you can enjoy crunchy triangles with some guacamole dip.
Baked Cheesy Spinach Triangles was posted by me sometime back, and so this beet triangles was quite similar and tried almost the same proportions. The acceptance of the cheesy spinach triangles was the much-needed boost to try out the beets version. Luckily, the beets triangles also finished in no time and I prepare these as an after school snack for kids, and they were totally mad over these. I served the cheesy triangles with guacamole dip, but you can always make mayonnaise dip or ranch.Spinach triangles give a green colour, and it's easy to include greens, esp for kids (which they otherwise wouldn't have eaten spinach) and beet triangles are pink which is very appealing to kids with all health benefits of beets.They taste similar to the tortilla chips and are very crisp.Try making these at home and enjoy with a spicy dip or a salsa !!
Preparation time ~ 10 minutes
Cooking time ~ 15 minutes
Serves ~ 4-5
Author ~ Julie
Ingredients
wheat flour 1 cup
fine semolina 1/2 cup
chilly powder/chilly flakes 1/2 tsp grated mozzarella cheese 1/2 cup beets purée 1/3 cup or 1 small beet + 1/3 cup water baking soda 1/4 tsp salt 1/3 tsp oil 2 tbsp
Method
In a bowl, add flour, semolina, chilly powder/flakes, salt and baking soda.Combine well.
Add the grated mozzarella cheese, mix well to get a crumbly mixture.
In a blender, add the peeled, washed beets and water 1/3 cup.Blend till smooth.
Add the purée little by little to the mixture until you get a stiff, firm dough.Semolina absorbs water and so wait till rest time is over.Leave to rest for 10-15 minutes.If the dough is very stiff, add a little more left over purée if any or water to get a pliable but firm dough. Add the oil and mix well.
Make 6-7 large balls of the dough and lightly dust each ball with flour and start rolling the dough in a very thin circle like chapthis. Be gentle when rolling out as beets dough will be thinner than usual chapathi dough.So, may be stickier too.
Heat a non-stick pan or tava.When hot, transfer the rolled chapathis/discs on to the tava.Fry both sides like you do for chapathis until you see brown spots here and there.
Brush little oil on the surface of beets chapathi and remove on a plate.Repeat the same step for all other balls/rolled chapathis.
Pre-heat oven to 400 degrees F and cut the discs in halves and then quarters, cut in triangles.
Place the cut triangles in a tray and bake in the oven for 5-6 minutes.Remove from oven and flip the other side, place again in oven for 3-4 minutes.Look for slightly brown edges, the chips are crisp and ready.
NOTES * If you wish to deep-fry them, then cut it in triangles soon after you make chapathis shapes.Deep-fry in hot oil on medium heat until crisp. * You can use all-purpose flour too.
* You can add 1/2 tsp cumin seeds or 1/2 tsp roasted cumin powder to the dough preparation. * You can use butter for added flavour instead of oil. * You can even cut out left over chapathis and bake them up for a quick snack the same way.
After school snacks for kids is an everyday question, and invariably I try and make this quick, simple yet a filling one so that they don't hunt for store brought snack packets. I had posted a similar dosa wraps sometime back that you can try out with left over dosa batter. Those dosa wraps were a savoury version, and this is a similar sweet version that you can feed your kids without much guilt.
You can use any leftover rotis also for making the cover, and there is no need to make a separate cover like I did in this. If you are using leftover rotis, then this is a really quick one to make. The covers that I prepared are really soft pliable and very thin and so when these wraps are toasted in ghee, they are real crisp and delicious. I usually prepare the covers much in advance before the kids arrive and keep covered. Assemble the wraps just after they arrive so that they are served warm. If you don't like the jaggery and grated coconut filling, then try a sweetened mawa or sweet vermicelli for a change. Being from Kerala, we love the nutty flavour of coconut in all meals, so enjoyed it. Do give this simple recipe a try and enjoy !!
Preparation time ~ 15 minutes
Cooking time ~ 15 minutes
Author ~ Julie
Serves ~ 7-8
Ingredients
for making the cover
maida (all-purpose flour) 1/2 cup
wheat flour 1/2 cup
oil 1.5 tsp
salt to taste
for assembling
nendran pazham(banana) 2
coconut grated 1/2 cup
jaggery 2 tbsp
broken cashews 1 tbsp
raisins 1 tbsp
almond spread 2-3 tbsp
Watch on YouTube-
Method
Thaw the almond spread if using homemade like I did. I have made the chocolate almond spread like in this recipe here.
Mix the flours, salt and add water little by little to make a smooth batter. The batter shouldn't be very thick nor very runny. Keep aside for 10 minutes, or make the fillings ready by then.
Heat a pan and add the melted strained jaggery syrup. To this add grated coconut, broken cashews and raisins. Dry up all moisture and get the filling ready (may take 6-7 minutes).
In a bowl, slice the plantains or bananas in thick slices.Keep aside.
Heat a pan and add a ladleful of batter. Spread like thin dosas. Flip and coo both sides, using a wooden spatula, pressing down all sides so that the wrap covers puff up nice and good.
Repeat making all wrap covers till you finish the batter and switch off flame.
On a cutting board or plate, place one cover. Cut the radius of the circle on one side using a pizza cutter. Now, add the coconut-jaggery filling on one quarter, spread the chocolate almond spread on second and fourth quarter. Place the banana slices on the third quarter.
Now, fold each quarter to get a finished wrap. See video for more clarity. Similarly, prepare all the wraps and keep ready.
Heat a pan and apply ghee on the pan. Place each or two wraps. Press using a spatula and cook till the cover looks nicely toasted. Apply ghee on the top side and flip to toast the other side too.
Serve warm. You can drizzle some chocolate syrup or honey for added garnish.
NOTES
* You can use any leftover rotis also for making the cover, and there is no need to make a separate cover like I did in this.
* If you don't like the jaggery and grated coconut filling, then try a sweetened mawa or sweet vermicelli for a change.
RECIPES THAT I POSTED USING ETHAKKA(NENDRAN PAZHAM )-
.png)


.png)
.png)