Print Friendly and PDF

Monday, March 28, 2022

Strawberry Falooda (VIDEO)

Falooda is a Mughalai originated Indian version of an ice cream dessert made with various layers consisting of milk, jelly, noodles, sabja seeds and ice cream. I love falooda because we get to taste a different layer of bites in this refreshing summer drink. There can be n number of variations of this dessert, as many there are ice cream flavours. So, there are no hard and fast rules to make a good falooda. You can always play up with different flavoured jellies, corn flakes, choco chips and many more to add on and make your own version of falooda. 


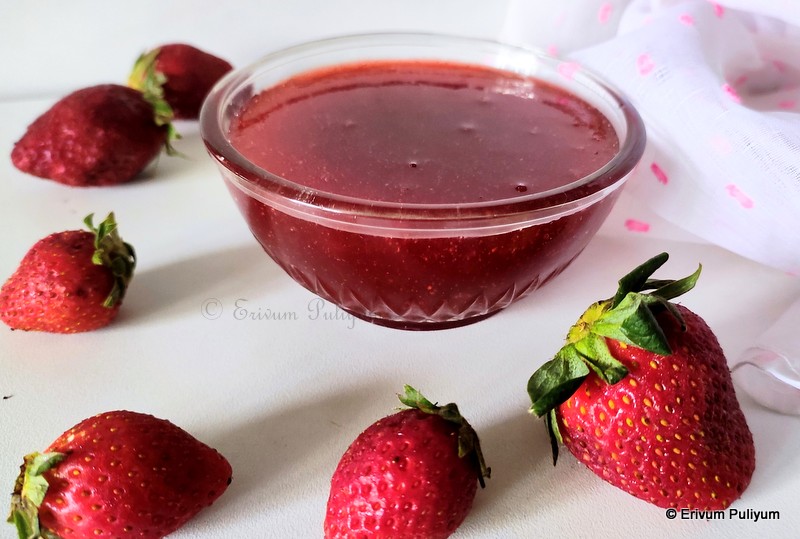
This is a strawberry falooda that I made using fresh strawberries. I first made the strawberry crush and then prepared the strawberry milk with it. I have used the thin vermicelli that you make kunafa. But if you get hold of falooda sev then use that. Strawberry jelly, Strawberry Ice cream(eggless) is added on top of the fresh strawberry milk shake. If you are interested to try making strawberry ice cream at home, then here is the link. Do give this a try and enjoy !!


Preparation time ~ 20 minutes
Cooking time ~ 10 minutes
Author ~ Julie
Serves ~  4 glass
Ingredients
to make strawberry milk shake 
milk 2 cups
granulated sugar 1 tbsp

to make strawberry jelly
strawberry jelly powder 1 pkt
hot water 2 cups

to cook noodles/ falooda sev
falooda sev/ noodles 1/4 cup
water 1 cup

Assembling
strawberry milk shake 2 1/4 cups
cooked sev 1/2 cup
sabja seeds 2 tbsp (water 1 cup)
Strawberry Ice cream(eggless),4 scoops


Method
  • Boil the water to make strawberry jelly. Add the water to the jelly powder, mix to dissolve. Then, cool down the solution and refrigerate for 2 hours to set.
  • Boil water to make the noodles. Then, add the noodles(I have used thin noodles) and cook till soft(thin noodles took about a minute). Drain the water and keep ready.
  • Soak the sabja seeds in a glass of water. Leave undisturbed for 30 minutes until swells up nicely.
  • In the meantime, add the strawberry crush, add chilled milk(2 cups) and sugar in a blender jar. Blend to a smooth mix. Refrigerate until use.
  • Take a glass and add a layer of strawberry crush on the inner walls of the glass. In this add the chopped jelly. To this then add a tbsp of sabja seeds and then add a tbsp of cooked noodles. Then again, add a layer of strawberry jelly. Pour the milk until almost full and add a scoop of strawberry ice cream to finish. Serve immediately !!
VIDEO LINK


 NOTES
* You can always alter the quantity of jelly, sabja seeds, cooked noodles in each glass. Add a layer of crunchy corn flakes too for an additional crunch.


Homemade Strawberry Crush (VIDEO)

Strawberry crush is a concentrate made with fresh strawberries and sugar. There are a good deal of crush available in markets like pineapple, mango and so on. These are used to make cake topping and poured over dessert and used as garnish in mocktails. The available ones in market use sodium benzoate, which is a chemical used to increase the shelf life of food. However, the one you make at home can be made without adding any such preservative and lemon can be use the natural preservative. This crush remains fresh for two weeks, and so I make small batches and refrigerate. 

There is hardly any cooking process and as it's strawberries there is no need to add any food colour. Strawberry has a natural colour and so looks excellent. I have used strawberry crush to prepare strawberry falooda which will be posted soon. Do give this a try and enjoy !!


Preparation time ~ 10 minutes
Cooking time ~ 10 minutes
Author ~ Julie
Serves ~ a small bottle 
Ingredients
hulled strawberries, 200 gms
granulated sugar 200 gms
lemon juice 1 tsp


Method 
  • Wash and hull the strawberries. Cut the strawberries in quarters and then, add to the jar with sugar, grind coarsely without adding any water.  
  • Heat a pan and add the ground mix. Bring to a  boil and continue to cook. The sauce gradually thickens (takes about 6-7 minutes). Add lemon juice at this point and then switch off flame. 
  • Cool completely, and you may find the texture of the sauce is nicely thickened to drizzle as garnish or used as topping. Store in clean dry glass containers and leave in refrigerator, stays good for two weeks. 

Video Link-


NOTES
*Lemon juice prevents sugar crystallized and preserves the crush. Leave refrigerated.

RELATED POSTS
* Cranberry Sauce


Tuesday, March 22, 2022

Cabbage(Muttakoos) Thoran (VIDEO)

Cabbage thoran or muttakoos stir-fry is a simple and one of the traditional stir-fry made in Kerala. This thoran (stir-fry) needs no explanation and is very simple to prepare. This is one of the fibre packed stir-fry that every malayali household makes once a week. And so, I never felt the need to post this recipe here, as the making is so simple. Cabbage Pakora is one recipe that I liked making with cabbage that you can try on a cold monsoon evenings with a cup of garam chai(tea).

However, my grandma used to make this thoran(stir-fry) in a special way and I used to love that and so follow the same till date. She used to thoroughly mix the cabbage along with grated coconut and leave for some time. This really brings out the delicious flavours in the stir-fry than simply cooking the stir-fry like others. And, one of my neighbour aunty once told me that adding the coarsely ground coconut at the end of cooking cabbage adds a unique flavour and when I tried this, I too could taste the fresh nutty flavour of the coconut. So I started adding the coconut at the end, but you may always add the crushed coconut to my grandma's style of mixing and then coo together. I have posted almost every unique stir-fry recipes with different veggies listed at the end of the page, please scroll down to check any recipes. Do give this stir-fry this way and feel the difference. If you notice the change in taste, please let me know too 😊


Preparation time ~ 15 minutes
Cooking time ~ 10 minutes
Serves ~ 4-5
Author ~ Julie
Ingredients
cabbage 1/2 
onion 1 small or shallots 10
green chillies 2-3
ginger 1' piece
curry leaves, a sprig

to coarsely grind
coconut grated 1/2 cup

to temper 
mustard seeds 1/2 tsp


Method
  • Wash and chop the cabbage in smaller strands. Peel and cut the ginger and onion, chop small. Cut the green chilli in 3-4 pieces. Remove the stalk from curry leaves. Add all of this to the chopped cabbage.
  • IMPORTANT TIP: Add the turmeric powder and add salt lightly. Mix thoroughly with hands by crushing so that everything looks combined. Leave for 10 minutes until the cabbage leaves out moisture.

  • Heat oil in a pan and splutter mustard seeds. To this, add the combined mix of cabbage.
  • Cover and cook for 5 minutes till the cabbage looks half way cooked. 
  • Add salt if needed, and add the coarsely ground coconut. Add 2tbsp of water to the blender jar to remove the residual coconut and add to the mix. Give a quick stir and cook again for 2 -3 minutes. 
  • Finally, dry up any moisture left in the stir-fry and switch off the flame. Serve warm with steamed rice.


NOTES
* You may add a tsp of sambar parippu or chana dal while tempering. Some people do that, but we generally don't add, so just skipped.
* You can add the grated coconut just like that too, without coarsely grinding. Coarsely grinding adds a binding to the thoran (stir-fry).

STIR- FRY(THORAN) RECIPES POSTED :


Thursday, March 17, 2022

Chakri Peda (Chocolate Peda) | Milk Powder Peda ~ Holi Special

Festivals in India, without sweets ?? Sweets and happy occasions go hand in hand. Sweets are a must for all such little celebrations, and we do enjoy them too, isn't it? What is your favourite sweet treat ? If you ask me, I would comment a lot as there are many Indian sweets that I love the most. Please do comment your favorite sweets, so that I know if I left any of them.


This is a simple peda recipe but with a twist of adding both chocolate and milk peda in one. The shape of these cute peda makes it more special as they look like the chakris (wheels). The two flavour can be played along, and you can modify or replace the chocolate part with pista / strawberry/ saffron or any other flavour which you can think of. These look inviting and tempting with both flavours and takes hardly any time to make these pedas. All you need is good quality milk powder, avoid using diary whiteners as it doesn't yield good results. This sweet can be made by a novice and surprise your family members. I have shared the step by step pics for better understanding, hope that helps. Do give these a try and enjoy !!


Preparation time ~ 20 minutes
Cooking time ~ 15 minutes
Serves ~ 8-10 pedas
Ingredients
milk powder 1.5 cups
milk 1/2 cup + 1tbsp
cashews 3tbsp
granulated sugar 1/3 cup
cardamom pods 5-6 
ghee 2tsp + 1 tsp
cocoa powder 1 tbsp
powdered sugar, 2 tsp


Method
  • Grind the cashews with sugar and cardamom pods to a smooth mixture (I haven't sieved this mixture, but you can always sieve it to check if there are any large pieces). 
  • Mix the milk powder with milk without lumps and put on flame. Add the ghee and mix well. If you are using milk with  cream or malai then omit adding the ghee.


  • Continue to cook till it thickens on low flame, else the bottom mixture gets burnt.
    Then, add the cashew- sugar mixture. The milk powder mix will loosen as the sugar melts. Continue to cook till the mixture starts to leave the pan and forms like a thick clay mass. Switch off flame.
  • Divide the mix in two and remove one part from flame. To the other part in the pan, add the cocoa powder and powdered sugar (2tsp). Mix this well and put again on low flame. When the mix gets thick, switch off flame. Add 1/2 tsp ghee in both dough surface so that it doesn't get dried up. Once it's slightly warm to the touch, divide each of this white and brown dough in two, i.e. you will have two white and two brown dough mixes. The dough shouldn't be completely cool, else it's hard to stick pieces of the dough together.


  • Roll the dough lengthwise as in pic and cut out small portions. Now, roll each of these small portions in small, cute balls. Then put six balls together alternatively in a circle (see pic). Now press the balls together to shape them like a disc, and then flatten the sides by rolling.


  •  Place in the plate and shape others till you finish all. Wait for one hour to cool completely and then serve.


NOTES
* Don't wait for the dough to cool completely, else both the dough may not stick together and may cut open when biting. So start rolling together when it's slightly warm itself.
* Avoid using diary whiteners and use only good quality milk powder for best results.
* You can replace the chocolate part and try other flavours like pista, kesar, strawberry or any others.


Monday, March 14, 2022

Coffee Cake with Homemade Coffee Sauce & Coffee Whipped Cream Frosting (VIDEO)

How often do you make frosting cakes at home?? Am not talking about home bakers and professional bakers, but who otherwise are passionate of frosting cakes and pastries. I do a lot of baking at home, but I hardly do frosting unless it's a family member's birthday or on any special occasions. Last month it was my elder son's 15th birthday, and he wanted a simple frosted cake as always. The flavour was his choice and I decided to give the coffee cake a try. 


I had to make everything from scratch, right from the cake bake to homemade coffee caramel sauce(the recipe of which is posted here). But I totally enjoyed the process of making this cake as there was enough time for me to bake the cake, prepare coffee sugar syrup, coffee sauce and coffee whipped cream. I was a little apprehensive about the coffee flavours as everything had coffee in it, but to my surprise all was perfect and right. We totally loved the cake on the second day than first as the cake was super moist and full of flavours. If you are looking for any good coffee frosting cakes, then bookmark this up and give it a try. The video link is shared below too. 


Preparation time ~ 20 minutes
Baking time ~ 25-30 minutes
Serves ~ 1 kg cake 
Author ~ Julie
Ingredients
for cake
all-purpose flour (maida) 1 cup
baking powder 1 tsp
baking soda 1/4 tsp
cocoa powder  1 tbsp
salt 1/8 tsp
powdered sugar 3/4 cup 
eggs 3
any neutral oil 1/2 cup + 2tbsp
vanilla essence 1 tsp
instant coffee powder 1/2 tsp
milk 2-3 tbsp 
vinegar 1/2 tsp

for coffee syrup
water 1.5 cups
instant coffee powder 2 tsp
sugar 6 tbsp 

for coffee whipping cream
whipping cream, 2 cups
coffee sauce 3 tbsp

assembling
prepared coffee sauce 6 -7  tbsp
prepared cake cut in three layers
prepared coffee whipped cream
prepared coffee sugar syrup


Method

VIDEO 


BAKING THE CAKE
  • To warm milk(2 tbsp), add coffee powder and mix till coffee powder is completely dissolved.
  • Sift the flour, baking powder, baking soda, cocoa powder and salt twice. Keep aside.
  • Beat three egg in a glass bowl using a beater and add powdered sugar in batches till the mixture looks creamy and pale.
  • Then, add in the oil and mix well. Add vanilla essence and the coffee milk mix, give a quick stir. Add the dry ingredients in three batches.
  • Pre-heat oven to 180 degrees F and line a 7' or 8' tray with parchment paper and dusted with flour on the sides. 
  • The batter should be of ribbon consistency , to adjust that add 1 or 2 tbsp milk as needed.
  • Transfer to the prepared pan and bake in pre-heated oven for 25-30 minutes.
  • Remove from oven and cool on a wire rack. Remove the cake from cake pan and cool completely before wrapping in cling wrap till use.
PREPARING COFFEE SYRUP(for soaking cake)
  • Add the water in a pan and bring to a boil. To this add the sugar and coffee syrup. Mix well until the sugar and coffee powder is completely dissolved. Switch off flame and leave to cool. If preparing earlier, then refrigerate till use.
PREPARING COFFEE WHIPPED CREAM
  • Beat the whipping cream with a beater until soft peaks. To this add, the coffee sauce(3 tbsp) and beat again until stiff peaks(takes about 4-5  minutes). Tilt the bowl upside down and check if cream is flowing down, if it stays like that, then it's ready. Refrigerate covered until use.
ASSEMBLING
  • Cut the cake in three thin layers or two as per your likes using a serrated knife.
  • Place the first layer of cake after placing a dollop of cream. 
  • Then soak the cake nicely using the prepared coffee syrup. Then add the coffee whipped cream using a piping bag and level this up with a spatula. Finally, add the coffee sauce on top (about 1.5 tbsp). Spread using a spatula.
  • Then, place the second layer and soak the cake followed by coffee whipped cream and coffee sauce (1.5 tbsp).
  • Then finally place the top layer, soak the cake nicely. Add the coffee whipped cream on the top and sides to give a nice crumb coat. Refrigerate at least half an hour before you apply the final coat.
  • Apply the final coat of whipped cream and using a scraper draw a pattern on the sides. Pour the coffee sauce on the sides, using a small piping bag to dribble down through the sides.
  • Also, pour the coffee sauce on top and spread evenly using an offset spatula. Then add the coffee whipped cream in a piping bag with star nozzle, draw designs on the upper border and lower borders. Finally, I placed a few chocolate chips on the sides and chocolate designs on top to finish the cake. Refrigerate until the cake is set (about 2 hours) and enjoy !!


NOTES
* You can use espresso coffee powder too when making this cake. I have used instant coffee powder.
* I have added only 6 tbsp sugar for making coffee sugar syrup, which was good enough with the caramel coffee sauce and whipped cream. But you can add 2 more tbsp if you need more sweet. Also, I have added 3/4 cup powdered sugar in the cake, which you can increase upto 1 cup. This cake is moderately sweet.


Coffee Caramel Sauce | Homemade Coffee Sauce ~ Great Topping for Dessert & Cakes

Today's post is a rich, creamy and delicious coffee sauce bursting with coffee flavours. I was planning to make a birthday cake for my son's birthday, and his requested flavour was coffee. For the cake, I needed a coffee sauce to make the whipped cream and to add as a topping in layers. Then I decided to give this sauce a try and use it in the cake. The cake post is coming up, and I have used the coffee sauce in the cake. We had some leftovers too which I used for topping ice creams, and they even poured over pancakes and had. Tastes delicious !!

I would say you must give this sauce a try for topping your favourite coffee pudding. If you are looking for a quick coffee pudding, then here is my post link. The sauce hardly takes any time to prepare, and you need to caramelize the sugar and then add the remaining ingredients. The sauce may thicken considerably on cooling. You can remove some amount in a bowl and add a little hot milk to get the consistency. Try making this sauce and enjoy !!


Preparation time ~ 10 minutes
Cooking time ~ 20 minutes
Serves ~ 150 ml sauce
Author ~ Julie
Ingredients 
instant coffee powder 2 tsp
*butter 2tbsp
milk 2tbsp
fresh cream or whipping cream 1 cup
granulated sugar 1 cup
salt 1/8 tsp


Method
  • Add the 2tbsp hot milk to the coffee powder and give a quick stir to dissolve the coffee powder. Keep aside.
  • Heat the granulated sugar 1 cup in a heavy bottomed pan and let it caramelize on low heat. Once the sugar is caramelized to golden brown, switch off the flame.
  • Add the butter immediately, give a quick stir. Then add the coffee mix. Give a mix again, the sauce may look getting thicker at this point.
  • Finally, add the heavy cream or whipping cream and give a mix. The cream may look curdled a bit, but don't worry. Keep mixing and put the pan back on low heat.
  • Stir for about 5-7 minutes until you see the sauce thickens. Switch off flame in a medium thick consistency as in video. The sauce thickens considerably as it thickens. 
  • Store in glass bottles and refrigerate. You can use for two weeks.

NOTES
* You can use salted or unsalted butter for this recipe. If using salted butter, then skip adding the salt in the recipe.
* If the coffee sauce is too thick after refrigeration, remove a part of the made sauce as needed and add a tbsp of hot milk to dilute and use.
* I used the sauce in this coffee cake here.


Friday, March 11, 2022

Muloshyam(Kaplanga / Omakka) | Raw Papaya Mulakushyam (VIDEO)

Muloshyam or Mulakushyam is a simple curry of Palakkad, you may call this as mildy spiced vegetable soup like curry. This can be added in the comfort curries as it's easily digested. This is a traditional recipe of muloshayam and there are n number of variations of this basic mulakushyam now available on internet. Ideally, pepper powder or green chilly is added. There are people who add chilly powder instead of green chillies, some don't add tomato, some do add coconut paste too. But let me tell you that these are the modified versions of muloshayam. While having a chit-chat with one of my palakkadan friend, she told the basic recipe goes as below (minus tomato). Muloshayam or mulakushyam means 'mulaku dooshyam' that chillies are bad for health.  If you are fed up with making coconut based curries for lunch, then this is a choice for your digestive system once in a while.


Usually ash gourd, vellarika(cucumber), pumpkin, chena(elephant yam) are used to make this curry and so vellarikka has a mild sour flavour on its own, so adding tomato is not needed. I was using raw papaya, so I added the tomato to  add a little tangy flavour to the curry, as I was apprehensive about my family's acceptance of this simple curry. But to my surprise, they all liked it, and my concept was that the curry would be watery without coconut paste. However, the curry is medium thick gravy and if you require thicker gravy, mash all the raw papaya pieces, and you will get the desired consistency. I preferred keeping little pieces to bite in the curry, but you can always choose as per tastes. If you have no veggies in your pantry and all that you get is a raw papaya from the backyard, then go ahead and give this curry a try. Split moong dal can also be used in place of sambar parippu(toor dal).  Give this curry a try !!


Preparation time ~ 10 minutes
Cooking time ~ 20 minutes
Author ~ Julie
Serves ~ 5
Ingredients
raw papaya 1 small size or 2 cups cubed
green chillies 2-3 big or 3-4 small
tomato 1 small (optional)
toor dal(sambar parippu) 1/4 cup
turmeric powder 1/2 tsp
salt to taste
curry leaves, 2 sprigs
coconut oil 1- 2 tbsp


Method
  • Wash and peel the skin of raw papaya. Cut in halves and scoop out the seeds with a spoon. Wash again to remove any sap, which may irritate some people. Cut in cubes, slit green chillies and cut tomatoes.
  • Wash the dal and add to pressure cooker. Add enough water, turmeric powder and salt. Pressure-cook for 3 whistles and wait for the pressure to release.
  • Add the cut veggies to the pressure cooker and pressure-cook again for 3 whistles.
  • After the pressure is released, mash the papaya pieces here and there using a potato masher(mashing helps to thicken the gravy consistency).
  • Put the curry back on flame and boil again, add water and salt as needed. Boil for 4-5 minutes and add curry leaves, pour coconut oil on top and switch off flame.
  • Leave covered for 10 minutes for the flavours to seep in. Enjoy with steamed rice.


NOTES
* You can use split moong dal too instead of sambar parippu.
* You can use pepper powder(1/2tsp-3/4 tsp) instead of green chillies. This curry is generally spiced, so alter as per your tastes.

RECIPES USING RAW PAPAYA-


Monday, March 07, 2022

Classic Donuts | Doughnuts (VIDEO)

Did you know donuts were once called 'olykoeks' meaning 'oily cakes' as these were fried in oil when donuts were first brought to America? Strange but true is the fact that today the largest bakery of donuts is in Pensylvannia because Americans are donut crazy.😀


Donuts or Doughnuts? Quite a debatable topic! As the story goes, a New England woman fried some dough with nuts and sent with her son for his voyage at sea and called them 'donuts'. But her son was the one who created the hole in doughnuts, giving us the classic donuts shape. Baked Round Donuts  are the ones that I posted sometime back, and it's a healthier option to frying. But kids at times wish to have the classic donuts that we get from bakeries and to satisfy them, I do make these once in a while. These are simple to make, and the dough is quite easy to prepare. The only time taken is for the dough to rise. Rest of the steps are quite simple and dipping in chocolate is optional. You can just dip them in sugar glaze too. Give these a try and enjoy !!


Preparation time ~ 10 minutes
Rising time ~ 1.5-2 hours
Cooking time ~ 10 minutes
Author ~ Julie
Ingredients
all-purpose flour 2 cups +1/4 cup
milk 1/2 cup + 3 tbsp
instant dry yeast 2tsp
granulated sugar 3tbsp
salt 1/2 tsp
unsalted butter, 3 tbsp
egg 1
oil to fry 


Method
  • Mix the yeast with 3 tbsp lukewarm milk. Add sugar to fasten the process. Keep aside to proof or 10 minutes.
  • To the yeast mixture, add the egg. Beat well with a wire whisk or spatula.
  • Mix the flour(2 cups) and salt. To this, add the yeast and egg mixture.
  • Add the remaining milk (1/2 cup) and knead well. The dough may be sticky at this point, add a little more flour if needed. Knead for about 6-7 minutes and then add softened butter. Combine and knead for another 2-3 minutes.
  • Oil a bowl and place the dough, The dough may not hold a neat shape, but that's fine. Cover and leave to rise for one hour.
  • After one hour, the dough doubles. Punch down the air and place on a lightly dusted surface. Roll the dough in 1/4' thickness. 
  • Now using a doughnut cutter or using two lids or cookie cutter, cut out a 2' round and the smaller round with 1 cm lid. Place the cut donuts on a parchment paper and leave for second rise 20-25 minutes. 
  • Heat oil in a pan and check if oil is hot enough. Slide the prepared donuts and wait for a minute ill the donuts puff up nice and then using a skewer, flip the other side. Brown the doughnuts golden and remove on a parchment paper.
  • Re roll the scraps and make more doughnuts and finish the dough. Continue to fry the remaining doughnuts. 
  • If using a glaze, you can do that, or you can dust with confectioner's sugar.
  • I preferred dipping in melted chocolate, as kids love that way. Double boil the chocolate and dip each of the doughnuts in them and add sprinkles. 
   
Enjoy !! 


Tuesday, March 01, 2022

Tawa Style Pulao | Mumbai Street Style Pulao (Step by Step Pics)

Tawa Style Pulao is a popular Mumbai street style pulao recipe made in a hot iron frying-pan(tawa) in which they make the pav bhaji masala. To the same pan, some leftover rice is added along with vegetables and prepared to soak up the spicy pav bhaji masala flavours leftover in the pan. Ideally long grain is used to make the tawa style pulao but here I have used kaima rice (jeeragashala rice) as I had some leftover cooked rice. In fact, you can use any leftover cooked rice to make this pulao as per the availability.

As it's one of the quickest pulao to make, all you need is some cooked rice, chopped veggies and pav bhaji masala. This is best served when warm and tastes yumm with no sides either. If you have an iron griddle or anodized pan, then should work finer than a non-stick pan. I have used an anodized pan to prepare the tawa pulao.Do give this a try if you are hunting down a quick pulao.


RELATED POSTS


Preparation time ~ 15 minutes
Cooking time ~ 25 minutes
Author ~ Julie
Serves ~ 4
Ingredients
jeeragashala / kaima rice 1 cup
water 1 3/4 cups
salt to cook rice

potato 1/2 cup cubed
cauliflower 1/3 cup cubed
beans 1/2 cup chopped small
carrot 1/2 cup cubed
green peas 1/2 cup
capsicum 1/2 cup small cut
onion 1 finely chopped
ginger-garlic paste 1tbsp
green chillies 3 finely chopped 
pav bhaji masala 1 tsp + 2tsp
tomatoes 4 finely chopped 
kasuri methi 1 tsp
oil (vegetable) 3 tbsp
salt to taste

to make paste
kashmiri chilly powder 1tbsp
cumin powder 1/2 tsp


Method
  • Boil the potatoes, cauliflower, beans and carrot in a pan  with water and salt lightly. Cook till tender and keep aside.
  • Add water in a pan (1 3/4 cups) with salt. Boil and add the rinsed rice, cook till done (may take 10-12 minutes). Spread the rice on a plate to cool completely and helps to prevent the rice from becoming mushy. 


  • Mix the kashmiri chilly powder and cumin powder with little water and make a paste. OR soak 5-6 dry kashmiri chilli in hot  water and grind with cumin seeds to a smooth paste. Add salt lightly.
  • Heat oil in a heavy bottomed pan and add the ginger-garlic paste and chopped green chillies. Then add onions, sauté and followed by capsicum. Sauté lightly without losing the tenderness. Add chopped tomatoes and add the kashmiri chilly paste with cumin.
  • Cover and cook till the tomatoes are mushy. Quickly add the boiled veggies, thawed green peas and  slightly mash. Add the pav bhaji masala (1 tsp), mix well. Transfer the cooked rice to the pan. Add the rice in batches and mix.
  • Finally, add the kasuri methi pav bhaji masala(2 tsp). Give a quick mix to combine, adjust salt to taste. Add coriander leaves to garnish. Serve warm with any of your fav sides or raitha. We served with Dhaba Style Paneer Curry.


NOTES
*I used frozen green peas, so added at the end with boiled veggies. If you are using fresh green peas, then boil with other veggies.
* Making a kashmiri chilli paste, yields the authentic colour to the tawa style pulao.
* You can use any veggies of your choice as per availability, but more or less these are the frequently used ones.
* Oil can be replaced for butter or both can be divide and taken. 

Try out these sides: