Print Friendly and PDF
Showing posts with label SWEETS. Show all posts

Thursday, March 19, 2026

Sweet Potato Puran Poli ~ Happy Ugadi wishes !!

Happy Ugadi wishes to all my friends who celebrate !!

Puran poli is a famous sweet of Karnataka, Telangana & Maharashtra. It's made in all important festivals in these states and in marriages and other select occasions. Boli from Kerala is slightly different than puran poli. I have already made the classic puran poli and shared here where I have aleady discussed the differences of boli and puran poli in detail. Do check out here if interested.

This time, I wished to try the sweet potato version of puran poli. This was in my to do list since long and finally, am happy that I tried it out. All loved it at home. The filling tastes similar to a split moong filling. The puran poli came out soft and nicely pufed up. Do give it a try and enjoy !!

Watch the YouTube #shorts here on the sweet potato puran poli.


Preparation time ~ 15 minutes
Cooking time ~ 15 minutes
Serves ~ 8 bolis
Author ~ Julie
Ingredients 
for cover 

maida 1 +1/4 cup

salt 1/4 tsp

turmeric powder 1/4 tsp

oil 1 tbsp + 2 tbsp

water as needed 


for filling 

sweet potato 2 (cooked & mashed=1 cup)

jaggery 3/4 cup

grated coconut 1/2 cup

cardamom powder 1/2 tsp

salt a good pinch 

ghee 2 tsp


Method

  •  Add the sweet potato in a pressure cooker with enough water. Pressure cook for 2 whistles on high flame. Switch off and wait for the pressure to release. Peel off the skin and mash the sweet potato until smooth. Discard any lengthy fibers.
  •  In another bowl, add maida, turmeric powder, salt, oil and mix. Add water little by little and knead for 5 minutes. Pour (2 tbsp)oil in a bowl and place the dough. Leave covered for 1-2 hours.
  •  In a pan, heat the grated coconut. Add the strained jaggery syrup. Cook until the syrup is absorbed. Add the mashed tapioca, cardamom powder, salt and mix. Combine well till moisture is dried. Switch off the flame & leave to cool. 
  • Make equal sized balls of the dough after an hour. Similarly make balls out of the filling. Keep aside.  Take a ball and place on a banana leaf or oil cover. Spread a little and place the filling. Bring  the dough together from all the sides to cover the filling. Now press and spread the disc in a roti shape thin. Add a tsp of oil if not spreading with ease. 
  •  Heat a pan and tilt the oil sheet over the pan. Gently remove the oil sheet and cook the boli both sides evenly till nicely puffed up. Smear oil/ghee on top and cook all edges properly. Remove on a plate and serve warm. 
  •  Repeat making all bolis and cook one by one till all are done. Enjoy !! 


Friday, November 03, 2023

Suji Burfi | Rava Barfi

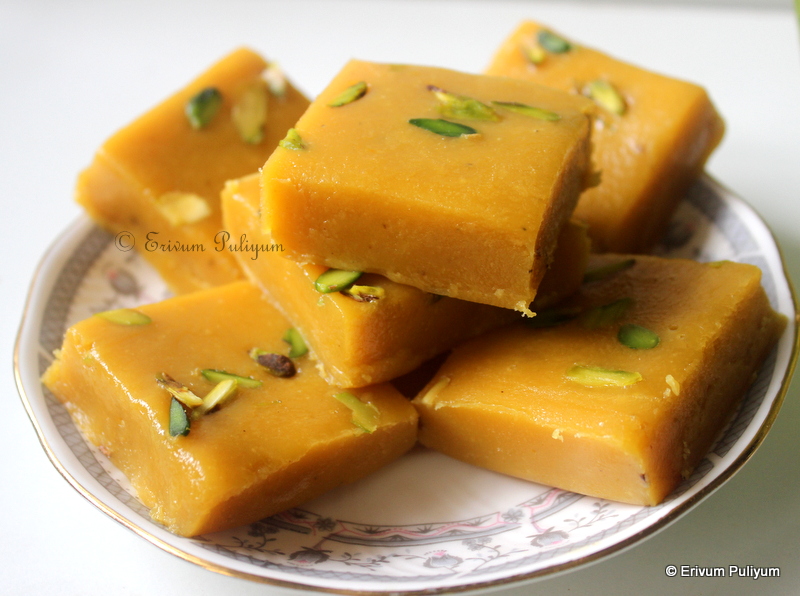
Diwali is around, and how are your preparations going on? Hope all are busy tidying & lighting up homes, buying dresses, diyas and a lot more to welcome Laxmi Devi. Festival season is full of happiness and joy, and a great get-together for families and friends. Sweets are an inevitable entity, especially during Diwali, and this is the perfect time when there is a lot of adulteration in the store brought sweets as the demand is high in the market. It's always wise to rely on good quality sweets or make a few savouries and sweets at home. 


There are many simple sweets that can be prepared days ahead and can be stored 3–4 days at room temperature. Suji laddu, besan laddu, besan burfi are few of them and this time I tried this rava barfi which is very tasty and perfect for a quick preparation at home. The barfi is soft and has a milk flavoured barfi flavour due to the use of ghee and milk powder. I am not fond of using food colours when making for our use, so avoid that and added a pinch of turmeric powder instead.Do give this a try and enjoy this Diwali if you are looking for something simple and sweet.


Preparation time ~ 10 minutes
Cooking time ~ 15 minutes
Serves ~ 12–15 pieces
Author ~ Julie
Ingredients
rava (fine)/ suji 1 cup (200 gm)
ghee 6 tbsp
milk powder 2 tbsp (18 g)
almond slices 2tbsp
pistachio slices 2 tbsp
saffron strands, a good pinch
turmeric powder, a pinch
cardamom powder 3/4 tsp
sugar 3/4 cup (130 g)
water 1/3 cup (5 tbsp)

Watch on YouTube -


Method 
  • Heat a pan and add ghee. Add the rava and roast on low flame for 3–4 minutes till the raw smell disappears. Don't let the rava change colour, keep flame on low.
  • Switch off flame and move away from residual heat. Add the milk powder and mix well, keep aside.
  • In a sauce pan, add the water and sugar. Dissolve the sugar and get a sticky consistency. No string consistency is needed. Switch off flame.
  • Pour the warm syrup in the rava milk powder mix. Combine well without lumps, put back on flame.
  • Cook till the mix is thickened, add the cardamom powder and turmeric powder. Give a quick mix.
  • Add a drop on a plate and wait for 30 seconds, try rolling the mix with fingers. If it's non-sticky and forms a ball - then the mix is ready to set in the tray.
  • Brush ghee in a tray and keep ready. Pour the mix immediately on the tray, level the top and side edges to get correct shape. 
  • Garnish with saffron strands, almond and pistachio slices. Gently press with a spatula to set. Leave to cool for 15 minutes.
  • Mark the lines to cut the desired shapes. Cool completely and break in pieces. Enjoy!!
                                                      

NOTES
* Roast the rava nicely without changing the colour, use fine rava for best results. 
* Adding turmeric powder is optional, gives a nice colour. You can add a pinch of yellow food colour too.


Friday, September 29, 2023

Millet Moong Dal Laddu | Proso Millet Laddu (No Sugar) ~ Healthy Protein Rich Laddus

Millets can be incorporated in many ways in our diet. I have been using millets for the past 5–6 years. I have been using millet flour in making appams, idlis, neer dosa, cookies and muffins. Below is a compiled list of the millet recipe tried so far. This is an easy, tasty sweet that you can enjoy this festive season. This laddu uses no sugar and is made with jaggery and ghee. This is a perfect sweet for all age groups. You can use any millets of your choice. I have used proso millet flour, the recipe of making flour is shared here. 

Proso millet has many healthy benefits, like the other millets. This has proved to boost cholesterol metabolism, improving liver and heart health by increasing high density lipo proteins. They also help in bone strengthening and improving digestion. All millets have one or the other benefits. These can be included in our diet in a number of ways. All loved this sweet healthy version of using millets. Do give this simple laddu recipe a try and enjoy. 


Preparation time ~ 10 minutes
Cooking time ~ 10 minutes
Author ~ Julie
Serves ~ 12-14 laddus
Ingredients
millet flour 3/4 cup
split moong dal 1/2 cup
jaggery 2/3 cup
ghee 4 tbsp or 1/4 cup melted
raisins 2 tbsp
sliced almonds 2 tbsp
salt, a good pinch
cardamom powder 1 tsp


Watch on YouTube -


Method
  • Wash the split moong dal, rinse, drain the water. Transfer to a clean towel to dry moisture for 30 minutes. After 30 minutes, add to a non-stick pan and dry roast the moong dal until golden brown (may take 6–7 minutes). Cool completely and powder smooth in a blender jar.
  • In another pan, melt the jaggery with 1/4 cup water. Switch off and strain the syrup to discard impurities. Keep aside.
  • In a non-stick pan, add ghee(2 tbsp). Fry the sliced almonds and raisins till golden brown. Drain from ghee and keep aside. To the same pan, add 2 tbsp ghee, and add the millet flour. Roast on low medium flame for 3–4 minutes or until fragrant. Then, add the moong dal flour and roast another 2–3 minutes until the ghee is well coated in the flour. Add the fried almonds and raisins. Add a pinch of salt & give a quick mix. Switch off flame. Add the jaggery syrup in the residual heat and mix in the residual heat. Add jaggery syrup as per taste buds, I added 3/4th of the 2/3 cup syrup.
  • Start making balls or laddus when the mix is warm and the heat is bearable to shape. Else, it may not hold shape when cold. Repeat making all balls till the mix is finished.
  • Store in airtight containers for 4–5 days at room temperature.


NOTES
* I melted 1/3 cup ghee but used only 1/4 cup or 4tbsp.
* I used 3/4th cup of the 2/3 cup jaggery syrup.
* If at anytime the balls are not getting shape, add the melted ghee or jaggery syrup.
* You can use any other millet flour to make these laddus.


RELATED POSTS 

Sunday, July 23, 2023

Mango Kesari | Mango Sheera | Mango Suji Halwa

Mango kesari is a tasty halwa recipe that requires no added colour or flavour. Tastes delicious with puffed up pooris or just like that. I have already posted a pineapple kesari on the similar styles, love these fruit flavoured kesari than the classic kesari or sheera with added colour. This is a seasonal choice that you can try making when you get ripe mangoes in abundance. Now, the season is almost coming to a halt, but still give it a try if you love to make something sweet quickly.


Preparation time ~ 10 minutes
Cooking time ~ 15 minutes
Serves ~ 5-6 
Author ~ Julie
Ingredients 
suji/ rava 1 cup
sugar 1/2 cup
water 2 cups
mango pulp 1/2 cup or 1 medium-sized mango
cardamom powder 1/2 tsp
saffron strands 12-15 strands
ghee 3 tbsp (divided)
almonds 2 tbsp
cashews 2 tbsp
raisins 1 tbsp


Method
  • Wash, peel and cut mangoes in pieces, add to a blender jar and blend smooth without adding any water. The pulp should be 1/2 cup, keep aside.
  • Add ghee(2tbsp) to a non-stick pan and fry the almonds, cashews and raisins. Then remove this to a plate and chop the almonds and cashews when cooled. Keep aside.
  • Add the suji/ rava to the same ghee, continue to roast the suji on medium flame for -4 minutes until fragrant and lightly browned (IMPORTANT STEP).
  • Remove the suji to a plate and then add the water (2 cups). Add sugar to dissolve. When the water starts to boil, add the roasted suji and keep mixing to prevent lumps. 
  • Then add the saffron strands, cardamom powder. Finally, add the mango pulp and give a quick mix. 
  • Add the chopped nuts and raisins. Combine well. Add remaining ghee little by little and give a quick mix. Switch off flame and serve with puris or just like that.


NOTES
* Add the saffron strands when water is boiling for best results. I missed that time.
* You can add 2 more tbsp of ghee for tastier version.
* Mango kesari can be served warm or cold as per personal preference.
* I used neelam mango for this recipe.


Monday, March 06, 2023

Suji Gujiya ~ Holi Special

Holi without gujiya is a big missing, and mawa gujiya tops this list. However, if you don't have access to mawa or if it's hard to get easily at your place, do you wish to celebrate a Holi without gujiya?? No !! This is an answer to all those who are looking for a quick gujiya that tastes almost similar to mawa gujiya and can be stored for longer days than mawa gujiya. Suji guijiya almost matches the mawa gujiya and I love the filling in these gujiya as it's very tasty in itself. The cover is crisp, flaky and delicious. Try these out and enjoy for this Holi.


Preparation time ~ 10 minutes
Resting time ~ 20–25 minutes
Cooking time ~ 20 minutes
Serves ~13-14
Author ~ Julie
Ingredients
for making cover
all-purpose flour(maida) 1.5 cups
ghee 3 tbsp
salt a pinch
water 1/3 cup(approx.)

for making filling
*suji (rava) 1/2 cup
dessicated coconut 1/3 cup
*granulated sugar 1/4 cup 
almonds chopped 2 tbsp
cashews chopped 2 tbsp
raisins halved 2 tbsp
*cardamom pods 4-5


Watch on YouTube-


Method
MAKE COVER-
  • Sift the flour with a pinch of salt, I missed the video clip of adding salt. To this, add ghee and mix the flour like bread crumbs. Hold the flour together by pressing and check if the ghee is moistened the flour. Then add water little by little to make a stiff dough, use very little water each time. I used about -6 tbsp or 1/3 cup. Knead the dough another 5 minutes to make the dough pliable, cover and restore 20–25 minutes.


MAKE FILLING-
  • In a blender jar, add granulated sugar along with cardamom seeds and powder fine.Keep aside.
  • In another pan, heat ghee. To this add fine rava(suji). Roast the suji for about 5 minutes on low flame. Add the dessicated coconut then and give a quick mix. Continue to roast another 5 minutes until the suji looks nicely roasted and browned. The coconut gives out a nutty flavour. At this point, switch off the flame and add the chopped almonds and cashews. Add the cut raisins, to give a nice mix. Transfer to a bowl and cool. Then add the powdered sugar along with cardamom. Combine well.
  • Now, knead the dough another minute and pinch out small balls (around 12-14) of the prepared dough. Smoothen the ball and roll using a rolling pan in a 3' circle, no need to dust flour wile rolling.
  • Place 2tbsp of the prepared filling in the center. Moisten the sides using water and stick the edges by folding in semicircle. Then make designs of your choice by folding the edges or by pressing using a fork.
  • Place the prepared gujiya on a plate lined with clean cloth and cover with a clean cloth too. Prepare the rest of the gujiya similarly.
  • Heat oil in a wok and when the oil is hot, slide in the prepared gujiya one by one. Don't overcrowd the wok. Wait for a minute for the gujiya to puff up and float on the surface of the oil.
  • Then flip and fry all sides till golden frying. Similarly fry all gujiyas till done, its better not to place on paper towels as they lose crunch.
  • Cool completely and store in airtight containers. Enjoy with tea or as a sweet !! 


NOTES
* You can use oil instead of ghee when making cover but ghee adds the flakiness.
* It's better to use fine suji for making gujiya than the coarse. If you don't have fine, then powder the coarse rava in mixer and use. I had fine rava with me so used that. 
* Use 1/2 cup powdered sugar or powder 1/4 cup granulated sugar to get 1/2 cup powdered. 
* I have powdered cardamom pods with sugar but you may use 1/2 tsp cardamom powder. 


RELATED POSTS
* Namak Pare 


Friday, October 21, 2022

Besan Burfi | No Milk Powder, No Mawa Barfi ~ Diwali 2022

Wishing all my friends a Happy and Prosperous Deepavali :)

How are your last minute preparations going on?
Though we don't celebrate Diwali, I love this festival very much because of the positive vibes. The lighting, decluttering and paintings done at home, everything everywhere looks neat and tidy, a lot of variety sweets at Halwai shops and the fire crackers all create a great mood. 

I personally don't like the fire crackers, thinking of the impact this causes on our air. It would have been nice, if the crackers are lit at one place for a community or for a housing society which will lessen the quantity of crackers burnt compared to what each individual homes burn every year. This is just an opinion of how we can help the environment and no hard feelings against Diwali. Anyway, that's each person's decision to help the air for the upcoming generations.

Let's get back to today's recipe - another simple one, but a little tricky. I have been struggling to get a perfect besan barfi for the past 4-5 trials. But am happy that I learnt finally and this is so simple to make as it hardly takes any time. Roasting the besan and getting the sugar syrup to one string consistency is IMPORTANT, no shortcuts. I really loved the beautiful colour of the barfi because of the pinch of yellow colour added, which was lacking in my previous trials. This really gives the exact colour like halwai shops. Do read below and start off making the recipe. Enjoy !!


There are many lesson learnt during this experimentation which are shared below-
1. Use a non-stick pan and a spatula for easy mixing.
2. Use melted ghee for correct measurements. The bowl in which you measure the besan can be used to measure the other ingredients, that means the besan: sugar : ghee ratio will be 1:1:1/2. 
3. Roast the besan excellent for the correct texture and taste. Roast on low flame without changing colour for about 6-7 minutes for 1 cup besan with ghee. This is important else the besan will have raw taste. The besan may not cook properly. Sprinkle few drops of water on the surface to check, if it sizzles then besan is well roasted.
4. Get the sugar syrup to one string consistency and mix this well with besan mixture.
5. Check if the besan, sugar mixture together is leaving the sides of the pan like a mass. Cook till you achieve this stage because the barfi may turn chewy otherwise.


Preparation time ~ 20 minutes
Cooking time ~ 20 minutes
Author ~ Julie
Serves ~ 9-10 pieces barfi
Ingredients
besan/ kadalamavu 1 cup (120 gms)
melted ghee / neyyu 1/2 cup
granulated white sugar 1 cup (200 gms)
water 1/2 cup
cardamom powder 1/2 tsp
yellow food colour, a pinch


Watch on YouTube -


 Method
  • Sift the besan without any lumps. Keep aside, this helps to yield a smooth burfi.
  • Heat a pan on low heat and add the sifted besan.To this, add the melted ghee. 
  • Then, mix the besan with ghee. Initially the ghee and besan mixture will tun lumpy but as besan gets roasted, the ghee will float on top. It may take 6-7 minutes on low flame to reach that stage. (Sprinkle few drops of water on the surface of besan, if it sizzles then the besan is well roasted) Switch off flame and move from heat or keep mixing few more minutes, else the besan may change colour due to residual heat. Add the pinch of food colour and give a quick stir. The colour may not show up now in the besan, but as you add the sugar syrup, the colour becomes prominent.
  • Heat another pan and add the sugar. To this, add 1/2 cup water and bring this to a boil. Let the syrup get to a one string consistency. Add cardamom powder, mix well. Check the sugar syrup by pressing the syrup between your thumb and index finger, this should form one string. Switch off flame and add the sugar syrup to the warm besan mix little by little and combine well.
  • If the besan mix becomes a little watery, then place on low heat and continue to cook till the mix starts to leave the sides of the pan.
  • Line a tray with parchment paper and apply oil/ ghee on the sides. Transfer the burfi mix to the pan and tap the tray a few times to release any trapped air bubbles.
  • Garnish with sliced pistachios. Leave to cool in tray for 15- 30 minutes at room temperature.
  • Then pull out the barfi mix with the parchment paper. Cut in desired shapes and enjoy !!

NOTES
* Roast on low flame only else the besan gets burnt.
* Once sugar syrup reaches on string consistency, switch off flame and add little by little in the besan mix. Give a quick stir.

MORE BESAN SWEETS AND SNACKS DIWALI RECIPES


Wednesday, August 10, 2022

Rajasthani Style Danedar Moong Dal Badam Halwa | Cherupayar Parippu Badam Halwa

Dal Badam halwa is a famous delicacy from Rajasthan, made during marriages and other festivities. The authentic version is a tedious process of soaking, grinding the dal(split moong dal) and badam(almonds), slow cooking the mixture for long hours in ghee, but the end product is the granule form of the halwa which is worth all the efforts. Nowadays, people have created many shortcuts to this traditional recipe by coarsely grinding the dal and almonds. Storing this mixture and preparing for a quick fix halwa. That process may yield the same flavours, but I wanted to go by the original version so that I can know the efforts put in behind the making of this delicious halwa.


I haven't tried the shortcut method yet, though have seen many videos on YouTube. So I can't comment on the tastes of that method. But let me tell you that this traditional version of the danedar(granules) tasted almost like store brought delicacy. This might involve a good workout to your arms, but the end result was worth trying. The dal is first soaked along with almonds. Then ground to a smooth paste, which is then mixed with ghee and added to the pan. Use a non-stick pan for best results as it uses lesser ghee. The mixture is then roasted on low flame and then cooked with sugar syrup. The whole process of this quantity took almost an hour to finish. Less adulterated and homemade makes this so special. If you love trying out something different for this Rakshabandan, then give this a try and enjoy !!


Preparation time ~ 20 minutes
Cooking time ~ 1 hour
Author ~ Julie
Serves ~ 6-8 bowls
Ingredients
split parippu / moong dal 1/2 cup
almonds blanched and soaked 1/4 cup
ghee 1/2 cup
granulated sugar 3/4 -1 cup
cardamom powder 1 tsp
saffron, a good pinch 
milk 2 cups
sliced almonds 2 tbsp
sliced pistachios 2 tbsp


Watch on YouTube-


Method

  • Wash and soak the moong dal for 3-4 hours. Blanch the almonds in hot water, remove skin and soak the almonds too. Drain all the water after soaking and add the dal to a blender jar without water and grind to a coarse paste. To this add soaked almonds and  grind to a smooth paste, adding very little water. 
  • Mix half of the ghee(1/4 cup) with the ground paste. Add this to a non-stick pan and heat the pan on low flame. Continue to cook on low flame till the dal mixture looks roasted and the raw smell of dal disappears.
  • The mixture turns to a lump and is nicely roasted. To this, add the milk and break the lumps. Cook on low flame to cook the dal again. Scrape anything to the bottom each time so that it doesn't get burnt at the bottom.
  • Then add the saffron soaked milk and cardamom powder. Once saffron is added, the colour of the halwa mixture turns to golden yellow colour (which I loved the most).When the mixture looks dry, add the granulated sugar and give a quick mix. The dal mix then turns thin and sugar dissolves. Cook again till the mixture again starts to leave the pan and forms a lump. Add the sliced pistachios and almonds (half), mix well.
  • Now keep adding a tsp of ghee, continue stirring with a wooden spoon on low flame. Biceps gets a good work when making this halwa, but the end result is worthwhile. Keep adding a tsp of ghee till the bigger chunks break into smaller lumps and the smaller lumps to granule form. By then, the ghee starts to show up or the mixture starts to give out the added ghee. At this stage, stop adding ghee and mix to get the fine granular halwa. Takes one hour to get granules, so have patience to stir continously.
  • Finally, garnish with left over sliced pistachios and almonds. Enjoy warm or cool. Refrigerate leftovers, thaw before serving.


NOTES
* Use a heavy bottom non-stick pan to get desired results and to reduce usage of ghee. Works perfect.
* I started making this halwa in the evening, but by the time I finished making it turned dark and so had to put on lights in the video.
* If you don't like granules, then add a few more tsp of ghee to get the usual halwa consistency. But I personally loved the granule form of this halwa.


Friday, June 17, 2022

Vermicelli Barfi | Semiya Barfi (VIDEO)

Semiya or vermicelli is popularly used in making kheer or payasam. What else do you try out frequently with semiya or vermicelli? The other popular item made at home is Vermicelli(semiya) Upma that I have already posted. I had bought thin vermicelli or nylon vermicelli for making the kunafa. Then, I prepared sheer khurma too, but then there was still some leftover. So thought to make this barfi which was a good thought as everyone loved it at home. The best part of making this barfi is that this sweet doesn't have many calories and sugar compared to the amount usually added in Indian sweets in general. And so, this sweet may not taste very rich but believe me, this barfi is good in its own way.

The thick kind of vermicelli may not taste very good for making this barfi as the strands may be crunchy. However, if you like biting the crunch, then try with the thick type vermicelli. The thin variety when cooked is  soft, yet the strands are identifiable in looks alone, which gives a unique look. If you are hunting down on trying some simple sweet recipes that you would like to prepare in a jiffy, then this is the right choice. Do give these a try and enjoy !!


VIDEO LINK-


Preparation time ~ 10 minutes
Cooking time  15 minutes
Author ~ Julie
Serves ~ 6-8 pieces
Ingredients
nylon vermicelli(thin) 3/4 cup
pottukadala (roasted bengal gram) 1/4 cup
ghee 1.5 tbsp
milkmaid / condensed milk 1/3 cup
milk 1/2 cup
cardamom powder 1 tsp
sliced pistachios 1 tbsp (garnish)


Method
  • Dry roast the pottukadala(roasted bengal gram) and grind to a smooth powder. Keep aside. 
  • Heat a pan and add ghee. To this add vermicelli and dry roast for 2 minutes till lightly brown. Then add pottukadala powder and roast with it till the raw smell disappears. Add milk to the mix and the mixture absorbs the milk. Then, add condensed milk, cardamom powder and mix well. The mixture starts to leave the pan and becomes a ball. Switch off the flame. 
  • In the meantime, line a bread tray with parchment paper, add little sliced pistachios and transfer the mixture. 
  • Level the mixture with a spoon and add sliced pistachios on top to garnish. Leave to cool for 20 minutes and cut in squares. Enjoy.


NOTES
* You can add 1/4 cup milk powder too instead of roasted bengal gram(pottukadala).
* I haven't added colour to the barfi, but you can add a pinch of  yellow food colour or saffron strands for colour.
* If you like biting through the thin strands of vermicelli, then omit adding the amount of milk, only add condensed milk.


RELATED POSTS (Vermicelli Recipes)


Friday, April 22, 2022

Aam(Mango) Pappad | Manga Thera (Step by Step Pics)

Mangoes are back in season, do you love mangoes? Mangoes are one of our family favourite fruit and so enjoy as much as we can. As this is a seasonal produce, we have to wait another year to get them fresh again. This is one of the best ways that you can preserve mangoes for a year, and we did enjoy some mangoes this way. We had a lot of mangoes in our native backyard last year, and there was lockdown during summer as the second wave of corona was on. So, we utilized most of the time plucking mangoes and jackfruit(chakka). We enjoyed a lot of them every day, and then I thought to preserve them and check if it works out. There was immense sun as it was summer  and so, the drying process of these papad (thera) was easier. 


There are no chemicals used, nor any artifical colours and essence in this recipe. Cardamom is the only flavouring agent used. I preserved this in the fridge, and we enjoyed these almost a year. I had also prepared Jackfruit Preserve(Chakkapazham Thera) the same way, which was also good. But we liked the mango thera much better than jackfruit ones. Yet another season of the King of fruits is here and if you get hold of some fresh ripe mangoes, give this a try and enjoy all throughout the year.


Preparation time ~ 10 minutes
Cooking time ~ 20 minutes
Serves ~20 pieces
Author ~ Julie
Ingredients
mango 3 cups pulp (10-12 mangoes or 1.5 kg)
sugar 200 gms
cardamom powder 1/2 tsp
ghee 2 tsp 


Method
  • Wash and clean the mangoes well. Peel the skin and put the fleshy pieces in a mixer jar and make a smooth paste without adding any water. Please make sure that there are no pieces left in the pulp.
  • Transfer this pulp to a heavy bottomed pan and add the sugar. Heat this mixture on a low medium flame as the mixture starts to splatter if we do on a high flame. Continuous stirring  and use of a long handle spatula is needed to avoid hot splashes. You may require to stir this mixture for about 20 minutes till the consistency looks thick and starts to coat the stirring spoon. Add the cardamom powder and mix well.


  • Smear ghee in three steel plates preferably and pour the mango mixture in the plate as a thin layer.The thinner the layer, the faster will be the drying process. I could pour in three plates. 


  • Sun dry the prepared plates with the mixture for 2-4 days with a muslin cloth cover so that there is no dirt sticking to the top of the mixture when wet. Sun dry till the top of the mixture looks unstick. (The thinner the layer and the sun's strong heat decides the drying time). Mine was done in three days.Run a knife along the edges of the dried pappad and gently peel the pappad(thera) from the plate. Cut in strips and preserve as bars or roll them if possible.
  • Store in airtight containers for future use in refrigerator. I preserved for a year and had.


PRESERVE THE MANGOES :

Thursday, March 17, 2022

Chakri Peda (Chocolate Peda) | Milk Powder Peda ~ Holi Special

Festivals in India, without sweets ?? Sweets and happy occasions go hand in hand. Sweets are a must for all such little celebrations, and we do enjoy them too, isn't it? What is your favourite sweet treat ? If you ask me, I would comment a lot as there are many Indian sweets that I love the most. Please do comment your favorite sweets, so that I know if I left any of them.


This is a simple peda recipe but with a twist of adding both chocolate and milk peda in one. The shape of these cute peda makes it more special as they look like the chakris (wheels). The two flavour can be played along, and you can modify or replace the chocolate part with pista / strawberry/ saffron or any other flavour which you can think of. These look inviting and tempting with both flavours and takes hardly any time to make these pedas. All you need is good quality milk powder, avoid using diary whiteners as it doesn't yield good results. This sweet can be made by a novice and surprise your family members. I have shared the step by step pics for better understanding, hope that helps. Do give these a try and enjoy !!


Preparation time ~ 20 minutes
Cooking time ~ 15 minutes
Serves ~ 8-10 pedas
Ingredients
milk powder 1.5 cups
milk 1/2 cup + 1tbsp
cashews 3tbsp
granulated sugar 1/3 cup
cardamom pods 5-6 
ghee 2tsp + 1 tsp
cocoa powder 1 tbsp
powdered sugar, 2 tsp


Method
  • Grind the cashews with sugar and cardamom pods to a smooth mixture (I haven't sieved this mixture, but you can always sieve it to check if there are any large pieces). 
  • Mix the milk powder with milk without lumps and put on flame. Add the ghee and mix well. If you are using milk with  cream or malai then omit adding the ghee.


  • Continue to cook till it thickens on low flame, else the bottom mixture gets burnt.
    Then, add the cashew- sugar mixture. The milk powder mix will loosen as the sugar melts. Continue to cook till the mixture starts to leave the pan and forms like a thick clay mass. Switch off flame.
  • Divide the mix in two and remove one part from flame. To the other part in the pan, add the cocoa powder and powdered sugar (2tsp). Mix this well and put again on low flame. When the mix gets thick, switch off flame. Add 1/2 tsp ghee in both dough surface so that it doesn't get dried up. Once it's slightly warm to the touch, divide each of this white and brown dough in two, i.e. you will have two white and two brown dough mixes. The dough shouldn't be completely cool, else it's hard to stick pieces of the dough together.


  • Roll the dough lengthwise as in pic and cut out small portions. Now, roll each of these small portions in small, cute balls. Then put six balls together alternatively in a circle (see pic). Now press the balls together to shape them like a disc, and then flatten the sides by rolling.


  •  Place in the plate and shape others till you finish all. Wait for one hour to cool completely and then serve.


NOTES
* Don't wait for the dough to cool completely, else both the dough may not stick together and may cut open when biting. So start rolling together when it's slightly warm itself.
* Avoid using diary whiteners and use only good quality milk powder for best results.
* You can replace the chocolate part and try other flavours like pista, kesar, strawberry or any others.