Print Friendly and PDF
Showing posts with label BIRIYANI. Show all posts

Thursday, October 06, 2022

Yakhni Mutton Pulao | Kashmiri Yakhni Pulao | Potli Pulao

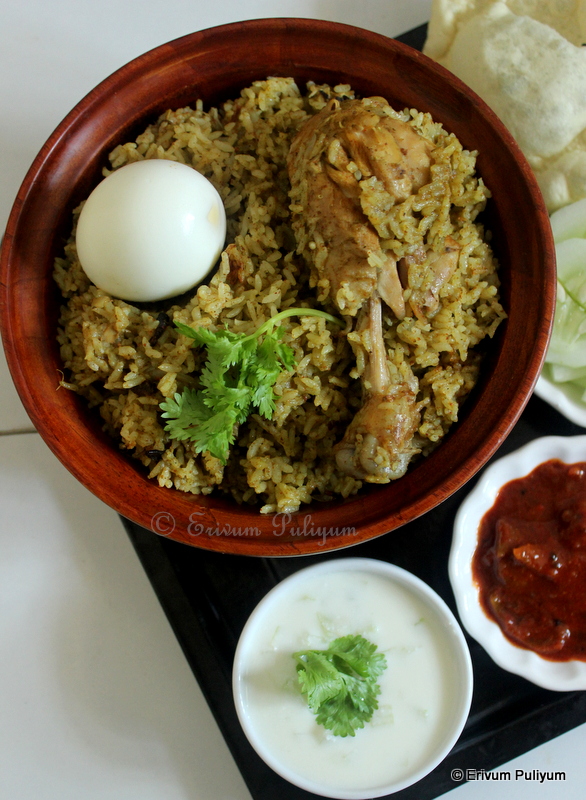
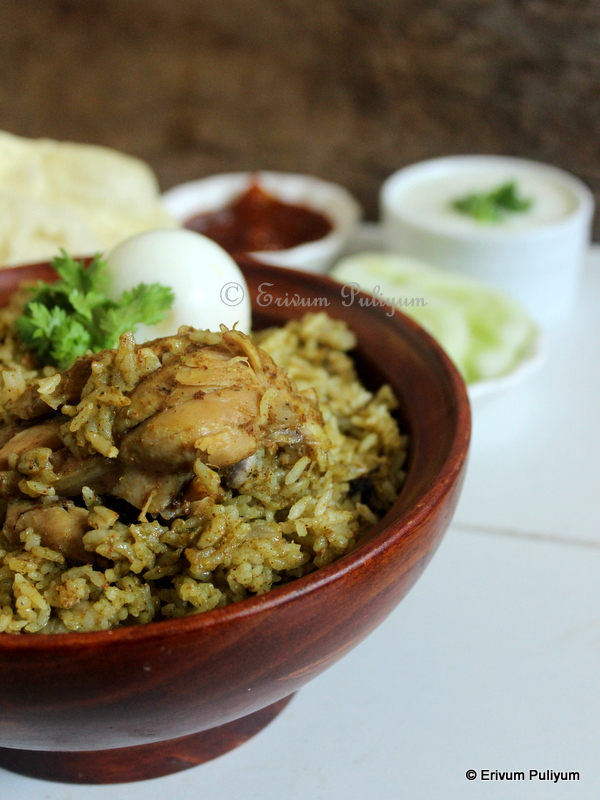
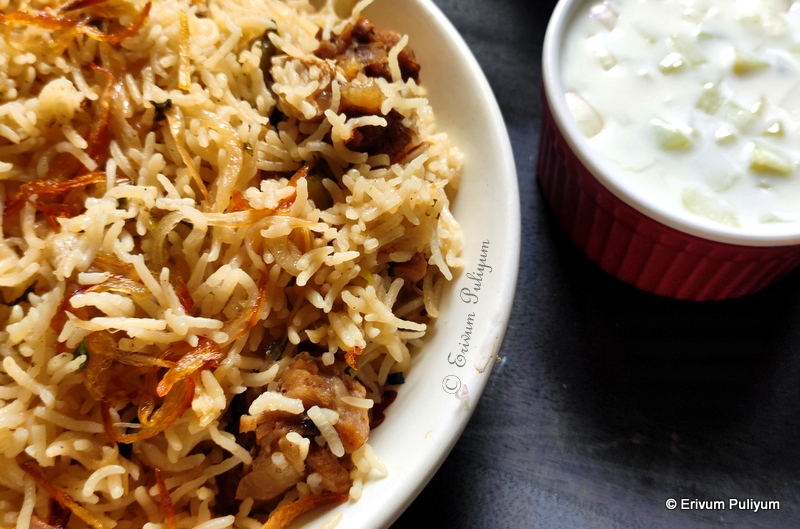
 Yakhni's history dates back to Akbar's ruling, Persian based cuisines had the yogurt based meat curries and this was introduced in India by the Mughal. Yakhni is part of Greek and Turkish cuisines too, but what makes the Kashmiri Yakhni different from that of theirs is the absence of tomatoes and there is no usage of turmeric powder too. Kashmiris make the best yakhni curry or the slow cooked meat. This is an absolute treat for non vegetarians. The Kashmiri pundit version is without onions and garlic, and so can be made without that too. Yakhni means the cooked stock or broth that has two more ingredients in it other than the meat, yogurt and saffron. The yogurt adds to the richness of the gravy, and the saffron adds a lemon hue to the cooked rice. The pulao made in this stock is the yakhni mutton pulao. 


How is Yakhni made?? The meat is slow cooked with the equal amount of water with some whole spices and a flavourful broth is acquired. Then the meat pieces are removed, and the broth is again cooked with yogurt, fried onions and whole spices when the meat is added again to get a delectable gravy. Yakhni curry is a curry in itself and this pulao is made using this curry. Soaked rice is added to the cooked meat and fried. Then the rice is cooked in the broth and saffron infused milk is added to get the light colour. Finally, garnish with some fried onions and serve. Mutton meat is usually used to make yakhni pulao, but you can always make with chicken as well, but the fat content infused from mutton meat along with ghee gives the pulao the richer taste. 

Also, This pulao is also known as potli pulao, as the whole spices are tied in a muslin cloth and added to the mutton to cook. Once the mutton is cooked, the potli is removed and discarded after squeezing out the juices as much as possible. These are the pics from my first trial when I added the spices directly into the pulao, but in that method, the spices gets in the broth, and it's hard to remove them once mutton is cooked. Those spices get mixed in the rice and may not taste very good, especially the whole spices like coriander seeds, whole peppercorns. Watch the YouTube video on making the potli and making the pulao. I have used pressure cooker to fasten the process of slow cooked meat, which you can slow cook in a pan too. This is a mildly spiced pulao with a great richness of ghee, saffron and mutton. Give this a try !


Preparation time ~ 20 minutes
Cooking time ~ 45 minutes
Serves ~ 5-6 
Author ~ Julie
Ingredients
for yakhni
mutton 750 gms
bay leaves 2
whole peppercorns 10-15
nutmeg (jathikka)1/4 tsp grated
mace (pathri) 1 flower
cardamom 5-6
black cardamom 2
shahjeera 1/2 tsp
cumin seeds 1/2 tsp
coriander seeds 1 tbsp
cloves 5-6
cinnamon 2" piece
fennel seeds 2 tbsp
crushed ginger 1' piece
crushed garlic with skin 5-6
green chilli vertical slit 2
onion 1 medium-sized
salt to taste
water 2.5 cups

for pulao
basmati rice 2.5 cups(500 gms)
crushed ginger 1 tbsp
crushed garlic 1 tbsp
green chillies crushed 1 tbsp or 2
mint leaves half a handful
garam masala 1 tsp
yogurt 4-5 tbsp
salt to taste
onion medium-sized 4 or 2 large sliced
ghee 4 tbsp
broth(yakhni) 4 cups


Watch on YouTube- 


 Method
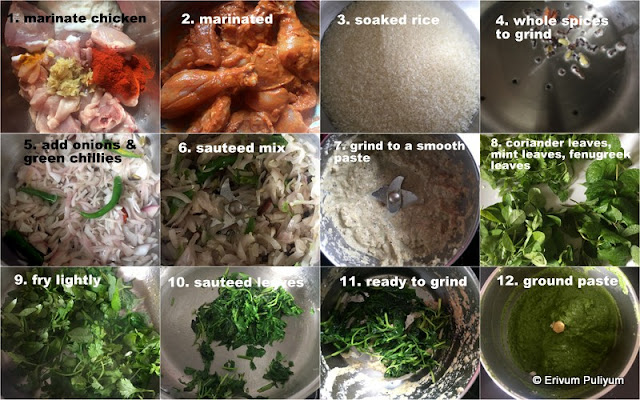
  • Wash the meat, rinse under running water and drain. Keep aside. Wash and soak the basmati rice separately in water for 15-20 minutes.


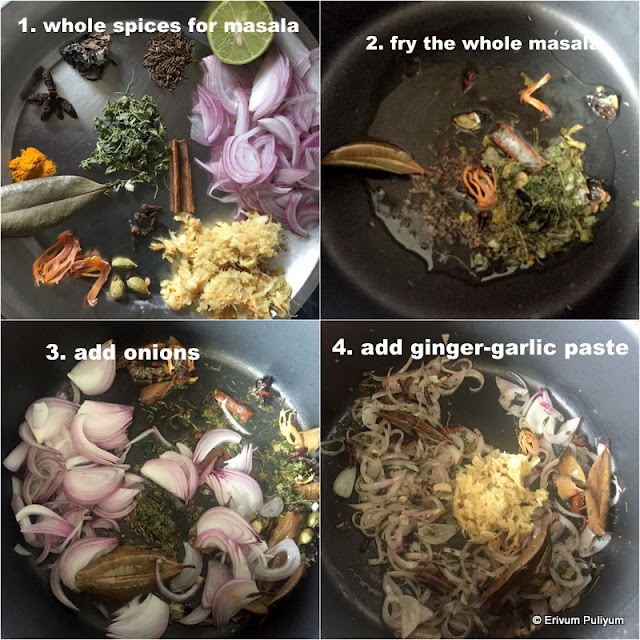
  •  Lightly crush the onion, garlic and ginger in the yakhni list. In a muslin cloth, add all the ingredients listed above except mutton. Make a potli or closed pouch. In a cooker, add the mutton pieces and the potli.Mix well, add 2.5 cups water and cover the cooker  to make broth (yakhni). Pressure-cook on high for one whistle and then slow cook for another 2 whistles depending on your meat, or for 7-8 minutes on low flame. (Wait for the pressure to release and then check if the meat is nicely cooked and the broth is flavourful). Separate the broth and meat (remove the potli with spices by gently squeezing the juices). Measure the broth and add more water if needed to make 4 cups.

  • In another pan, add ghee. Fry the onion in batches until lightly browned and crisp (I fried in two batches and remember to remove the fried onions slightly earlier than it looks fried as the onions turn to a deeper colour once it's drained too). Add a pinch of salt to speed up the frying process. Drain and keep on a plate. 
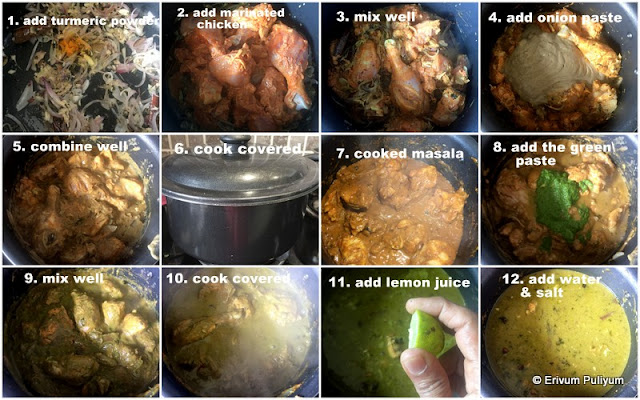
  • In the remaining ghee, add the crushed ginger- garlic and green chillies. Sauté until the raw smell disappears. Then add in the mint leaves and to this add the fried onions(Reserve 2 TBS for garnish and add the rest), add 2 TBS of water just to help the onions soften. To this, add the meat along with yogurt and garam masala powder. Give a quick stir and add salt. Cook covered for 7-8 minutes on medium flame until oil separates. 


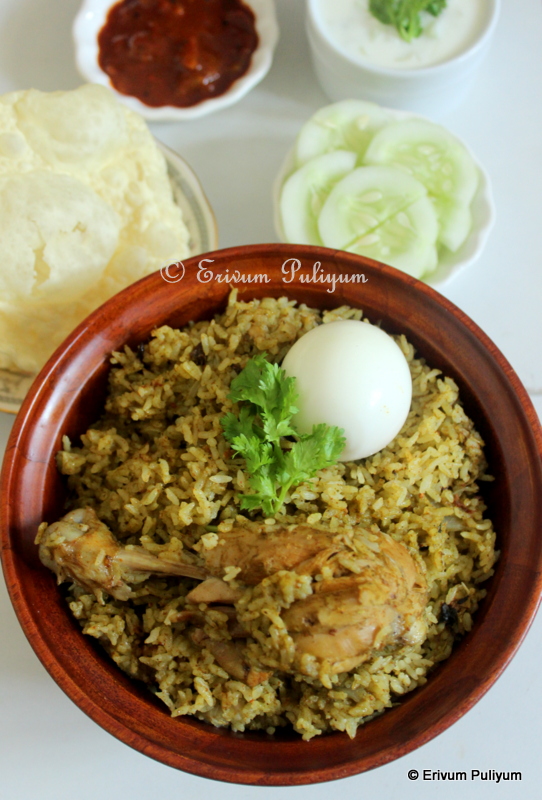
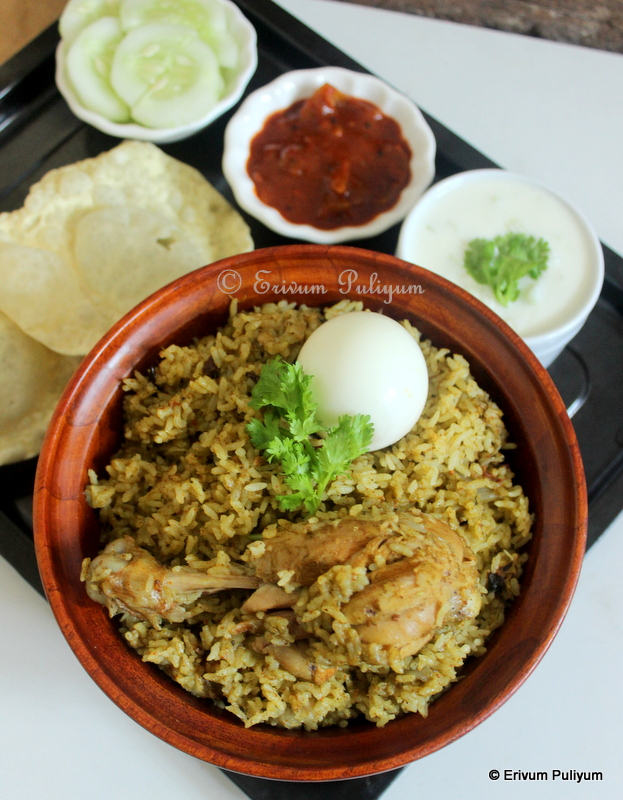
  • To this add the drained rice. Fry lightly until nicely coated in the masala. Then add the broth(yakhni) 4 cups to the pan and bring to a rolling boil (If your measured broth is less, add water and make 4 cups). Add salt as needed. Cover and cook on medium flame for 10-14 minutes until the rice looks cooked and broth is evaporated. Garnish with remaining fried onions and serve warm.

NOTES

* You can use ghee and oil or use oil alone too, but the authentic version uses ghee alone. So use ghee if possible. I have used ghee.

* Add fried nuts and raisins for a richer variation. I haven't added.

* Add the whole peppercorns in the mutton just like that and not in the potli if you like to bite up a few in the rice.
* The pulao is not very spicy, you can always increase the use of green chillies to spice it up or use pepper powder.
* You can add few drops of kewra essence too. I haven't added.
* If you want to try the kashmiri pundit version, then omit adding the onions and garlic.


Tuesday, January 25, 2022

Donne Biriyani(Chicken) | Bengaluru Biriyani (Step by Step Pics)

Donne biriyani is Bengaluru's signature biriyani, served in these leafy pouch/ cups. Donne, the word, literally means a pouch/cup made with areca nut palm leaves and so is the name. Back in history, Bengaluru has been a strategic military hub and so this biriyani dates back to the early military hotels in the city and the Shivaji Military hotel are the famous hotels that serve donne biriyani the best. Those days this biriyani was made with mutton and these eateries were a quintessential part of city life. This biriyani is mildly spiced, unlike the Hyderabadi Chicken Biriyani.


However, this biriyani is made with jeeraga samba rice / kaima rice like in the Dindigul Thalapakketti Biriyani(Tamil Nadu). Though this biriyani is easy to make, but there are two pastes to be prepared in this biriyani. The first paste is an onion, green chillies and whole spices paste. Second one is the green leaves paste which include mint, coriander and fenugreek leaves which imparts a colour and unique flavour. Curd is added in the marination of chicken. I have referred this You tube video for making this biriyani and this biriyani tasted almost similar to the authentic one served in the city. The amount of water added to cook the rice shouldn't be more, else the rice may turn mushy as the rice is cooked with the chicken. Do give this biriyani a try and enjoy !!

Few sides that you can try with biriyani- 


Preparation time ~ 25 minutes
Marination time ~ 30 minutes - overnight
Cooking time ~ 40 minutes
Author ~ Julie
Serves ~ 4-5 
Ingredients
chicken 750 g
hot red chilli powder 1 tbsp
turmeric powder, a pinch
ginger-garlic paste 1 tbsp
curd/ yogurt 1/2 cup

to grind 1
cinnamon 4-5
cloves 10-12
cardamom 5-6
peppercorns 1/2 tbsp
green chillies 3-4
onion 2 big sliced

to grind 2
mint leaves / pudina, 1/2 handful
coriander leaves/ malli ela, a big bunch
fenugreek leaves/ uluva ela, a small bunch

for making biriyani
jeerakashala/ kaima rice 1/2 kg(500 g)
cinnamon 1' piece
cloves 4-5
cardamom 5-6
mace / jathipatri 1
star anise 1/2
stone flower 1/4 tsp
shah jeera 1/2 tsp
bay leaf 1
kasuri methi (dry fenugreek leaves) 1 tbsp
onion 1/2 sliced
ginger-garlic paste 3 tbsp
turmeric a pinch
*water 3 cups
ghee 3tbsp
oil 1/2 cup
lemon juice 1/2 of 1
salt to taste

boiled eggs 4-5


Method

  • Wash and clean the chicken pieces, if the pieces are big then make gashes. Add the chilli powder, turmeric powder, ginger-garlic paste, curd and salt to make a paste. Add to the chicken pieces and mix well. Leave the chicken marinated for minimum 30 minutes to overnight. If you are marinating overnight, then refrigerate the chicken pieces and thaw before use.


  • Wash and soak the jeeraga samba rice for 15-20 minutes.
  • Heat oil in a pan (2 tbsp), add the cloves, pepper corns, cinnamon, cardamom pods (REFER TO GRIND 1 LIST). Add the sliced onions 3, 4-5 green chillies. Fry the onions till lightly browned. Switch off flame and let it cool. Add this to a blender jar and ground to a smooth paste by adding little water. Remove to a bowl.
  • To the same pan, add a tbsp of oil and add the mint leaves, coriander leaves and fenugreek leaves(REFER GRIND 2 LIST). Fry lightly for a minute(don't over do as the greens may lose colour). Switch off the flame and add the greens to the same blender jar and make a smooth paste. Add a little water as needed.


  • Heat oil in a pan and all the ingredients of whole spices for the masala making. Then slide in one sliced onions. When the onions turn translucent, add the ginger-garlic paste. Then add a pinch of turmeric powder, followed by the marinated chicken. Mix this well and add the onion paste. Combine the mixture well, chicken may leave out water. Add water as required, add salt, cover and cook for 5-7 minutes on medium flame.
  • Then, add the green colour paste. Mix well, check salt. Cook covered for 10 minutes on medium flame. To this, add the lemon juice and add water (3 cups) as the gravy is remaining. Add salt and bring the water to a boil. 


  • When the water starts to boil, add soaked jeeraka shala rice. Mix well and cook covered. To keep the lid tight, either seal the edges or place a weight on top, as I did in the pic. Slow cook for 20 minutes until the water is absorbed and rice gets cooked. 
                                            
  • Fluff with a fork and then add ghee(3 tbsp). Switch off flame. Keep covered for another 5 minutes and serve warm with boiled egg, raitha, Lemon Pickle and pappadam.


NOTES
* Adding fresh fenugreek leaves gives a nice green colour and imparts a unique flavour to the biriyani. Omit if you don't like it, but I would say you must try adding. There is also use of dry fenugreek leaves too, unlike other biriyanis.
* Use any neutral oil to make the biriyani. Ghee is added for flavour towards the end of biriyani making.
* I added only 3.5 cups water to cook the rice (2.5 cups). As per the measure of the rice, the water amount should be 5 cups (1:1.5 ratio of rice to water). However, the gravy amount roughly was 1.5 cups, so reduced water as per that. You can also decide the amount of water as per the quantity of gravy.

RELATED POSTS

Friday, November 26, 2021

Fish Pulao(Rice) | Meen Choru (Step by Step Pics)

Yet another weekend is here !! People in the US are having a long weekend with Thanksgiving and Black Friday. Weekends whether it's long or just the Saturday- Sundays is special. But weekend cooking is something I don't like much and would like to relax and enjoy like all others sitting idle at home and so spend the least time in kitchen. I cook up recipes that need less time to put together but should be a hearty meal as well that all would love too. One pot meals are a great choice then, and I end up making Vegetable pulaoAchari Chana or Chicken Pulao (Quick Version) or erachi choru

This recipe of Fish Pulao or Fish Rice or Meen Choru is similar to  erachi choru and if you have some good firm fish in hand, you can give this a try. The rice gets good flavours of the fish and the only thing to keep in mind is to give this a try using fresh firm fish, else may not taste good. I got a fresh  neymeen(seer fish) and so used in this recipe, tasted delicious and all loved it. This recipe is not very spicy, as kids don't eat very spicy pulao. You can always modify the spicy levels as per tolerance. I have used jeerakashala(kaima) rice for the recipe, but you can always use basmati rice or bullet rice. Unlike fish biriyani this hardly takes any time to put together and ghee is not used, and am sure you will love it if you give this a try!!


Preparation time ~ 30 minutes
Cooking time ~ 30 minutes
Author ~ Julie
Serves ~ 5-6
Ingredients
to marinate
neymeen/ ayikoora/ seer fish  500 g
kashmiri chilly powder 1tbsp
pepper powder 1/2 tsp
turmeric powder 1/4 tsp
lemon juice 1 tsp
salt 1/2 tsp 
oil 3 tbsp

for cooking rice & masala
jeerakashala rice(kaima rice) 3 cups (600g)
water 6 cups
ghee 2tbsp
oil 3tbsp
onion, 2 medium-sized chopped
tomato 2 large chopped
coriander powder, 1 tsp
hot chilly powder 3/4 tsp
turmeric powder(manjal podi) 1/2 tsp
perinjeerakam(fennel seeds) 1 tsp
fenugreek powders, a good pinch
coriander leaves 1 tbsp
mint leaves 1tbsp
whole garam masala (1' cinnamon, 4-5 cloves,3-4 cardamom, bay leaves 2)
salt to taste

to grind
ginger 1' piece 
garlic 10 cloves
green chilli 2 
coriander leaves, 1 small bunch
mint leaves 1 small bunch 


Method
  • Wash and clean the fish pieces under running water, rinse 3-4 times. Drain all water and keep aside. Marinate the fish using the ingredients mentioned above, except oil. Leave the marinated fish for 30 minutes-1 hour. Heat oil in  a pan and shallow fry the fish lightly so that the pieces don't break easily. Fry both sides, remove to a plate and use the remaining oil to make masala.
  • Add the ginger, garlic, green chillies and coriander leaves, mint leaves. Wash and soak the jeerakashala rice for 20 minutes in another bowl.

  • Add oil to another cooking pan, or use the same pan to sauté onions. To this add the whole garam masala pieces. Then add the chopped onions and sauté until it's lightly browned. Then add the ginger- garlic paste and sauté till the raw smell vanishes. To this add the spice powders on low flame and add the ground masala and sauté till the raw smell vanishes. Finally, add tomatoes, mix well and cook covered till the tomatoes mash nicely. 
  • Add 1/ 4 cup water and slide in the fish pieces. Cook covered till oil separates on the surface of the masala.

  • Then remove the fish pieces on a plate and add water (6 cups). Add salt and bring to a boil. Transfer the soaked rice and cook covered till 3/4th done(about 10 minutes). Then place the fish pieces over the rice in the last few minutes of cooking and simmer on low flame for another 5 minutes or till the water is absorbed.


  • Garnish with chopped coriander and mint leaves. Leave covered for another 15 minutes and serve warm with cucumber raitha.

NOTES
* Add lemon juice while cooking rice if you feel the rice will stick.
* This is a medium spiced masala, if you like it more spicy add more green chillies to grind or replace the kashmiri chilli powder in marination to hot chilli powder.


Monday, November 01, 2021

Mushroom Dum Biriyani (Step by Step Pics)

When all are lazying and enjoying their weekend at home, I too don't like to spend more time in the  kitchen. How about you, ladies?? True, right ? Moreover, many are busy with Diwali preparations, how about preparing a menu plan beforehand and include this mushroom biriyani too?? Just a thought..  Invariably, most of our weekends are one pot meal and the beauty of this meal pattern is you just need a raitha/ pickle/ pappad as side. When I say all about one pot meal in the intro, that means today's post is a one pot meal- Mushroom Dum Biriyani, he he 😀. This recipe is a flavourful and delicious one; definitely a keeper for your weekends/ festive occasions/ pot luck parties or a quick whip for lunch box too.

Everyone loves mushroom here, and so I knew they would love this biriyani too. Don't get scared by the word 'biriyani' thinking this recipe may be an elaborate one and the ingredient list may look long but believe me it gets whipped quickly. I have posted a Mushroom-Paneer Pulao long time back which you can check out here. Getting good quality & fresh mushrooms is the key to making this biriyani flavoursome. Also, remember to keep the mushroom pieces slightly bigger as it shrinks after cooking. If the button mushroom is small, you can add just like that. I have just placed weight on the lid to give 'dum effect' which was perfect (see pics). Do give this biriyani a try, am sure you will love it !!


Preparation time ~ 20 minutes
Cooking time ~ 45 minutes
Serves ~ 4-5
Author ~ Julie
Ingredients
for cooking rice
basmati rice, 2 cups
lemon juice 2tsp
cloves 5-6
cardamom 5
bay leaves 2
cinnamon 3 pieces
salt to taste
water 3 cups
ghee 2tbsp
coriander leaves 4tbsp
pudina (mint leaves) 4tbsp

for mushroom masala
button mushrooms 200 g(2 cups)
onion 3 sliced
tomato 3 chopped
ginger- garlic paste 2tbsp
yogurt 2tbsp
kashmiri chilly powder 2tsp
hot chilly powder 1/2 tsp
coriander powder 2tsp
turmeric powder 1/2 tsp
biriyani masala 1tsp
salt to taste
ghee 2tbsp
oil 4 tbsp
saffron strands few
milk 1tbsp

for garnish
cashews 2tbsp
raisins 2tbsp


Method
  • Wash the mushrooms by dropping in *maida mixed water (removes the dirt and soil quickly, check notes). Rinse under running water and drain water, keep aside. If the mushrooms are big, cut in cubes. If it's small, then add just like that.
  • Wash and soak the basmati rice for 20 minutes. Drain this water and use along with water to coo the rice. Heat a pan and add the ghee(2 tbsp) and drain the water completely from rice and add. Fry the rice until fragrant.
  • Boil 3 cups of water in a pan and add the whole spices listed above. Add the lemon juice and required salt. When water starts to boil, add the rice and cook until done. Takes about 10 minutes on medium flame.
  • In a heavy bottomed pan or biriyani pot, add ghee and oil. Fry the cashews and raisins till light brown and drain, keep aside. To the same oil, add handful of sliced onions and fry till light brown and crisp, drain from oil and keep aside for garnish. In the same pan, add the remaining onions and fry till lightly browned (may take 7-8 minutes on medium flame).
  • To this, add the ginger- garlic paste and sauté till raw smell disappears. Then add spice powders on low flame. Slide in the chopped tomatoes, add a splash of water. Cook the tomatoes covered until the tomatoes soften up. Then add the yogurt and combine well, add salt as needed.
  • Add half of the chopped coriander and pudina(mint) leaves. To this add the cleaned mushrooms (Don't add any water as mushroom leaves out water). Let this cook for 5-7  minutes until the mushrooms are well cooked, and the masala is thick gravy. Switch off flame.


  • Heat another frying pan on high and then place the mushroom gravy pot on top of this, reduce the flame to low. Add the cooked rice on top of this masala and level it up. Then add the saffron mixed milk, fried onions, chopped coriander, mint leaves and fried cashew and raisins. Cover the pan and place weight on top or seal the sides around the lid using atta. (I usually place weight). Cook on low flame for 20 minutes till it's done. Switch off the flame and wait for another 15 minutes before you open the pan. Mix well, and I served with raitha, pappadam and ada manga achar.


NOTES
* Add a pinch of salt when sautéing onions to speed up.
* Add biriyani masala if you have, or else add garam masala. I make my own batch and so use that.
* Add a tbsp of maida in a bowl of water and add the mushrooms in it. Wash the mushrooms immediately and remove from water, or else will absorb water.


Friday, August 27, 2021

Brinjal Gravy for Biriyani | Biriyani Side Curry

The first side dishes that goes along with a Kerala style biriyani is salad, papad and pickle. But when it comes to enjoy a Tamil Nadu style or Karnataka style biriyani, the meal is served with a brinjal gravy. Initially I never tasted the side which they served in restaurants along with biriyani. However, after a long time stay in Bengaluru I decided to try this once and was hooked by the flavours that paired well with the biriyani. Totally love the combo that I started trying this at home with the veg biriyani/ pulao. Kids are not into this gravy much, as they totally love pulao as it is. But H loves this gravy now, and so I keep making often. I wouldn't say this is an exact replica of what I tasted in restaurants, but this is somewhat same to that. Give this a try with your delectable biriyani and enjoy !!

Try out more sides like the brinjal gravy-


Preparation time ~ 30 minutes
Cooking time ~ 30 minutes
Author ~ Julie
Serves ~ 4-5 
Ingredients
brinjal 4-5 medium-sized
tomato 4
ginger- garlic paste 1 tbsp
onion 2 chopped
*chilly powder 1/2 tsp
turmeric powder 1/4 tsp
jaggery 1/2 tbsp
tamarind 1 lemon size 
black peppercorn 1 tbsp
mustard seeds 1tsp
oil 2 tbsp
coriander leaves 1tbsp
Salt to taste


Method
  • Wash and cut the brinjals in large cubes. Keep soaked in enough water. Grind the roughly chopped onion to a smooth paste, remove and keep in a bowl. Then add the tomatoes to the same jar and blend to smooth paste.
  • Soak the tamarind in water for 15 minutes and squeeze out the pulp. Use 1/4 cup pulp.
  • Heat oil(1 tbsp) in a pan and add the cut brinjal pieces after draining the water. Fry the brinjal pieces until halfway cooked.

                                               
  • Then, drain the pieces and keep aside. To the same pan, add the remaining oil. Splutter mustard seeds and black pepper corns. Add the ginger- garlic paste and sauté till raw smell disappears.
  • Pour the onion paste and sauté till the raw smell of onions disappears and onions gets cooked. Add the spice powders on low flame and sauté till raw smell disappears.
  • To this add the tomato paste and cook till the tomatoes are cooked, oil floats. Then add the tamarind pulp and add salt as per taste. Add the jaggery powder or piece and mix well. Cook covered on low flame till the gravy thickens.
  • Slide in  the brinjal pieces, add water as needed and cook covered again till the brinjal pieces turn soft(takes about 7-8 minutes).
  • Garnish with coriander leaves and serve warm with biriyani.                                        


NOTES
* I have used kashmiri chilly powder here, and so is the colour of the gravy. But ideally, this gravy is not very bright-colored. So use hot chilly powder for authentic colours.
* Use small sized purple variety brinjal for traditional feel.
* Use more jaggery if you love the curry more sweet, use more tamarind if you like it tangy. This is a balanced taste which you get.

Friday, July 02, 2021

Dindigul Thalappakatti Biriyani | Dindigul Chicken Biriyani (Step by Step Pics)

Our niece joined for a professional course at a reputed college in Dindigul last year and since then sis in law's family have visited Dindigul couple of times. They tasted this yummy biriyani in Dindigul and we also wished to visit her college and planned to taste this yummy biriyani soon. Unfortunately corona and lockdown cancelled all plans, she came back from hostel and continued with online classes and our trip got postponed and so goes the wait to taste the delicious biriyani. I have made up my mind to taste this biriyani in Dindigul whenever possible in the near future as soon as corona gets over, hopefully soon. Ever since I knew about this biriyani from friends and family I badly wanted to give this a try at home. This biriyani is a quick one pot meal unlike other biriyani as there is no elaborate step by step cooking, just warm up the whole spices and grind to a smooth paste. Also there is no much usage of onions(savala) except the shallots. The shallots, mint leaves, coriander leaves, green chillies, garlic cloves and ginger are ground coarsely which makes it easier to saute together unlike other Kerala style biriyani. 


I referred to the Dindigul food court video in YouTube and made this biriyani. The ingredients list was easily available items in our pantry but had no stone flower(kalpasi)and it wasn't easily available in grocery stores here so just left that out. This flower adds a special smoky aroma (as heard from friends), anyways will keep trying to get and keep it ready whenever I try next. This is more of a pulao kind biriyani and the rice is cooked with the chicken. The biriyani gets a yummy flavor as it gets cooked in the chicken stock and this biriyani is sticky compared to the other basmati type biriyani. Remember to fluff it with a fork and leave the lid open for 5-7 minutes before you actually serve it out. I was in a hurry to click pics and so couldn't wait much and so the rice looks a bit mushy though it wasn't overcooked. Do give this  a try if you love to try out different biriyani and am sure you will love this flavorful one, we all loved it !!


Preparation time ~ 20 minutes
Cooking time ~ 30 minutes
Serves ~ 5
Author ~  Julie
Ingredients
jeeraga shala(kaima) rice 2 cups
oil 3 tbsp
ghee 2 tbsp
curd 4 tbsp
water 4 cups
salt to taste
lemon juice 1 tsp
mint leaves 2 tbsp chopped
coriander leaves 2 tbsp chopped

to marinate (optional step)
chicken with bones(skinless) 500 gms
turmeric powder 1/4 tsp
hot chilly powder 1 tsp
salt to taste

to grind whole masala
coriander seeds 2 tsp
fennel seeds 1/2 tsp
pepper 1/2 tsp
cumin seeds 1 tsp
cinnamon 5-6 pieces 1'long
cloves7-8
mace 1
cardamom 3-4
bay leaf 1
kalpasi 1 small
star anise 1
cashews 5-6

to coarsely grind
shallots 15-20 (200 gms)
garlic cloves 10-12
ginger piece 1.5 ' piece
mint leaves a handful
coriander leaves a handful
green chilli 3


Method
  • Wash the chicken well and drain water completely. Make a marinate(optional step) using the ingredients listed above and keep aside for half an hour or refrigerate overnight. I usually refrigerate overnight that way helps to get the spices coated well in the chicken.
  • Warm up the whole spices and grind to a smooth powder in a blender jar. Remove on a plate and keep aside.

  • In the same jar, add the shallots, garlic cloves, ginger, green chillies, mint leaves and coriander leaves. Grind coarsely without adding any water.
  • Wash the jeeraga shala rice and soak in water for 15-25 minutes (use the soaked water to cook the rice helps retain flavor and nutrition).
  • In  a heavy bottomed pan, add oil and ghee. To this add the coarsely ground masala. Saute for 2-3 minutes till the raw flavor disappears and is cooked. To this add the ground whole spices(add chilly powder and turmeric powder at this stage if not marinating chicken, I usually add while marination so skip adding here). To this add the curd and mix well.
  • Then add the chicken pieces and saute for 3-4 minutes till the masala nicely coats the chicken. Then add a cup of water and add salt. Cook the chicken covered for 7-8 minutes.

  • Add in three more cups of water, lemon juice,chopped mint leaves, chopped coriander leaves  and salt. Finally toss in the soaked rice and cook covered.Place a weight on top of the lid and cook for 15-20 minutes. In between check the rice like about after half time just in case the water isn't dried up soon. Switch off flame and leave the lid open for 5-7 minutes, fluff the rice with a fork (else it becomes mushy).

  • Serve warm with raitha or a plain yogurt and sliced cucumber.

NOTES

* Remember that in this biriyani the spice comes from the green chilli, pepper corns  and hot chilly powder so increase if needed. This is a mild spiced biriyani.

* The chicken marinating step is optional and you may leave out that step but remember to add the chilly powder and turmeric powder in the masala then when you cook.

* Shallots adds a sweetness to the masala unlike the onions.


MORE BIRIYANI RECIPES

TRY THESE SIDES WITH BIRIYANI


Monday, November 23, 2020

Erachi Choru | Malabar Style Meat Rice ~ Step by Step Pics

Erachi choru or Malabar style meat rice is a simple rice compared to the elaborate biriyani. The meat is first cooked separately and then the rice is cooked in the gravy of the meat to get the complete flavor of the meat. This is a perfect one pot meal as the amount of meat is less compared to the biriyani meat. Unlike biriyani this doesn't use much ghee in large amounts and there are no much garnishes with fried onions, dry fruits and nuts. Kaima rice or jeerakashala rice is used to cook erachi choru but there are recipes using basmati rice to cook too. 

I have used basmati rice in this recipe but you can always use kaima rice or jeerakashala rice. Traditionally mutton or beef is used for erachi choru but you can always try out with chicken too. I wouldn't claim this as the original style of erachi choru as there are many variations of this same recipe in different areas in the northern parts of Kerala. I have followed a few recipes from the web and have modified slightly without much change to the original recipes. This rice tastes best when served hot and doesn't need any sides except for a dates pickle or biriyani chammanthi. The spices are less compared to biriyani but for a quick choice or one pot meal, this is a perfect choice. Do give this a try if you love one pot meal and enjoy.


Preparation time ~ 15 mins
Cooking time ~ 25 minutes
Author ~ Julie
Serves ~ 5-6
Ingredients
for marination
chicken / mutton / beef 500 gm (I have used chicken)
chilly powder 1/2 tbsp
turmeric powder 1/2 tsp
salt to taste

for cooking meat / chicken
onion 2 medium sliced (reserve 1/2)
ginger-garlic paste 2 tbsp
green chilly 3
tomato 1 large
lemon juice 3 tsp
chilly powder 1 tbsp
pepper powder 1/2 tsp
coriander powder 2 tbsp
oil 2 tbsp 
salt to taste

to cook rice
basmati rice 3 cups(600gms)
onion 1/2 reserved from masala sliced
ghee 2 tbsp
oil 2 tbsp
coriander leaves / malli ela 3 tbsp
mint leaves / pudina 2 tbsp 
whole garam masala - fennel seeds 1tbsp, cinnamon 2 strand, cloves 5-7, cardamom 3, bay leaf 1, shah jeera 1 tsp(I used cumin seeds), star anise 1
salt to taste
water 2 cups + 2 cups gravy = 4 cups


Method
  • Wash and clean the chicken. Rinse well, drain water and marinate using the ingredients listed above overnight or half an hour minimum (marination is optional in this recipe but I prefer doing this as broiler chicken takes time for the masala to get in).
  • Wash and soak the basmati rice in enough water.
  • Heat oil in a pressure cooker and then add the sliced onion(reserve 1/2 of 1 to use when making rice i.e. use 1 1/2 sliced onions). Add salt and saute till translucent, add the crushed ginger- garlic and green chilli paste. Saute until raw smell disappears.


  • Add chopped tomato and then add the spices on low flame (the tomatoes need not be cooked till mushy). Saute until raw smell disappears. And then add the marinated chicken. Mix well.
  • Then, add a cup of water and enough salt. Combine this well and close the pressure cooker. Cook for two whistles on high heat and then switch off flame. Wait to release pressure and then open the cooker. Drain the gravy from the chicken and measure the amount. Reserve the pieces in the cooker.


  • In another biriyani pot or non stick pan, heat the oil and ghee as listed. To this, add all the whole spices along with 1/2 sliced onion. Saute until lightly translucent, add the cooked chicken pieces and saute until its dry(may take 2-3 mins).


  • Then add in the chopped coriander leaves, mint leaves(3/4 th of it and reserve 1/4 th for garnish). Add the measured gravy amount(mine was 2 cups) along with 2 cups of water to cook rice. Also add 2 tsp lemon juice. Wait till the water starts to boil and add salt as needed. Add the soaked rice and cook covered for 20 minutes on low medium flame. Keep checking in between and mix to evenly cook rice and chicken. Garnish with reserved coriander leaves and mint leaves. Keep covered for 10 minutes and serve warm with biriyani chammanthi or dates pickle.


NOTES
* If you are using kaima rice or jeerakshala rice use water in the ratio of 1: 2 i.e. each cup of rice to 2 cups of rice.
* Feel free to add more ghee if you love the flavors or replace oil for ghee.
* The rice tastes best when served hot so prepare this rice just before serving. Also, steam any left overs before serving for best taste.