Print Friendly and PDF
Showing posts with label KIDS LUNCHBOX. Show all posts

Wednesday, July 26, 2023

Cauliflower(Gobi) Rice ~ Quick Lunch Box Veg Recipes

 Cauliflower is a versatile veggie and can be used in various forms in our daily meals. Most of the time, I end up making the gobi manchurian with veg fried rice for a weekend lunch. However, gobi is one veggie which kids don't make a fuss, and they love in whichever form they are served with. Check out a few of the recipes that are successfully running at home, taking turns. 

This cauliflower rice recipe is a little different from that of the usual cauliflower rice, where we add small florets and make rice. This recipe uses grated cauliflower and that can be cooked alone with the spices, and served as again 'cauliflower rice' for a low-carb version wherein there is no addition of extra cooked rice. The grated cauliflower itself resembles that of rice and is cooked just like that. 

However, this version of mine has cooked rice that I prepare for my kid's lunch box, which I don't plan for a low-carb version. This rice is quite simple to prepare and put together if you have cooked rice at hand. The only time needed is the blanching of florets and grating the florets (I used a manual grater, which otherwse can be done in a food processor quickly). The best part of this rice is that the rice tastes delicious, but hardly anyone notices the grated cauliflower in the rice, especially if you have some picky eaters. Give this a try and pack for the lunch boxes or a quick fix weekend brunch.


Preparation time ~ 15 minutes
Cooking time ~ 10 minutes
Serves ~ 4
Author ~ Julie
Ingredients 
to cook rice
basmati rice 1.5 cups
water 3 cups
salt to taste

to make cauliflower rice
cauliflower 400 g or a medium size one (2 cups grated)
ginger-garlic paste 1 tbsp
onion 1 finely chopped
green peas 1/4 cup
tomatoes 2 small chopped 
turmeric powder 1/2 tsp
hot chilli powder 1.5 tsp
pepper powder 1/2 tsp
fennel powder 1/2 tsp
garam masala 1/2 tsp
whole spices - cardamom 3, cloves 3, cinnamon 1' piece
water 1/4 cup
ghee 1 tbsp
veg oil 3 tbsp
salt to taste
coriander leaves 2 tbsp chopped


Watch on YouTube -


Method
  • Wash and soak the rice for 20 minutes. Boil water(3 cups) in a pan and add salt. Add rice when water starts boiling. Cook till done, switch off and keep covered till use. If you have cooked rice ready at hand, omit this step. I showed the step of making rice to share the amount of cooked rice needed for this recipe, which you can modify as per your need.
  • In a wide heavy bottom pan, add oil. To this add ginger-garlic paste and sauté a minute for the raw smell to disappear. Slide in the whole spices, followed by chopped onions.
  • Sauté onions until lightly browned, add a little salt to fasten the process. Then add turmeric powder and chilli powder on low flame, sauté until the spices are done. To this, add chopped tomatoes. Give a quick mix, cook covered until tomatoes are soft and cooked.
  • Add the green peas and grated cauliflower.Give a quick stir and add the remaining spices- garam masala, pepper powder, fennel powder on low flame. Combine and cook covered for 3 minutes on low flame.
  • Add 1/ 4 cup water and add salt. Combine well and cook covered for another 3 minutes. Adjust salt and add ghee, give a quick toss.
  • Finally, add in the cooked rice and mix gently. Add the chopped coriander leaves and switch off flame. Keep covered for 10 minutes and then serve (for the flavours to infuse in the rice).


NOTES
* I have used frozen green peas, you can use any others like fresh or dried. If using fresh or dried, cook accordingly and add.
* Fennel powder imparts a nice fragrance, add fennel seeds if you don't have powder. Add the fennel seeds when adding whole garam masala.
* I have used homemade garam masala, the link is here.

Monday, July 10, 2023

Palak Poori | Spinach Puri

The best thing about a palak poori is the natural green colour of these pooris.  They look so good, puffed up and decked up as if to attend a royal function, isn't it ? :D 
Pooris are not very healthy when it comes to counting calories, but I do make this once a month to keep kids happy. Palak is a great option to sneak in the poori dough, as my kids don't like spinach otherwise. I know that am not doing justice to the palak too, as some of the nutritionists may defend that the greens lose the nutrient value when fried. Anyway, not looking back on all that aspects and just want to share that we just loved the green pooris. If you would like to give this a try, go ahead and check below for full recipe.


Preparation time ~ 15 minutes
Cooking time ~ 20 minutes
Author ~ Julie 
Serves ~ 15 pooris (approx)
Ingredients
wheat flour 2 + 1/4 cup
salt 1/2 tsp
cumin seeds 1/2 tsp
veg oil 1 tbsp
oil for frying

to grind
spinach 1 small bunch
green chilli 1
ginger 1/2' piece


Watch on YouTube -


Method
  • Wash and clean the spinach leaves. Boil water in a pan and add salt. Add the cleaned spinach leaves to this water. Blanch for 2–3 minutes. Remove the leaves from water and add to ice-cold water (retains green colour). Then add the leaves to a blender jar along with ginger and green chilli. Grind to a smooth paste. The spinach purée was 3/4 cup.
  • In another bowl, add wheat flour(2 cups). Add salt and cumin seeds, mix well. Add the spinach purée little by little and knead to a smooth dough. Add 2 tbsp water to the jar and mix. The dough may be sticky at this point, so add the reserved 1/4 cup flour little by little. (Don't add any extra water). Finally, add the veg oil and mix. Cover and rest for 10–15 minutes.
  • Pinch out small lemon size balls and dip in flour, roll in circular shaped discs. Prepare a few before frying a batch of pooris.
  • Heat oil in a wok and add oil. To this, slide in the poori one by one to fry. Wait for a minute to puff up and then flip, fry both sides. Drain from oil once golden brown. Place on paper towels.
  • Similarly, make and fry all the pooris. Enjoy with some potato masala.

NOTES
* You can add carom seeds too or a dash of chilly powder instead of green chilli.
* The same dough can be used to make spinach chapathis if you don't like frying.
* The aloo masala recipe is here, check this link.

RELATED POSTS
* Ragi Poori


Saturday, June 03, 2023

Black Chana Pulao | Karutha Kadala Pulao | Lunch Box Special

Back to school !! 

And here starts the worry of moms as to what to send for lunch box each day. Kids love all sorts of junk fancy items and moms try to send them a healthy, filling meal. But one pot meals are liked by most of the kids as they don't have to think much and can just gobble down without much fuss if it's tasty. One such meal for today is preparing this black chana pulao in a pressure cooker. 
\
The work becomes much easier if you already have some boiled chana in the refrigerator. Just take out and add to make a filling healthy meal or a lunch box meal. Achari Chana Pulao is another interesting option made with kabuli chana, try that out too. Give this a try !!!


Preparation time ~ 10 minutes
Cooking time ~ 20 minutes
Author ~ Julie
Serves ~ 4
Ingredients
*karutha kadala / black chana boiled, 1.75 cups
basmati rice 1.5 cups
water 2.5 cups
onion, 2 medium-sized sliced
ginger-garlic paste 1 tbsp
tomato 2 medium-sized chopped
kashmiri chilli powder 1.5 tsp
hot chilli powder 1/2 tsp
coriander powder 2 tsp
garam masala 3/4 tsp
turmeric powder 1/4 tsp
salt to taste
coriander leaves 2 tbsp chopped
vegetable oil 3 tbsp
lemon juice 2 tsp

Watch on YouTube-


Method
  • Wash and soak the basmati rice in water for 20 minutes.
  • Soak the chick peas overnight and then cook as you regularly do in a pressure cooker. Keep the cooked water for gravy. Drain half cup of the boiled chick peas in a blender jar and pulse twice without adding any water. Keep aside.  
IMPORTANT- I have used 3/4 cup dry chick peas= 1.5 cups soaked chick peas = 1.75 cups boiled cooked chick peas for 1.5 cups basmati rice.I have mentioned each of the measures of chick peas so that it becomes easy if you are directly trying out the recipe with some leftover cooked chick peas. Modify the rice quantity to your available cooked chick peas and make pulao.
  • Heat a pan and add oil. Add the ginger-garlic paste. Sauté until raw smell disappears. Slide in the onions, curry leaves and sauté until lightly browned.
  • Add the turmeric powder, hot chilli powder, kashmiri chilli powder, coriander powder and garam masala. 
  • Add the tomatoes and cook till the tomatoes are mushy.
  • Add the ground chick peas and mix well. Then, add 1 cup of the chickpeas cooked water. Add the remaining boiled chick peas and cook covered for 5 minutes.
  • Then add the 2.5 cups water, add the lemon juice, and finally add the drained rice and few coriander leaves.
  • Cook for two whistles on high. Finally, add the remaining coriander leaves once the lid is opened. Fluff with a fork and enjoy with yogurt and cucumber.

NOTES
IMPORTANT- I have used 3/4 cup dry chick peas= 1.5 cups soaked chick peas = 1.75 cups boiled cooked chick peas for 1.5 cups basmati rice.I have mentioned each of the measures of chick peas so that it becomes easy if you are directly trying out the recipe with some leftover cooked chick peas. Modify the rice quantity to your available cooked chick peas and make pulao.
* You can add 2 tsp of ghee too, but I kept it very simple for lunch box.
* You can try the same recipe with white kadala (kabuli chana) too.
* Grinding half of the chick peas and adding makes the pulao tastier.
* I haven't added whole spices in this pulao as kids don't like separating them out in their lunch box.

RELATED POSTS


Sunday, May 14, 2023

Chicken Sandwich ~ Lunchbox Ideas

What is your favourite sandwich ?? I love all kinds of sandwiches, but this chicken sandwich is a family favourite. This chicken sandwich is a filling yet tasty one that can be prepared quickly for a brunch or picnic, or for a lunch box for kids. This sandwich can be had with or without toasting the bread, both ways taste good. The only time needed to make this sandwich is the cooking of chicken and shredding. Do give this a try and I would love to hear the feedback too !!


Preparation time ~ 10 minutes
Cooking time ~ 20 minutes
Serves ~ 6 sandwiches
Author ~ Julie
Ingredients
chicken 250g
salt 1/2 tsp
pepper powder 1/2 tsp

onion 1 small fine chopped
carrot 1 small (1/4 cup) 
capsicum 1/4 cup
coriander leaves 2 tbsp
mixed herbs 1 tsp
chilly flakes 1 tsp
mayonnaise 4 tbsp

bread 12 slices
unsalted butter 2-3 tbsp, softened


Watch on YouTube -


Method
  • Wash, rinse and cut the chicken in bite size pieces. Cook the chicken with salt and pepper powder, add 1/4 cup water. Cook covered for 6–7 minutes until done. The water is used up while cooking, if not, drain the chicken pieces and cool slightly. Shred the chicken pieces using a fork in thin strands (don't use a mixer as it gets fine minced).
  • To a bowl, add the shredded chicken, fine chopped carrots, onion, capsicum, mixed herbs, chilly flakes, salt lightly.Add mayonnaise and give a quick mix. Refrigerate for 30 minutes to 1 hour for flavours to set (optional step but gives a nice flavour). Add the chopped coriander leaves, give a quick toss. (I have not added any salt in the filling as cooked chicken contains salt, if you wish you can add)
  • Apply the butter and spread the sandwich filling. Spread butter on the other side of the bread, top up with another slice. Spread butter again and place on heated tava or frying pan. Smear butter on the top bread slice and flip. Cook another 30 seconds until toasted.
  • Similarly, make all the other sandwiches. Enjoy warm with a dash of ketchup !!

NOTES
* Adding carrots is optional, or you can add grated too. But we love fine chopped carrots as it adds a little crunch in between.
* You can even sauté the veggies and add to the sandwich.
* The refrigeration helps the filling to bind together with spices, mayonnaise and ketchup.
* Add ketchup along with mayonnaise and can be prepared too.
* You can even add mashed avocado instead of mayonnaise.In that case, add few tsp of lemon juice too.

Wednesday, August 24, 2022

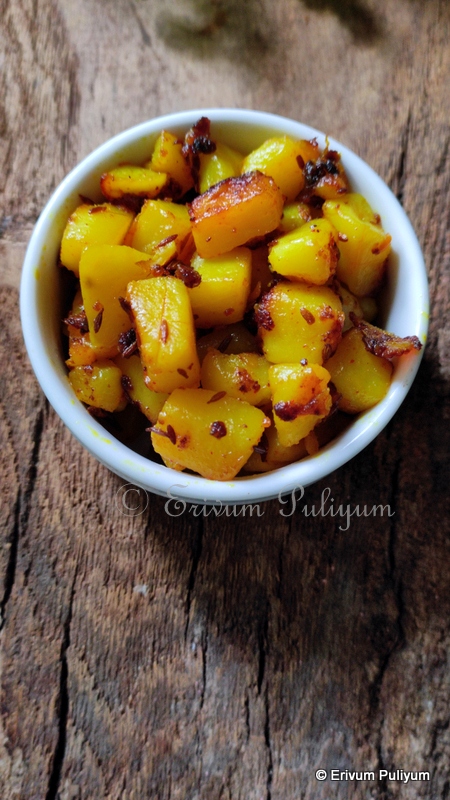
Jeera Aloo | Cumin flavoured Potatoes | Urualakizhangu Jeerakam Fry

Preparing morning breakfast along with kid's lunch box is a hectic task for all moms. You literally have to look out for quick fixes for breakfast or lunch so that both are ready before they leave to school. I also try preparing recipes from scratch and hardly rely on package foods. Therefore, this jeera aloo recipe is one such quick fix recipe that I make with lemon rice for them frequently and kids love this combo very much.

This is a very simple recipe that is ready in a few minutes, and so give it a try if you haven't. The jeera (cumin seeds) gets nicely struck to the potatoes and the potatoes are nice crisp and delicious. Watch my Instagram handle for jeera aloo reel, OR YouTube #shorts on this recipe.


Preparation time ~ 10 minutes
Cooking time ~ 10 minutes
Serves ~ 3
Author ~ Julie
Ingredients
potato 4 medium-sized, cubed small
crushed garlic 2 tsp
jeera (cumin seeds) 2 tsp
turmeric powder 1/4 tsp
chilly powder 1/2 tsp
salt to taste
oil 2tbsp


Method
  • Peel, wash and cut the potatoes in cubes. Leave soaked in water till use.
  • In a pan, add oil. To this add cumin seeds. When it crackles, add crushed garlic and sauté till raw flavours disappear.
  • Then slide in the cubed potatoes. Add turmeric powder, chilly powder and salt. Mix well and cook covered for 5 minutes on low flame. The potatoes get cooked in the steam when cooking on low.
  • Check for salt and add a few splashes of water if needed. Finally dry up any moisture and switch off flame.
  • Enjoy with lemon rice or steam cooked rice.

NOTES
* You can omit adding crushed garlic if you wish, but I like the crisp fried crushed garlic pieces in this stir-fry and for reducing gas ailments due to potatoes, garlic is good.


RELATED POSTS (Stir Fries)-


Friday, May 06, 2022

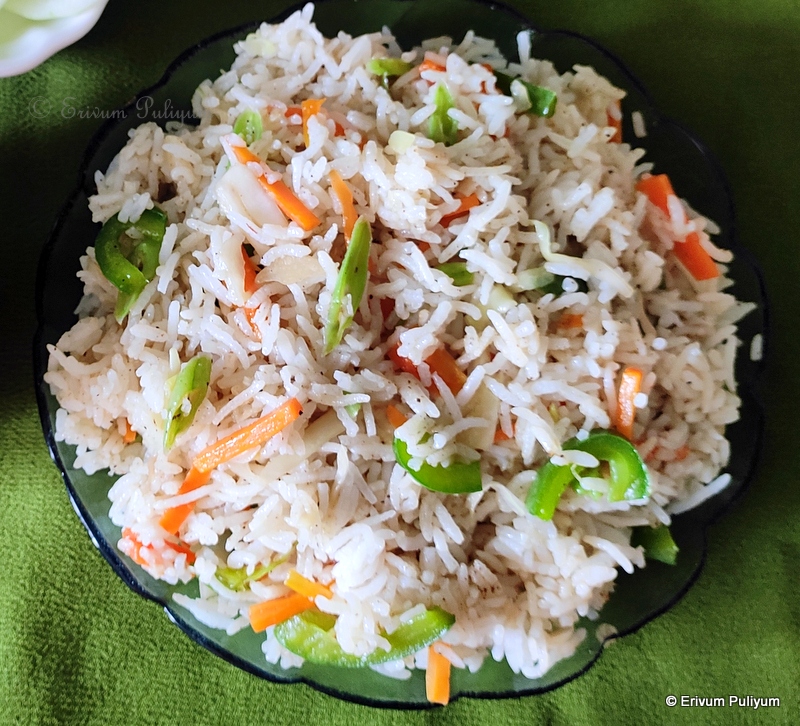
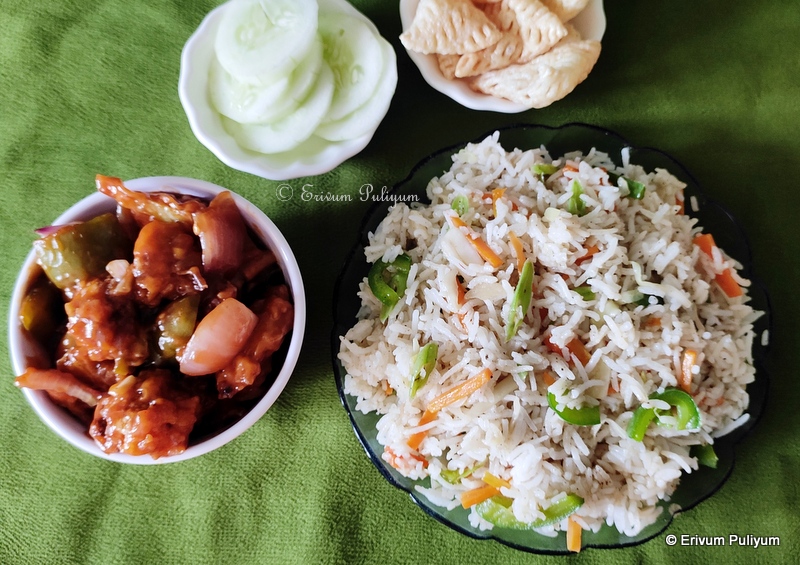
Veg Fried Rice | Vegetable Fried Rice (without sauces)

Fried rice is one of the quickest recipes that I would say you can prepare in no time. I do make egg fried rice or veg fried rice as they do with sauces. However, these days I have started to make this veg fried rice without any sauces. The difference that I felt is that this rice has no sauce flavours and this rice needs a side like Gobi Manchurian to pair with. Otherwise, texture wise the rice is fluffy, healthy and delicious for a quick fix meal. 


If you like fried rice and don't like using sauces, then this the right choice. You may even scramble two eggs in this and whip up an egg fried rice without sauces. As we were observing lent before Easter, so I avoided eggs in this recipe. Julienne cut the veggies so that it gets cooked faster and use an anodized pan or an iron wok to prepare fried rice. Use cooked cooled rice or refrigerated leftovers to prepare fried rice, otherwise the texture will be mushy. Try and enjoy !!


Watch the full recipe video-


Preparation time ~ 15 minutes
Cooking time ~ 15 minutes
Author ~ Julie
Serves ~ 4-6
Ingredients
for cooking rice
basmati rice 2 cups
water 3 cups
salt

for making fried rice
capsicum/ green bell pepper 1/2 cup thin sliced  
cabbage 1/4 cup thin sliced
beans 1/4 cup thin sliced
carrots 2 thin sliced
garlic chopped 2 tbsp

pepper powder 1 tsp
garam masala 1/2 tsp
salt to taste
oil (any neutral) 3 tbsp


Method
  • Wash, rinse and soak rice for 20 minutes and then cook in a pressure cooker. In a pressure cooker, add the water and salt. Bring to a boil, add the rice and cook for 10 minutes or till water gets absorbed and rice is cooked and fluffy. Transfer the cooked rice to a plate and leave to cool.
  • In the meantime, heat oil in a pan and add chopped garlic. Sauté until lightly crisp. To this add chopped cabbage and beans. Then add sliced carrots and capsicum, sauté again for 2 minutes.
  • Then, add the pepper powder and garam masala. Mix well. Add the cooked rice and gently mix the rice with the sautéed veggies. Give a quick toss and simmer for a minute covered on lowest flame. Finally, serve warm with any manchurian of your choice or just tomato ketchup.


NOTES
* You can add a sliced onion too.
* If you wish to make using sauces then, add a tbsp of light soy sauce and  1.5 tsp of chilli sauce for this measure. Omit adding pepper powder and garam masala in that case.
* If you have left over cooled rice, then can use that to make fried rice, which is easier.

RELATED POSTS
VEG SIDES

NON-VEG SIDES


Friday, April 16, 2021

Grilled Peanut Butter- Banana(Plantain) Sandwich

Sweet Sandwich ? Definitely not my kind of thing but my kids come up with such crazy ideas and this is born out of them. I was sure am not going to taste this but did make it for them. However after the grilling the cinnamon, ghee and peanut butter wafted out that I could hardly resist my taste buds. Sandwiches to me were always a savory version and I loved it that way. For a change I must admit that this also tastes delicious for a tea time snack, I wouldn't like it for breakfast though.

This sandwich is quite simple to make with minimal ingredients and I have used plantains in this recipe. You can use regular bananas too but here I have to find ways to finish off  plantains and so tried out this sandwich. I have tried many recipes with plantains earlier which are listed below at the end of the post, please check if interested. II have used peanut butter but if you or your kid is allergic to peanuts then try chocolate- almond spread which should work fine too. Am sure you will love it!!


Preparation time~ 10 mins
Cooking time ~ 5-7 mins
Author ~ Julie
Serves ~ 6 sandwiches
Ingredients
bread slices 6 
peanut butter 2 tbsp
banana 1 sliced 
unsalted butter 1 tsp + 1 tbsp
brown sugar or white sugar 2 tsp 
cinnamon powder 1/2 tsp


Method
  • Heat butter in a pan, add the banana slices. Add in the brown sugar or granulated white sugar and mix well. Wait till the banana slices are carmelized. Finally, add the cinnamon powder and switch off  flame.


  • Spread the peanut butter on one slice and then arrange the caramelized banana pieces(I prepared caramelized bananas in two batches and so cut both in different ways, one sliced & one chopped). Close with another slice of bread.
                                           
  • Apply butter or ghee on top of the slice and invert on the pan with the buttered side up. Grill the bread and then cut in two diagonally . Pour chocolate sauce on top (optional) and then serve warm.


NOTES
* You can use white granulated sugar instead of brown sugar.
* I have used homemade peanut butter and so its a bit chocolaty peanut butter than the color of  the original peanut butter. You can use store peanut butter or use almond chocolate spread or nutella too.
* I have used ghee instead of butter for grilling. You can use whichever you prefer.
* You can use regular dole or robusta bananas to make this sandwich too instead of plantains.

RECIPES THAT I POSTED USING ETHAKKA(NENDRAN PAZHAM )-


Monday, June 01, 2020

Aloo Roti | Kizhangu (Potato) Chapathi ~ Step by Step Pics

Most of my paratha recipes that I posted here so far has been repeated n number of times and everyday to recreate something different has been challenging too. My elder one hardly like regular chapathis unless it is served with a potato curry or chicken curry. So one way to make him eat chapathis is to stuff chapathis and make them as parathas. And that's the time I stumbled upon this aloo rotis and I liked the part that these use less potatoes compared to stuffed aloo parathas. Aloo roti is a simple chapathi that's definitely a lighter version of aloo paratha. Its much more simpler to prepare than the stuffed aloo paratha. Unlike regular rotis these rotis are soft and can be rolled to enjoy. My kids totally loved this version of rotis and I was more than happy that these could be served with a simple raitha or just like that. Ghee is smeared on top which adds further to the softness of these rotis. The layers can be easily separated and you hardly need a side to go with these if served warm. The spices are added to the flour along with cooked mashed potatoes to knead to a smooth dough. The only care you must take is to first knead the dough with mashed potatoes and then add water little by little to make a smooth dough or else you may end up with a sticky dough. Try these out at home.


Preparation time ~ 10 minutes
Cooking time ~ 20 minutes
Serves ~ 10 rotis
Author ~ Julie

Ingredients
wheat flour / atta 2 cups
aloo / potato 3
ginger garlic paste 1 tsp
chilly powder 3/4 tsp
turmeric powder 1/2 tsp
carom seeds / ajwain 1/2 tsp
cumin seeds 1/2 tsp
*mint leaves (pudina) 2 tbsp chopped
salt to taste
water to knead 1/3 cup (approx.)


Method

  • In a cooker, add the potatoes and boil them  for 3 whistles with salt and water. Remove from heat and peel the skin off. Mash the potatoes very well and keep aside.

  • In a bowl, add the wheat flour, cumin seeds, carom seeds, chilly powder, turmeric powder, salt, chopped pudina (mint leaves). To this add the mashes potatoes and start to knead. As you do, combine the flour with mashes potatoes and spices (don't add any water till you feel there is need for water in the flour. Add water little by little to knead the dough to a smooth dough like chapathis. Rest the dough for 10 minutes.
  • Pinch out small portions of dough like we do for parathas. Roll out very thin by dusting flour, and then apply oil, fold the chapathi and apply oil again. Re-roll the folded roti like we do for parathas. 

  • Heat a pan and wait till its hot. Slide the made rotis and cook both sides by flipping. Apply oil or ghee.
  • Repeat the same steps till you finish making all rotis. Serve warm with raitha.


NOTES
* I love mint flavor and so use them frequently in all dishes. But if you like coriander leaves then go ahead and use that.


.

Thursday, February 20, 2020

Spinach - Corn Rice | Palak Rice ~ Lunch Box Special

Its been quite a few days since I posted something here. The reason being simple, I just got pre occupied with several other things that I hardly got time to pen down the drafts and publish them. So sorry dears. Anyways wish I have this energetic feel always to keep my blog space ready to publish all posts consistently. Today's post is a simple lunch box rice that takes hardly anytime to put together. Whenever mom prepared dishes out of these greens, I used to shy away as spinach was a big 'no' to me as a child.
But as I grew up and started understanding the good health benefits of spinach, I started using spinach in my cooking. Gradually this soft corner for palak helped me to try out variation of spinach recipes which would be acceptable to all especially my kids. The elder child is particular about a few peculiar tastes and so he doesn't like spinach. However spinach in the pureed form hardly tastes anything like spinach greens when it is ground along with a few cashews and added to this rice. The ground paste of grated coconut and cashews adds the needed fat to the rice to make it soft and doesn't make the rice dry out when mixed with spinach puree. The beautiful green color of this rice makes it stand out and definitely a kiddo pleaser too. Corn adds a nice sweetness to the rice which balances the flavours of palak. These are my home grown organic batch of spinach and so I plucked them before its very mature as baby spinach and so tasted delicious. The fried raisins in the rice is purely optional but my kids love cashew or raisins in these one pot meals and so I do add them. Do give this a try and am sure all will love it !!


Preparation time ~ 20 mins
Cooking time ~ 20 mins
Author~ Julie
Serves ~ 3 
Ingredients
rice 1 cup(basmati / sona masoori)
frozen corn kernels 1/2 cup
oil 3 tbsp
raisins  1 tbsp
turmeric powder 1/4 tsp
salt to taste

to grind
palak 1/2 bunch or 1 cup chopped
grated coconut 1/4 cup
cashews 10
ginger 1 " piece
garlic 4-5 cloves
green chillies 2 broken


Method
  • Soak the cashews in a bowl of water for about 20 minutes.
  • Wash and chop the palak(spinach). Blanch the palak and keep aside ( how to blanch palak- In a bowl of hot water, add the spinach leaves for about 40-45 seconds till stems are wilted.Immediately drain water and add in a bowl of cold water to stop cooking process. Drain water and use).

  • In a mixer jar, add the grated coconut, ginger, garlic, green chillies, cashews and blanched palak. Add a tbsp of water to grind to a smooth paste.
  • In the meantime, cook the rice as per packet instructions or rice variety. Keep aside to cool.
  • In a pan, heat the oil. Add in the raisins, wait till its golden brown. Drain and keep aside.In the same oil add the corn kernels. Saute the corn for about 1 minute and add the ground paste. 

  • Wash the blender jar with 3 tbsp of water and add. Cook till the masala is cooked well for 2 minutes, add salt and turmeric powder. Add in the cooked rice, mix well. Adjust salt if needed. 
  • Cook covered for a minute and switch off flame. Add in the raisins and mix well.Serve warm with cucumber raitha and fried fryms. Enjoy !!


NOTES
* I didn't feel the need to add chilli powder as 2 green chillies were added as paste. But if you still feel to increase the heat then feel free to do so.
* I  have used frozen corn, thawed and used. If you use fresh corn kernels,then cook and use.
* You can use frozen green peas too instead of corn kernels.


Sunday, January 26, 2020

Tricolor Sandwich | Chutney Sandwich

India celebrates its 71 st Republic day on this day with great fervour and zeal. Republic day always reminds me of the republic day parade and am happy that I could once attend the parade when we resided in New Delhi. The chill mornings of January in Delhi is hard to sit out but people from all over the country line up early in the morning to witness the parade wearing sweaters, jackets, caps and wrapped in shawls. If we think of the soldiers patrolling at the borders in Siachen , the freezing temperatures they handle then the winters of Delhi is nothing. Now, I love watching the Republic day parade every year in TV showcasing our Indian Military might which is one of the important events of the year. There are also tableaus, folk dances representing different states, bike stunts and air shows during the parade. I feel proud to be a part of this rich heritage and culture. Proud to be an Indian !!

Today's recipe is a simple sandwich that you can make in no time but these chutneys represent a foody representation of our flag colours. Hope you like it. The sandwich uses both green chutney and tomato chutney. If you have both ready at hand this sandwich can be prepared in no time. Enjoy making these any time for snacks or if you love sandwiches for breakfast.


Preparation time~ 10 minutes
Cooking time ~ nil
Serves ~ 2
Author ~ Julie

Ingredients
bread slices 6
spicy green chutney 3 tbsp
tomato chutney 3 tbsp


Method
  • Prepare the chutneys or use store brought spicy green chutney and make the tomato chutney as in the link.
  • Cut the sides of the bread (I have used regular bread but its better to use sandwich bread).
  • Now spread the tomato chutney(1.5 tbsp) on one layer and then place a bread. Then apply the spicy green chutney on the second bread and finish by placing a third slice on top.
  • Lightly press by placing a small weight on the bread for 5 minutes. Then cut diagonally and serve.
NOTES
* You can butter the inside of each slice of bread and lightly toast them to add more flavor. I did this for kids but for us kept it plain.


MORE TRICOLOR RECIPES FROM THIS SPACE- 
*Tricolor Puttu
*Tricolor Suji Cookies
*Tricolor Idlis


Thursday, February 21, 2019

Beef Paratha | Erachi (Meat) Paratha ~ Step by Step Pics

Parathas are always a happy dinner or quick lunch pack at my place for the boys, but to me its like serving an incomplete mealt(though its complete in itself )if you look on the nutritional part. That's because kids don't like any sides with parathas and just enjoy them rolling these up.H is not a big fan of parathas and he definitely needs a side like yogurt or raitha with parathas. Aloo parathas are the commonest one that they love most. Earlier I posted one non veg parathas so far that is using eggs- egg parathas and no other were tried unless I got to try this one.


Beef paratha was introduced to me by my cousin, all credits to L. His wife had prepared this for their dinner and over a casual phone call to him, got to know that he was having beef parathas. Though the call dropped minutes later, the blogger in me arose hinting I had to give beef parathas a try. I tweaked my own version of making the masala and finally made it. Though beef is one of my family favorite,I don't get it home frequently(may be once in two months or so). Then when I got beef, I had this in mind to try out the parathas with beef. And finally I tried out the parathas, kids were mad over them and I had to repeat making again the second time too when I bought beef. All loved it and if you love beef am sure you will love rolling up these parathas for a quick dinner or lunch pack. I made them for dinner and so the pictures were taken at night. The parathas can be had with a dollop of ketch up or just like that. You can even make the filling ahead and refrigerate to prepare the parathas thereafter. Do give this a try !!


Preparation time ~ 20 minutes
Cooking time ~ 25 minutes
Author ~ Julie
Serves ~ 8 parathas
Ingredients
to cook  beef 
beef  200 gms
turmeric powder 1/2 tsp
pepper powder 1/2 tsp
salt

to make masala
onions finely chopped 1 medium sized
shallots/ kunjulli 1 cup sliced
ginger-garlic paste 1 tbsp
green chillies / pachamulakku 2 finely chopped
tomato / thakkali 1 small chopped
chilly powder / mulaku podi 1 tsp
turmeric powder / manjal podi 1/2 tsp
garam masala 1/2 tsp
curry leaves a sprig
oil 2 tbsp
salt to taste

to make parathas
wheat flour 2.5 cups
salt
water
ghee to smear


Method

  • Wash and rinse the cubed beef 3-4 times. Drain all water, add the beef to a cooker with 1/4 cup water, salt, pepper powder and turmeric powder. Cover and cook till done for 4-5 whistles or till done(the cooking time may vary as the beef so keep a watch accordingly).
  • Knead the wheat flour and make a dough like we do for chapathi dough. Keep covered for 20 minutes.
  • To make filling- Heat oil in a pan and add the ginger-garlic paste. Saute till the raw smell goes. Slide in the onions, green chillies, curry leaves and shallots, saute till its translucent.

  • Add in the spices on low flame and saute again till raw smell disappears. Add in the tomato and give a quick toss. Keep the pan covered for tomatoes to get cooked and mushy. Finally add in the minced meat(beef) and mix well. Add salt slightly as needed(be careful as cooked beef already has salt in it). Cook covered for another minute till the spices are blend well with the mixture. switch off flame and leave to cool.

  • To make parathas- Make balls larger than for making a chapathi and roll out a 3 cm large disc. Place about 1- 1.5 tbsp of filling in the center and close by bringing the edges together to the center. Seal and dip in dry flour. Flatten a bit using hands and then roll using rolling pin until the parathas get shape. 

  • Heat a pan and wait till its hot. Transfer the parathas on the pan and cook both sides by flipping. Smear ghee or oil on both sides and serve on  a plate.
  • Repeat the same step for making other parathas similarly. Serve warm.


NOTES
* You can add coriander leaves to the masala. I didn't have it ready at hand and haven't added.
* You can try making the same with minced chicken too to make chicken parathas.
* You can use minced beef instead of cooking and mincing too. I that case directly add to the masala mix and cook covered till done.
* You can even make the filling of the parathas ahead and refrigerate. The parathas can be made instantly thereafter.

Check out this link for more parathas and Indian flat bread recipes here.