Print Friendly and PDF
Showing posts with label DIABETIC FRIENDLY. Show all posts

Tuesday, February 22, 2022

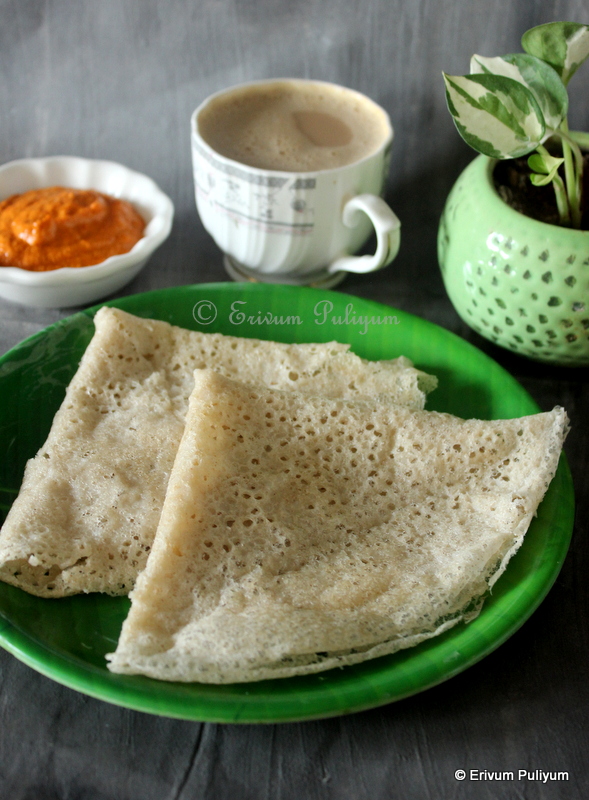
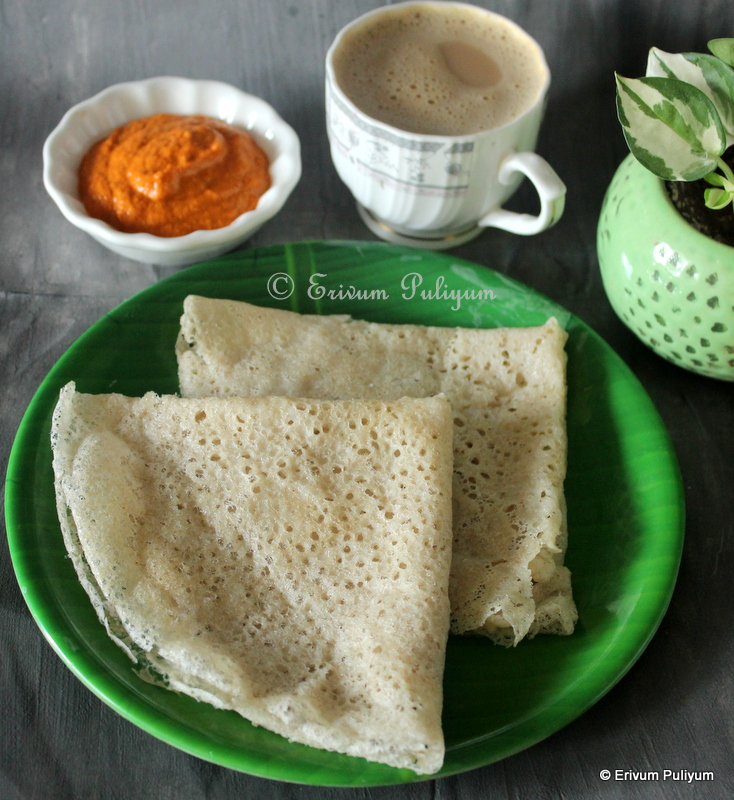
Barnyard Neer Dosa (VIDEO)

Barnyard neer dosa is an instant healthy dosa that can be quickly prepared without any fermentation. This dosa is a healthy breakfast option to all those who would like to avoid rice. Though you get store brought millet flours in stores, but I have used homemade millet flour that I prepare at home. The recipe link for making millet flour is already shared here. Taste wise these millets neer dosa don't taste anything obvious but the colour of these neer dosa is off-white than white. 

The only difference that I found in making these millets dosa is that it takes a little more time than usual neer dosa to cook. So wait patiently before you flip the dosa. Mangalorean neer dosa, the traditional one or millet neer dosa, I love them with a tangy chutney like tomato chutney, kunjulli chutney or mint chutney. How do you like to pair these crispy and light dosas ? You can even serve these with chicken sukka .Try these out and am sure you will love these.


Preparation time ~ 15 minutes
Cooking time ~ 10 minutes
Author ~ Julie
Serves ~ 4 neer dosa
Ingredients
barnyard flour 1/2 cup
cooked rice 3 tbsp
grated coconut 3 tbsp
salt to taste
water 1 cup


Method
  • Add the barnyard flour in a bowl. Add 1/2 cup water to this, mix well without lumps.
  • Take the cooked rice and grated coconut, add to a blender jar and add water. Grind till smooth and add to the barnyard batter. Combine well, add salt  and get a batter without any lumps. The batter shouldn't be very watery, but thinner than dosa batter.
  • Heat a non-stick pan and when the pan is really hot. Pour a ladleful of batter and swirl the pan to even out the batter. Cook till the sides are crisp and starts to leave the pan(may take longer than usual neer dosa batter). Add few drops of gingelly oil.
  • Flip the other side and cook for another 45 seconds. Repeat making the other barnyard neer dosa. Serve with tomato chutney or pudina chutney.


NOTES
* I have already posted the barnyard flour making from scratch, please refer the link.
* You can make this neer dosa using other millet flours too.

RELATED POSTS
* Barnyard Idlis

FOR MORE MILLET RECIPES, CLICK HERE.


Monday, September 20, 2021

Chakka Podi Puttu | Steamed Raw Jackfruit Powder Puttu


When you wish to reduce your carb load, yet would like to enjoy the traditional Kerala breakfast, then try these low-carb options. I have already shared the recipes of preserving raw jackfruit by sun drying the pieces and storing to powder, use this Raw Jackfruit powder in different recipes. It's good for diabetics to reduce the glycaemic load, and it also has more soluble fibres, thereby reducing the cholesterol. Raw jackfruit has many other benefits too, as it prevents colon cancer says research, and is a low acid veggie.

I have already shared a few recipes that I gave a try using this podi and today's recipe is yet another healthy alternative to malayalis favourite breakfast. I tried making puttu with the raw jackfruit powder and came out really soft and yum. These days I have been making frequently as I have a good pack of raw jackfruit well-preserved at home. The preserve should get over before the next season to make a new batch. You can prepare this puttu using raw jackfruit powder alone, but adding a little puttu podi gives a lighter feel as puttu podi is a little coarsely powdered than the raw jackfruit powder. If you don't have homemade raw jackfruit preserve or powder, we do get raw jackfruit powder in supermarkets under different brand names. You can even try using that and make puttu. Enjoy this puttu with kadala curry or ripe bananas.

Check out more jackfruit powder recipes
1. Chakka Podi Idli 


Preparation time ~ 15 minutes
Cooking time ~ 5 minutes
Serves ~ 1 kutti puttu
Author ~ Julie
Ingredients
chakka podi 1 cup
rice flour or puttu podi 1/3 cup
salt to taste
grated coconut 1/2 cup


Watch on YouTube -


Method
  • Mix both the flours and add salt. Pour water little by little to wet the flour like coarse bread crumbs. When you press the dough in your palms, it should hold shape.
  • Add enough water in a cooker and cover the lid. Place on flame without weight.
  • Then in a mould, add the grated coconut then add the flour mix alternating till you reach the top. Finally, add grated coconut to finish filling the mould.
  • Place the mould over the cooker without weight. Steam cook for 4-5 minutes or till the steam seeps up in the puttu maker for a few minutes and is ready.
  • Remove from the mould to a plate and serve warm with bananas or kadala curry or fish molly.

PUTTU VARIETIES


Monday, April 12, 2021

Chakka Podi Idli | Raw Jackfruit Powder Idli (Step by Step Pics)

After posting the chakka podi(raw jackfruit powder), here comes my tried and tested version of the frequently made recipe of idlis using chakka podi. These idlis are made similar to ragi idlis with flour mixed with idli batter. These idlis are very soft but don't puff up very high. Taste wise there is no difference but texture wise its a bit stickier than regular idlis. However, the main advantage of these beauties is that it definitely reduces your carb load thereby keeps a check on your weight and sugar levels per se. Chakka podi aka raw jackfruit powder is available in markets these days and if you don't get a chance to make your own batch then try these idlis with that pack. Please do let me know too how it turned out and enjoy !!


Preparation time ~ 10 mins
Cooking time ~ 15 mins
Author ~ Julie
Serves ~ 8 idlis
Ingredients
salt to taste


Method
                                             
  • Leave to ferment overnight or 6 hours. Add salt once fermented and pour in a idli mould. Steam cook for 12 minutes, it takes a little longer than regular idlis.

                                           
  • Cool the idli plates slightly and invert or scoop out on plates and serve with sambar or chutney. We served with sambar and pudina chutney.
Check this link for more chutney recipes here. 


NOTES
* Adding salt before fermentation can also be done, but i prefer adding after fermentation.
* Remember to smear a little oil in moulds before pouring the batter.
* Steam cook for 12-13 minutes or tooth pick inserted comes out clean.
* These days you get store brought chakka podi too, you can use that incase you don't plan to make your own flour.


CHECK OUT DIFFERENT VARIETIES OF IDLIS FROM THIS SPACE:


Monday, August 31, 2020

Thena (Thinai) Pradhaman | Foxtail Payasam (Kheer) ~ Step by Step Pics

Wishing all my dear friends a Happy Onam !!
This year Onam in Kerala is a cautious and caring one in view of Covid -19 just like all other festivals that crossed so far. Anyways let's hope that things return to normalcy soon and we can move around more freely esp children. So we have no guests this year and so its a silent Onam like without much happenings except for the usual sadya.I made a small sadya for uthradam and thena pradhaman was the highlight of yesterday. Thena (foxtail millet) is a nutritious millet highly beneficial for diabetics. The magnesium in this millet helps to increase insulin secretion and thereby reducing sugar levels..An essential amino acid called 'lysine' is found in this millet which otherwise is not produced in the body. The high antioxidant activity flushes out acidity in the body. Thena is also rich in copper, zinc, calcium, magnesium and iron mineral which helps boost immunity. It is rich in calcium and is easily digestible.


Let me be honest here, I was tasting thena pradhaman for the first time. I have prepared kanji earlier with this millet which is also healthy. Foxtail millet was introduced to me from the blogosphere. I saw many of my friends using many millets. The only millet I knew was finger millet or ragi until I started adding other millets to our staples. I use barnyard millet to make idlis and dosas. These days millets are easily available in super market aisles and can be bought.


Pradhaman and payasam are the highlight of any sadya. As far as my understanding goes, pradhaman is thick and rich and is double cooked unlike the payasam which is single cooked. Double cooked means cooking the grains or fruits first and then adding to make payasam. Payasams like vermicelli is made directly in the boiled milk. Coming back to today's pradhaman, tastes delicious and is rich in coconut milk flavors. The cooked thena looks and tastes similar to nuruku gothambu or mulayari pradhaman. The only tedious job that I felt when cooking the thena is that you need to remove the husk and then use. But if you get cleaned foxtail millet then this work is easier. If you get a chance to try this out, always go ahead and give this pradhaman a try and enjoy.


Preparation time ~ 15 minutes
Cooking time ~ 30 minutes
Author ~ Julie
Serves ~ 7-8 bowls
Ingredients 
*thena (thinai/ foxtail) millet 2 cups (refer notes)
cherupayar / whole moong dal 1/4 cup
jaggery 2.5 cups grated
cardamom powder/ elakka podi 3/4 tsp
ghee 2tbsp + 1 tbsp
cashews 2tbsp
raisins 2 tbsp


Method
Look for stones, sticks and other impurities in thena. Then add a tbsp of water to the thena and keep for 5 minutes. Add this thena to a blender jar and pulse 3-4 times till the husk is removed. Now transfer this to a plate or moram and shake to separate the husk and gently blew the husk portion. It may be easy to remove the husk then. If you still feel there are more husk then repeat the procedure by adding few drops of water and pulsing in blender. I referred this video here to remove the husk from thena. Though I took 2 cups of thena before cleaning and got only a cup after cleaning.Rinse the thena completely under running water thrice to remove any husk remaining and other dirt.


In another pan add the whole moong dal and fry roasted for two mins. Then add this to a blender jar and pulse 2-3 times till the dal look separated and outer skin is removed slightly. Rinse this dal under running waterfor 2-3 times till the outer skin is washed off.


Mix both dal and thena together, add to a cooker and add water 2.5 cups (each cup of thena needs 2 cups of water to cook). Pressure cook this for 2 whistles. Switch off flame.
In the meantime, dissolve the jaggery in a cup of water and strain the impurities. Keep aside. Similarly extract the coconut milk from grated coconut or if using canned coconut milk, then dilute the coconut milk accordingly and keep aside.


Heat 2 tbsp ghee in a heavy bottomed pan. Now transfer the cooked mix to this and fry the cooked mix for 2 minutes. Then add the jaggery syrup and mix well. Let the jaggery syrup get reduced a bit  and then add the third coconut milk and cook on low flame. Stir in between and then continue too coo  till its reduced completely.At this point add the second coconut milk. Continue stirring at this point and make a point to stir at the bottom of the pan so that it doesnt;t stick to the bottom of the pan.


It may take 15-20 minutes to get the thick consistency. Add the chukku podi, cumin powder and elakka podi. Mix well without any lumps. Finally, add the first coconut milk and mix well. Wait till one or two bubbles appear at the surface and switch off flame.


In another pan, heat the 1tbsp ghee and fry the cashews and raisins. Pour this over the prepared pradhaman. Enjoy warm or cold as preferred. We love it at room temperature.


NOTES
*If you are using cleaned foxtail millet then use only 1 cup for this measures.
*If you don't know, what's first second and third coconut milk then refer this post here.
* Refer this post here to make your own chukku podi and cumin powder.


Tuesday, February 25, 2020

Ragi Idli | Panjipullu (Finger Millet) Idli ~ Quick & Easy Method

As we all know ragi has numerous health benefits and is one of the best non- diary sources of calcium. Ragi (Finger Millet) is also a healthy whole grain that reduces the glycemic index and is perfect for diabetics. I have been trying to incorporate ragi in a number of ways like Ragi Peechappam, Ragi Chocolate Muffins, Ragi porridge(Panjipullu Kurukku), Ragi poori, Ragi Puttu, Ragi Ela Ada  Instant ragi dosa and multi grain healthy laddus. However, each time when one dish of ragi gets bored, I try another one to keep the proportion of ragi intake balanced in our family. Ragi idli was tried in several ways before and finally I settled to this quick and simple method of making which turned out perfect. Ragi was earlier soaked and ground with urad dal to make the traditional ragi idli batter but the batter was over fermented each time I tried that way. May be I went wrong with some proportions but this one with ragi flour came out really good and am sure you can give this a try. These are so simple to put together and all you need is a good idli batter and ragi flour, mix them up and ferment. These idlis turn out just like our regular idlis except for the colour.


The texture wise these idlis are soft and they need to de moulded from the idli mould soon after its out from the heat else the top dries out faster unlike regular idlis. Other than that the cooking process remains same and you can serve a healthy alternative for breakfast. Ragi on its own is very dry and may not taste the same like we do other flours as its gluten free. So mixing ragi four to rice or wheat improves the texture of the food item that you are preparing and in turn you can reduce the rice/ wheat proportions too compensating it with ragi. I do prepare both regular idlis and ragi idlis as kids make faces looking at these brown coloured idlis. So I serve them a mix of both regular and ragi idlis and this way it works fine. The grown ups enjoy ragi idlis alone.The texture of the idli is obvious from the pictures below and do give this a try if you are looking for reducing the rice calorie load. A good sambar pairs well with ragi idlis that we love the most compare to chutneys. Serve these soft idlis with sambar and tomato chutney, love it !!

Preparation time ~ 20 minutes
Cooking time ~ 15 minutes 
Serves ~ 8-10 idlis
Ingredients
ragi powder 1/3 cup
idli batter 3/4 cup
water 2 tbsp
salt to taste


Method

  • Prepare idli batter as you usually do with rice idli batter or if you use store brought idli batter then use that. Take 3/4 cup of this batter, keep aside.
  • In another bowl, mix the ragi flour with 2 tbsp of water. Add another tbsp if required to adjust consistency of batter.


  • Mix the ragi and idli batter, aerate the batter well using hands. Keep this covered in a warm place to ferment for 6-7 hours. 

  • After 7 hours, the batter will be nicely fermented. Grease the idli mould and pour the batter in mould. Place in idli cooker with water  and steam cook for 10-12 minutes on medium flame.
  • Remove the idlis from cooker and wait to cool slightly till its warm on touch (don't overdo the cooling, else the top becomes dry).
  • Serve warm with tomato chutney and sambar. Check out my homemade sambar powder too.


Monday, August 21, 2017

Bharwan Karela | Pavakka Nirachathu | Stuffed Bitter Gourd (Step by Step Pics)

Bitter gourd(pavakka) has many interesting facts apart from fighting diabetes. Did you know bitter gourd is effective in treating skin conditions and skin infections, eczema and psoriasis? Yes.. the blood purifying properties in bitter gourd helps prevent acne and does wonders. A glass of bitter juice everyday helps reinforcing your immune system and helps fight many diseases even cancer. However, make sure you are buying the organic ones or growing your own plant in the backyard.

Long back, as a school kid I used to see my North Indian friends bring this stuffed karela(pavakka) to school with rotis. Then, one day as a curious kid I requested mom to make it at home and she recreated the magic by asking her north indian friends in the neighbourhood. I did enjoy it but it wasn't a regular affair as we don't try much of other style recipes other than kerala style. Now, when I got hold of these cute fresh small ones the first thing that popped in my mind was to make stuffed karela(pavakka). When I asked mom she could list down the ingredients but hardly remember the quantities. Finally ended up searching and made this one day. Thanks to my family who love bitter gourds so was easy to finish. This recipe is not very spicy so if you wish to increase spice then add more chilli powder as per tastes. Authentically, mustard oil is to be used but H doesn't like the flavor and so I dropped that idea and made in canola oil. This was made when we were in US, was staying in drafts and here am yet to find these small ones. Try it out if you get these small cute bitter gourd and do let me know the feedback :)


Preparation time~ 15 minutes
Cooking time~ 15 minutes
Serves~ 6-7 stuffed karela

Ingredients
bitter gourd /pavakka / karela small or medium sized 6-7
lemon juice 1tsp
salt a tsp

for filling
cumin seeds /jeerakam 1/2 tsp
fennel powder /perinjeerakam podi 2tsp
coriander powder /malli podi 2tsp
chilli powder / milagu podi 1/2 tsp
garam masala 1/4tsp
amchur powder/dry mango powder 1tsp
asafoetida powder/ kayam podi a pinch
oil 4 tbsp (1 tbsp for filling + 3tbsp for frying)
salt to taste

toin or thread to tie the bitter gourds(karela)


Method
  • Wash the bitter gourds(pavakka) under running water.Scrape the bitter gourd outer skin  and make a gash,remove the seeds without breaking open into two (if the seeds are matured,can be discarded as it bites through.The spongy seeds can be taken and can be chopped along with outer scraps) and keep aside.

  • Marinate the bitter gourds(pavakka),the scraps using lemon juice and salt.Leave for half an hour,squeeze out the juice drained out (helps to reduce the bitterness).
  • Heat a tbsp of oil and add the spices on low flame.Add the scraps, the flesh (if using) and cook for 5-6 minutes. Switch off flame and leave to cool.


  • Once cooled, fill the bitter gourd with the filling tightly and tie each with toin or thread (I used thread). Ensure to tie the toin or thread tightly as it loosens up when you cook as the bitter gourd shrinks.
  • Heat a non stick pan and add oil. Keep the flame on medium,add the stuffed bitter gourd(pavakka). Then, reduce to low and cook else the oil turns black and the filling seeps out. Keep rotating all sides and cook for 6-7 minutes by covering with a lid.Check the bitter gourd and rotate the bitter gourd again for another 5 minutes,till the outer cover is crisp and browned.
  •  Drain on a paper towel and serve warm with chapathis or rice. Remove the threads and enjoy. We had with chapathis and thakkali curry(tomato curry).
NOTES
* Make sure to select fresh small stout type bitter gourds(pavakka) that helps in filling easily.
* I have adapted the recipe by watching Manjula's kitchen and Nishamadhulikka.com.
* If you wish to keep the biiterness then omit the marination and squeezing out. Use just like that.
OR If you wish to reduce more of the bitterness then along with marination, wash the scraps also under running water.
* Use mustard oil if you like the flavors for more authentic taste.


You may also like these
* Pavakka achar (Bittergourd Pickle)
* Pavakka Theeyal
* Baked Bitter gourd Fries (Pavakka mezhukuparetti,baked version))

Thursday, August 03, 2017

Kurkuri Bhindi | Crispy Fried Okra | Moricha Vendakka (Step By Step Pics)

Vendakka or bhindi(okra) is a versatile vegetable which can be used in curries,sambar or stir fry and it tastes great in all forms. We are a big  fan of this veggie and always buy whenever I get hold of fresh okra in the market. I have already posted few vendakka recipes, check out below if interested. My kids love the regular vendakka mezhukuparetti very much and invariably gets over soon at home. This is a north Indian style bhindi preparation that makes it crisp and crunchy. We had it with steamed rice and varutharacha sambar. This is a quick fix recipe that you can prepare in half an hour. Though the recipe demands deep frying but I just used my non stick pan and shallow fried in tow or three batches. It came out really crisp an delicious. Try and enjoy if you love it !!


Preparation time(incuding marination)~20 mins
Cooking time ~10 mins
Serves 3-4
Ingredients
to marinate (first)
okra 250 gms
cumin seeds 1/2 tsp
coriander powder 2 tsp
chilli powder 3/4-1 tsp
amchur powder/dry mango powder 1/2 tsp
turmeric powder 1/4 tsp
salt to taste

to marinate(second)
besan flour 2tbsp
rice flour 1tbsp

Oil to fry


Method

  • Wash the okra under running water. Drain the water completely and wipe each okra with a paper towel or leave to dry before cutting( reduces the sliminess).
  • Cut the okra length wise in half and then quarters. Place it in a wide bowl and add the spice powders,salt listed. Mix well and then leave 10 minutes,the salt helps to moisten the okra and spices get well coated with the okra.
  • Add the besan and rice flour,give a quick toss.Adjust salt if required (You may find the seeds popping out from the okra,not to worry and leave the seeds aside).


  • Heat oil in a pan/ wok and add the bhindi in batches on medium heat. Don't overcrowd the pan. Keep stirring and turning to get it evenly browned. (You can even deep fry the okra in oil but I feel this came out really good and so prefer shallow frying in a non stick pan).
  • Drain on a paper towel to absorb the excess oil.
  • Finish all the marinated okra and serve hot with steamed rice and varutharacha sambar like we did !!


NOTES
* I have shallow fried the bhindi in a non stick pan with very less oil and it cam out really crisp(takes slightly more time but more healthier I feel).
* You can use 1tsp lemon juice instead of amchur powder or dry mango powder.
* Adding rice flour makes the bhindi more crispier.
* The recipe is adapted from Manjula's Kitchen but slightly tweaked too.

TIP FOR SELECTING TENDER OKRAS
Snap the tail (pointed end)of each okras,If it snaps easily then its fresh and tender.If it bends and retracts,this means its fibrous and over matured.It will not cook properly.Always select tender ones.


 Check out more vendakka (okra) recipes below-
Vendakka Theeyal
Bharwan Bhindi( Stuffed Okra)
Dahi Bhindi

Vendakka Paal Curry

Friday, November 13, 2015

Ragi Ela Ada | Panjipullu Ada| Steamed Finger Millet Parcel

Hope everyone had a great Diwali with family and friends.And finally the wait for Diwali is over, and the drooling pics of sweets, savouries all over the blogosphere was overwhelming.Looking forward to drooling over 'Thanksgiving' recipes followed by 'Christmas' collections which marks the end of 2015.How fast does time fly??Whenever I look at my kids, I realize that time is really running;they were babies sometime back and now are school going.Anyway, can't stop the time, and we got to move on to keep pace with it.The traditional recipes of Kerala were very healthy and nutritious.All thanks to our great-grandparents who whipped these yummy recipes and were passed on to the next generations that did follow.But with time, many things changed, and those recipes have now been classified as the main source of carbohydrate mainly rice or tapioca (kappa) recipes and present day, people are asked to cut down carbohydrates as the increasing number of diabetics in Kerala takes its toll.What went wrong to all the healthy and nutritious foods?? Well…there are many factors to support these higher incidences.The sedentary lifestyle of people along with no exercise regimes has contributed to a large extent to this condition.Then, comes the pesticides, hormones injected in the plant right from the seedling to the fruit and animal products have added on to the situation.And the list goes on, where the main culprit to be blamed is the 'food'.Everything in moderation was the key principle what our grandparents followed as there wasn't much to waste, and they exercised well in the paddy fields, agricultural land and cultivated good organic foods too.Today the rice of what we eat is polished so neatly to attract buyers, whereas the rice of old times had the bran that made a whole nutritious food.I think these foods can still be enjoyed if we can actively bring about some changes in our lifestyle.


Moving on to today's post is a low carbohydrate steamed healthy snack that can be enjoyed by all age groups provided you moderate the amount of jaggery as per needs.Ragi is packed with iron and calcium.This is one of my favorite snack with ragi and make it often.Kids are not into the savory version of ragi, but ragi peechappam and ragi ela ada are their favorite.I have used frozen banana leaves but try to use fresh banana leaves to get the real flavors from the steamed banana leaves.The frozen leaves have very less aroma compared to that of the fresh leaves.The ragi flour is store brought and this can be prepared in very less time.These prepared adas can also be roasted in a mann chatti(clay pot) or kadai instead of steaming to give the ottada feel.I have tried both ottada version and ela ada version of this ragi snack and I feel in the ottada version, the filling becomes drier compared to the juicy steamed ones and I like the steamed ones better.Also, If you plan to dilute the jaggery (when added after straining the impurites) then coconut filling becomes dry.And so, I have used grated jaggery instead of purified jaggery, as there are no many impurities in the jaggery available here.This really adds that juicy feel when once cooked.If you are preparing this healthy snack for a diabetic or a person on low carbohydrate diet, then you may not add the amount of jaggery listed, but always reduce as required.Try these and enjoy making at home!!


Preparation time~15 minutes
Cooking time~15 minutes
Serves ~ 5 adas
Ingredients
for cover
ragi flour 1 cup
rice flour 1/4 cup
salt  a good pinch
water 1/2 cup

for filling
grated coconut 3/4cup
*jaggery grated 1.5cups
cardamom powder 1/2tsp
cumin powder 1/2 tsp

to wrap
banana leaves 5 or 6 pieces

Watch on YouTube-


Method
  • Sift the flours in a bowl and add a pinch of salt.Add boiled water and work to a chapathi like dough but a bit looser than chapathi as that gives soft adas(It's OK to have a sticky dough). Keep it covered for 10 minutes.
  • In another plate, mix the grated coconut, grated jaggery, cumin powder and cardamom powder.Thoroughly mix and leave for five minutes for the jaggery to blend in.
  • If using frozen leaves, thaw the leaves before use.Wash under running water.Cut out the banana leaves in rectangular shapes or any other desired shapes.
  • Divide the dough in five equal portions and place one portion on the cleaned banana leaf.Using the fingers, spread the dough on the leaf evenly (keep a bowl of water ready at hand to dip your fingers in it, and then try spreading the dough.Eases the work).
  • Now, place 2tbsp of the coconut-jaggery mixture on half of the spread dough, leaving a centimetre space at the edges.Fold the other half on top of the filling to cover it up and press down on the leaf to seal properly.
  • Repeat the same step to make more ragi ela ada and keep ready.
  • Heat water in a steamer and place the prepared ela ada in it (Please don't over fill the steamer with adas, leave space so that it gets cooked faster and also add sufficient water to cook otherwise the water in the steamer may dry up soon)
  • Cook covered on medium heat for 10–12 minutes, or till the leaves starts to pull out from the adas or the ragi changes to dark colour.
  • Remove from steamer and wait to cool lightly.Serve immediately just like that.


NOTES
* Adding rice flour is optional to ragi flour, you can make with ragi alone too, but I feel adding a little rice flour givesa nice texture to adas.
* You can use sugar instead of jaggery, too.But I feel jaggery is more healthy.
* I have used jaggery (1.5 cups) for kids, but for us just added a mild sweet flavour(1/2 cup).
* If you feel the jaggery has impurities, then it's better to dilute the jaggery in 1/4 cup water and strain the impurities.
* You can even add broken nuts and raisins to add taste to the filling.
* You can even try the ethakka filling in the ela ada that I tried earlier in this ragi ela ada, check out here.
* Cumin adds a nice flavor, omit if you don't like the flavors.

RELATED POSTS
* Ela Ada
* Ottada


Friday, June 26, 2015

Quinoa Mango Yogurt Parfait | Healthy Snacks

Parfait is a french word meaning 'perfect'.This is a frozen dessert made from base of sugar syrup,egg and cream.However,this is a protein packed healthy parfait made with quinoa and yogurt and topped with mango.This is a perfect summer treat for kids and all age groups.This can be given as a after school snack for kids and you can always try out with different varieties of fruits and dry fruits,nuts.Quinoa is considered world's healthiest foods and so this is a filling snack or can be served as a healthy dessert too.Use greek yogurt or hung curd for best results.Enjoy this simple and healthy recipe!

Other Quinoa recipes from this space-
Quinoa idlis
Quinoa Veg Pulao


Preparation time~10 minutes
Cooking time~15 minutes
Serves 4 cups
Recipe source~500 quinoa recipes
Ingredients
quinoa 1/2 cup
water 1 cup
yogurt(preferably greek yogurt) 1.5 cups
pecans 1tbsp
raisins 1tbsp
mango 1 chopped small
honey 2tbsp-3tbsp


Method
  • Boil a cup of water and add the rinsed quinoa.Simmer on medium heat and let it cook for 10-12 minutes until well cooked and the water is absorbed.
  • Mix the cooked quinoa with honey well.Keep aside.

  • Layer each glass(4) with yogurt(2tbsp) then add chopped pecans and raisins.Then add the next layer of quinoa(about 2tbsp) in each glass.Again,add a layer of yogurt and top with pecan and raisins.Finally finish with chopped mango garnish.
  • Cover and cool in  refrigerator.Serve chilled.

NOTES
* You can add sugar to sweeten the yogurt too but we like it plain.
* You can also layer the mangoes in between too.
* If you wish you can omit the dry fruits and nuts or use different nuts and dry fruits of your choice.