Print Friendly and PDF
Showing posts with label IDLI / DOSA. Show all posts

Tuesday, August 12, 2025

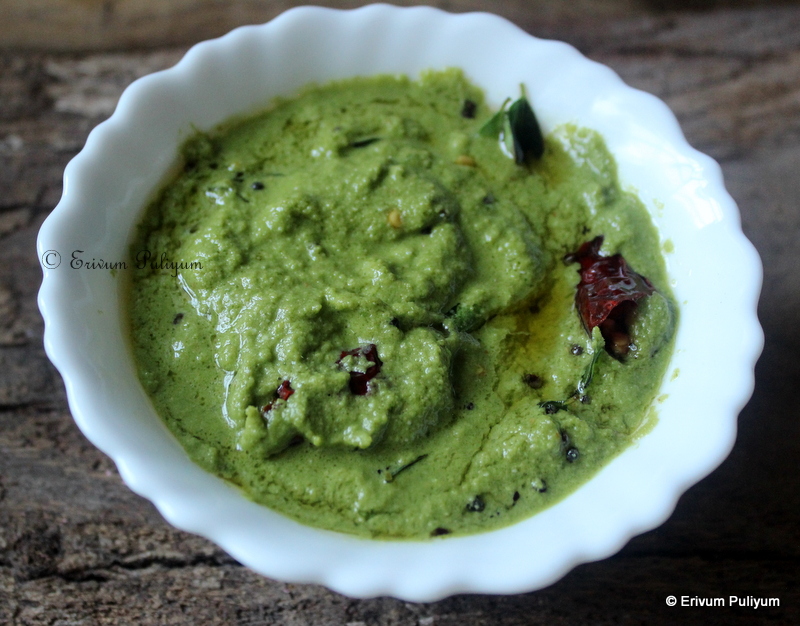
Shallots Chutney for Idlis/ Dosas | No Coconut Chutney

Looking for a simple, no coconut chutney ? Then here is a quick one with minimal ingredients. This chutney has no pottukadala and is really thick. Add boiled water to adjust consistency.  This works perfect with idlis and dosas or even uthappam. Check it out !!


Preparation time ~ 10 minutes
Cooking time ~ 5 minutes
Serves ~ 4-5
Author ~ Julie
Ingredients
urad dal  1.5 tbsp
dry red chillies, 3 broken 
shallots 1/2 cup
garlic cloves 2-3 
curry leaves 1 sprig
salt to taste
tamarind 1 small amla size
coconut oil 2 tbsps

to temper
coconut oil 2 tsp
dry red chillies 1 broken
curry leaves, a sprig 
mustard seeds 1/2 tsp


Watch on YouTube -


Method
  • Heat a pan and add oil. Add the urad dal and sauté until lightly browned. Add the red dry chillies and sauté. 
  • Add the shallots, curry leaves and garlic cloves. Sauté until shallots turn translucent.
  • Add salt and tamarind. Mix well and switch off the flame. Leave to cool slightly.
  • Transfer to a blender jar and add 1/4 cup water. Grind to a smooth paste. 
  • Pour this in a bowl and add 1/4 cup water. Mix until there are no lumps.
  • Finally, pour oil in a pan to temper. Splutter mustard seeds, dry red chillies and curry leaves. Switch off the flame and pour over the chutney.
  • Serve warm with idlis/ dosas. 
NOTES
* I have used Beydegi chillies, so used only 3. Depeneding on the type of chillies, alter the number. 
* The colour of the chutney comes from the chillies used.


Sunday, March 19, 2023

Instant Amla Chutneys - Dhaniya Amla Chutney & Spicy Amla Chutney (No Coconut)

Amla(Nellika) is in season and there are numerous health benefits of this simple fruit. The vitamin C content in amla is so good that it boost the immunity. We should always try to incorporate this fruit as much as possible for the herbal uses.My kids are not fond of eating this fruit raw, and so I try to incorporate them in chutneys to sneak in the benefits. 

These two chutneys are made without adding coconut and so can be made in a jiffy. Give these a try and serve with idli dosas or can be served as a diip with kachoris/ samosas/ beead pakoras. The spicy amla chutney can be served with steamed rice too. The spicy amla chutney is moderately hot and I have used beydagi chillies. Alter spice as per tolerance. The green chutney loses colour as it sits long, so make and use immediately, and this chutney is tart but compliments well when served with idlis or dosas. Tempering the chutney is totally optional and can be served without that too. Give it a try and enjoy !!


Preparation time ~ 10 minutes
Cooking time ~ 5 minutes
Author ~ Julie
Ingredients
For Dhaniya Amla Chutney
coriander (dhaniya leaves) 1 bunch
cashews 5
almonds 5
amla 2, deseeded and cut
green chilli 1
ginger 1/2’ piece
hing (kayam podi) 1/8 tsp
salt to taste
sugar 2 tsp

to temper
mustard seeds 1/2 tsp
red dry chilly 1 broken
curry leaves, a sprig
oil 1tbsp


For Spicy Amla Chutney
amla 3, deseeded & cut
shallots one handful
ginger 1 small piece
curry leaves 1 sprig
red dry chilly 4; broken
oil 2tbsp
salt


Watch on YouTube -


Method
FOR DHANIYA AMLA CHUTNEY(Malliyila Nellika Chammanthi)
Wash the dhaniya (coriander leaves), keep aside. To the blender jar, add the cut amla pieces, ginger, green chillies, almonds, cashews. Add hing, salt, sugar and pulse twice to crush the mix. Then add the washed coriander leaves. Add ice-cold water (2tbsp) and grind smooth. Transfer to a bowl. 
To temper(optional step)-Heat oil in a wok and add oil. To this add mustard seeds, dry red chilly and curry leaves. Switch off and pour over the chutney, mix and serve. We had with pesarattu(moong dal dosa).


SPICY AMLA CHUTNEY-
Heat a pan and add oil. To this, add the broken red dry chilly. Sauté until crisp, add the shallots, ginger and curry leaves. Then fry until onions are translucent and lightly browned. Add the cut amla pieces and sauté until lightly browned, add salt. Switch off and cool lightly. Transfer to a blender jar and grind to a smooth paste without adding water.


NOTES
* Tempering the chutney is totally optional and can be served without that too.
* Adding sugar to green chutney balances the flavours.
* The spicy amla chutney is moderately hot and I have used beydagi chillies. Alter spice as per tolerance. You can even add 2tbsp grated coconut to reduce spice or reduce the chillies.

RELATED POSTS

Wednesday, September 21, 2022

Tava Masala Idlis ~ Mumbai Style Street Food

Left over idlis?? Don't worry. Try out this healthy and chatpata snack with idlis. This is a Mumbai style street food style tava idlis that can be prepared quickly and can be served hot for an after-school snack or just like that anytime. I have already shared two very delicious snack recipes with left over idlis that I keep trying in between-baked idli snack & idli upma. Please check out if interested. 

Bored of idlis served with chutney ?? Then try out this recipe for a change. Am sure all would love this simple yet tasty recipe. This is a new hit at home and the recipe is quite simple. This gives a spicy and tangy idli mix. Enjoy !!

Check out the making here-


Preparation time ~ 10 minutes
Cooking time ~ 15 minutes
Serves ~ 4
Author ~ Julie
Ingredients
idli 8-10 
onion 2 medium-sized, fine chopped
tomato 3 chopped
capsicum 1 medium-sized
ginger-garlic paste 1 tsp
kashmiri chilly powder 1.5 tbsp
pav bhaji masala 2 tsp 
salt to taste
unsalted butter or oil 2-3 tbsp 
lemon juice 1.5 tsp or half of a lemon
coriander leaves 1 tbsp chopped


Method
  • Prepare idlis as you normally do, use idli batter. Scoop out and keep aside. Cut the idlis in small pieces (I cut each idli in 6-8 pieces), keep aside.
  • Make a paste by adding a little water to kashmiri chilli powder. Keep aside.
  • Heat a pan and add butter.To this, add fine chopped onions when butter is melted. Add a little salt to fasten process.
  • When onions turn translucent, add the ginger-garlic paste. Sauté till raw smell disappears.
  • Then add in chopped tomatoes. Sauté till tomatoes are cooked and mushy.
  • Toss in the fine chopped capsicum (green bell peppers). Sauté till lightly cooked, retain the crunchiness.
  • Add in the kashmiri chilli paste and pav bhaji masala powder. Mix well.
  • Slide in the cut idlis and combine well. Squeeze 2tsp of lemon juice over the prepared idlis. Finally, add in chopped coriander leaves. Switch off and serve warm.


NOTES
* Use oil instead of butter if calorie conscious. But butter tastes best for this recipe.
* You can soak red dry chillies (5-6) in warm water for half an hour and grind to a smooth paste instead of Kashmiri chilli powder.
* Add a tbsp of butter to make tava idlis more flavorful when serving, I omitted that.
* You can add more vegetables in this, but I feel this works good.
* You can add a pinch of pav bhaji masala to when serving for garnish.

If interested to try out recreating some good recipes with leftovers, check out this link for more LEFT OVER RECIPES.


Friday, November 19, 2021

Kerala Ulli Sambar | Cheriya Ulli(Vengaya) Sambar | Sambar for Idlis/ Dosas

Idli/ dosa when served with sambar and chutney is a delicious combo. I love the combo of idli- sambar than when  served with chutneys. Though idli can be served with the regular sambar, but I have a soft corner for this particular ulli sambar when it comes to serving with idlis/ dosas. If you haven't tried this ulli sambar, you must give this a try and am sure you will totally love this sambar with idlis/ dosas. I don't serve the ulli sambar with steamed rice as its milder in spices and has no much vegetables. Only shallots (kunjulli)and tomato is the only needed vegetable for this sambar. This is a very quick sambar recipe, very flavorful and thick sambar as it has ground coconut. Give this a try and enjoy !!

FEW MORE SAMBAR RECIPES-


Preparation time ~ 10 minutes
Cooking time ~ 25 minutes
Author ~ Julie
Serves ~ 4-5
Ingredients
shallots(kunjulli) 15-20
tomato 1 chopped
tuvar(toor) dal 1/2 cup
tamarind extract 2 tsp or a gooseberry size soaked
sugar a pinch(optional)
salt to taste

to grind
coconut grated 1/2 cup

to temper
mustard seeds 1/2 tsp
dry chillies 2/3 broken
curry leaves a sprig
coriander leaves 1 tbsp chopped
oil  1-2 tbsp


Method
  • Wash and peel the skin of shallots, wash and keep aside. Wash the dal and add to the pressure cooker, add turmeric powder and salt. Add enough water or add double the water than dal and pressure-cook for 3 whistles. Wait for the pressure to release.

  • In the meantime, add the coconut to grind in a blender jar and add a little water. Grind to a smooth paste and keep aside.
  • Add the peeled shallots and cut tomatoes to the cooked dal. Cook for 6-7 minutes until the shallots look cooked or turn translucent.
  • To this, add the sambar powder, mix well. Then add salt and tamarind extract. Finally, add the ground coconut paste and simmer for 2 minutes and then put off the flame. Add the pinch of sugar at this point if using. 
  • In another pan, add oil. Splutter mustard seeds when the oil is hot and add the curry leaves, dry red chillies and chopped coriander leaves. Sauté till the coriander leaves look wilted. Switch off the flame and pour the tempering over the sambar. Keep covered for 5 minutes and then serve. We served with idlis and tomato chutney.


NOTES
* If the shallots(kunjulli) are very big, then can cut in halves. The smaller variety adds a sweetness to the sambar.
* Adding a pinch of sugar is optional, it just adds a mild sweet tinge along with ground coconut paste, which tastes delicious when served with idlis.
* I have added homemade sambar powder, the recipe is here. You can use any store brought sambar powder.

IF YOU LIKE TRYING OUT VARIETY OF IDLI/ DOSA RECIPES, THEN HERE IT IS-
IDLI RECIPES:

DOSA RECIPES:


Monday, July 26, 2021

Indian Coffee House Masala Dosa (Step by Step Pics)

How many of you love the famous Indian Coffee House masala dosa?? We as a family love the masala dosas !! Whenever you land near an Indian Coffee House, the aroma of the crispy masala dosas with coffee is a perfect attraction to enjoy them. The Indian Coffee House is a restaurant chain run across India and is run by a series of worker cooperative societies, most of the waiters in the restaurant have a similar uniform with a turban. The menu list in Indian coffee house is quite simple, but every coffee house that you get in is crowded during peak hours like breakfast / lunch/ tea time. We love having masala dosa with uzhunnu vada(medu vada) with a cup of coffee.


Corona time, has given us ample time to experiment all the favourite tastes of restaurants. Kids were longing to have Indian Coffee House masala dosa, though I make the regular masala dosa often. Then it's their persuasion that I gave this masala dosa a try, and they were really happy with the outcome. Though it's quite similar to the traditional masala dosa but the signature mark to the dosas is the red color filling which you find only in Indian Coffee Houses. They add beetroot and carrot to the masala, and you get to bite small bits of these cooked veggies in between, and the rest of the filling is almost the same. Enjoy these masala dosas with thenga(coconut) chutney and a cup of piping hot coffee.

Check out more Dosa Recipes-


Preparation time ~ 15 minutes
Cooking time ~ 15 minutes
Serves ~ 10 masala dosas
Author ~ Julie
Ingredients 
to make dosa 
dosa batter 2.5 cups
salt to taste

for the filling
potato 3 medium-sized 
beetroot 1 medium-sized 
carrot 1 medium-sized
green chilly 2-3
onion 1 large sliced
ginger 1’ piece fine chopped 
chilly powder 1/2 tsp
turmeric powder 1/4 tsp
salt as per taste
coconut oil 2 tbsp
kadala parippu / chana dal 1 tbsp
mustard seeds 1/2 tsp
curry leaves a sprig


Method
  • Wash and add the potatoes in cooker with enough water and salt. Cook till 3 whistles and then wait till the pressure is released. Drain water and peel the skin of potatoes. Mash the potatoes to smooth and keep aside.
  • Boil the cubed carrot and beetroot in another pressure cooker or in an open vessel. Cook till done and mash the veggies. You can mash to a smooth paste, but I have seen chunks of the boiled veggie in Indian Coffee house served dosas. So, I have left a few pieces and mashed the rest.

  • Heat oil in a pan and splutter mustard seeds. Add the urad dal(uzhunnu parippu), fry lightly. Slide in the sliced onions, green chillies, chopped ginger, curry leaves and sauté till translucent. Add the chilly powder on low flame and mix well. 
  • Then add the mashed beetroot, carrot. Then add half a cup of water(the masala that I had in the restaurant is a bit waterier than regular masala dosas filling). Then, finally, add mashed potatoes. Mix everything well, adjust salt if needed and put off flame (don't dry up the water content completely). Put off flame and keep aside.

  • Mix the dosa batter well and add salt. Heat an iron griddle and pour a ladleful of dosa batter. Spread evenly as thin as possible. As it gets cooked and browns, add ghee on the layer. Then add 2 tbsp  of the filling and then fold half of the dosas from both sides.


  • Brush ghee on the outer sides and fry till crisp. Remove from pan and serve warm with chutney.
  • Repeat making the other dosas in the same manner. Each time before pouring the batter, clean the iron griddle with a cloth and brush oil and then pour the batter.

NOTES
* If the iron griddle becomes very hot, it's hard to spread the batter evenly. Sprinkle a few drops of water before pouring the batter and wipe dry so that the heat is reduced.
* Also, use a small katori (utensil) to spread the batter which gives an even spread dosa than ladle spread.
* Wiping the iron griddle with oil and sprinkling water gives crispier dosas than other methods.
* Add 1/2 cup rice flakes to grind when making dosa batter, gives a nice brown colour.
* Get the recipe of idli- dosa batter making in a mixer here.

Monday, April 12, 2021

Chakka Podi Idli | Raw Jackfruit Powder Idli (Step by Step Pics)

After posting the chakka podi(raw jackfruit powder), here comes my tried and tested version of the frequently made recipe of idlis using chakka podi. These idlis are made similar to ragi idlis with flour mixed with idli batter. These idlis are very soft but don't puff up very high. Taste wise there is no difference but texture wise its a bit stickier than regular idlis. However, the main advantage of these beauties is that it definitely reduces your carb load thereby keeps a check on your weight and sugar levels per se. Chakka podi aka raw jackfruit powder is available in markets these days and if you don't get a chance to make your own batch then try these idlis with that pack. Please do let me know too how it turned out and enjoy !!


Preparation time ~ 10 mins
Cooking time ~ 15 mins
Author ~ Julie
Serves ~ 8 idlis
Ingredients
salt to taste


Method
                                             
  • Leave to ferment overnight or 6 hours. Add salt once fermented and pour in a idli mould. Steam cook for 12 minutes, it takes a little longer than regular idlis.

                                           
  • Cool the idli plates slightly and invert or scoop out on plates and serve with sambar or chutney. We served with sambar and pudina chutney.
Check this link for more chutney recipes here


NOTES
* Adding salt before fermentation can also be done, but i prefer adding after fermentation.
* Remember to smear a little oil in moulds before pouring the batter.
* Steam cook for 12-13 minutes or tooth pick inserted comes out clean.
* These days you get store brought chakka podi too, you can use that incase you don't plan to make your own flour.


CHECK OUT DIFFERENT VARIETIES OF IDLIS FROM THIS SPACE:


Tuesday, February 25, 2020

Ragi Idli | Panjipullu (Finger Millet) Idli ~ Quick & Easy Method

As we all know ragi has numerous health benefits and is one of the best non- diary sources of calcium. Ragi (Finger Millet) is also a healthy whole grain that reduces the glycemic index and is perfect for diabetics. I have been trying to incorporate ragi in a number of ways like Ragi Peechappam, Ragi Chocolate Muffins, Ragi porridge(Panjipullu Kurukku), Ragi poori, Ragi Puttu, Ragi Ela Ada  Instant ragi dosa and multi grain healthy laddus. However, each time when one dish of ragi gets bored, I try another one to keep the proportion of ragi intake balanced in our family. Ragi idli was tried in several ways before and finally I settled to this quick and simple method of making which turned out perfect. Ragi was earlier soaked and ground with urad dal to make the traditional ragi idli batter but the batter was over fermented each time I tried that way. May be I went wrong with some proportions but this one with ragi flour came out really good and am sure you can give this a try. These are so simple to put together and all you need is a good idli batter and ragi flour, mix them up and ferment. These idlis turn out just like our regular idlis except for the colour.


The texture wise these idlis are soft and they need to de moulded from the idli mould soon after its out from the heat else the top dries out faster unlike regular idlis. Other than that the cooking process remains same and you can serve a healthy alternative for breakfast. Ragi on its own is very dry and may not taste the same like we do other flours as its gluten free. So mixing ragi four to rice or wheat improves the texture of the food item that you are preparing and in turn you can reduce the rice/ wheat proportions too compensating it with ragi. I do prepare both regular idlis and ragi idlis as kids make faces looking at these brown coloured idlis. So I serve them a mix of both regular and ragi idlis and this way it works fine. The grown ups enjoy ragi idlis alone.The texture of the idli is obvious from the pictures below and do give this a try if you are looking for reducing the rice calorie load. A good sambar pairs well with ragi idlis that we love the most compare to chutneys. Serve these soft idlis with sambar and tomato chutney, love it !!

Preparation time ~ 20 minutes
Cooking time ~ 15 minutes 
Serves ~ 8-10 idlis
Ingredients
ragi powder 1/3 cup
idli batter 3/4 cup
water 2 tbsp
salt to taste


Method

  • Prepare idli batter as you usually do with rice idli batter or if you use store brought idli batter then use that. Take 3/4 cup of this batter, keep aside.
  • In another bowl, mix the ragi flour with 2 tbsp of water. Add another tbsp if required to adjust consistency of batter.


  • Mix the ragi and idli batter, aerate the batter well using hands. Keep this covered in a warm place to ferment for 6-7 hours. 

  • After 7 hours, the batter will be nicely fermented. Grease the idli mould and pour the batter in mould. Place in idli cooker with water  and steam cook for 10-12 minutes on medium flame.
  • Remove the idlis from cooker and wait to cool slightly till its warm on touch (don't overdo the cooling, else the top becomes dry).
  • Serve warm with tomato chutney and sambar. Check out my homemade sambar powder too.


Wednesday, August 15, 2018

Tricolor Idlis | Carrot -Spinach Idlis ( Independence Day Special)

"Happy Independence day to all Indians !!''
How about celebrating this day by making some healthy and delicious that are naturally tri colored. Yes,you heard me right..not a drop of artificial colors. I am not a person who is fond of food colors especially when it comes to feeding kids. But then am not strongly against food colors but some how don't feel like using at home unless its an icing cake or where it becomes strongly inevitable. So,this year am celebrating independence day with tricolor idlis that are healthy and delicious. The saffron color was added with carrots which tasted sweet and the green color is given by spinach and they have no obvious taste or flavor of its own. I made these for my kids lunchboxes and they were very much happy to carry the idlis just to flaunt about the tricolor idlis. These idlis not only add the natural colors but also helps to sneak in veggies for kids who don't love greens esp spinach. You can use mint coriander leaves instead of spinach too. But am doubtful of the flavor with coriander leaves(cilantro) as I have not taste checked them. This can be made not only to mark our patriotism but also as a healthy alternative for kids lunchboxes if you are tired of the same old idlis. Enjoy!!


Preparation time ~ 20 minutes
Cooking time ~ 15 minutes
Serves ~ 8 idlis
Author ~ Julie


Ingredients
carrot 1 medium sized grated
spinach 1/2 cup chopped
idli batter 1.5 cups
salt to taste


Method
  • I usually prepare the idli batter as in the following link. You can use whichever batter suits you best to make idlis. Ferment accordingly and add salt to the batter once fermented.
  • Before making idlis, peel and grate the carrots. In a pan, saute the carrot with a tsp of oil with salt and then grind without adding any water or very very little batter as this may alter the consistency of the idli batter. Wash and chop the spinach, wilt it slightly with oil and then grind to a smooth paste(spinach may not need addition of water).


  • Now, mix 2 ladle full idli batter to each of the pastes and make a colorful batter and reserve the white idli batter as the third batter.
  • Grease your idli mould with oil if using steel ones and then pour half a tsp of batter in the mould starting with carrot then normal white idli batter and then spinach batter. If you still have space then add the white idli batter again on top in such a way so that the orange and green color batter is not hidden and is evenly distributed.
 OR 
  • You may just add each color of batter in each mould and then steam cook too without mixing. But I personally feel adding all the three batter together imparts a nice colorful and flavorful idlis.

  • Similarly fill in all moulds and then add enough water in the steamer and then steam cook for 12-15 minutes(it takes slightly longer than normal idlis to cook).

NOTES
* You should adjust the consistency of the batter after mixing. If the batter is too thick then dilute with water or if its watery use minimal water to grind.
* Add salt to the carrot and spinach lightly to flavor them.
* You can even spice up the idlis lightly by adding chopped green chillies.
* You may even add a round cut black olive in the center of the mould and then add the batters so that once cooked the idlis will have a proper flag look.

Few of my tricolor recipes that you may be interested to try out-
* Tricolor Suji Cookies
* Tricolor Puttu

I made the last idlis as single ones and didn't mix up the batter, enjoy making whichever way you love them-


Friday, June 29, 2018

Idli - Dosa Batter in a Mixer | How to get spongy soft Idlis and Dosas? (Step by Step Pics)

School days are always nostalgic memories of the past which I sometimes feel to rewind the cycle and get back to school uniforms again. Gone are the stress free days, but those are the days days when studies took the most stressful part and every child wishes to grow older soon to earn a living soon so that he/she can put away the books. Little do they know about the world that welcomes us after the school age. My kids also wish the same and I keep telling them that now is the best part of their age where you have enough time for play,studies or friends. My school days was always surrounded with many north Indian friends, who those days were crazy about idlis and dosas.The only access for north Indian friends to devour idlis or dosas was the lunch box that their south Indian friends brought to school. I had one of my good mallu friend, who never got idlis to eat for lunch whenever she bought to school as her mom always packed the idlis with gun powder(chammanthi podi) which was their favorite combo. Many of us were also in the same shoes and poor girls had to rely on canteen stuff to fill up their tummies. There were times when we used to carry two lunch boxes esp on a idli or dosa day,one for friends and one for self. Such was the craze of idlis and dosas during school days. Now things have changed, restaurants /dosa huts are an easy option for people who don't make idlis/dosas at home. Also, the idli /dosa batter is also readily available in super markets and Indian stores.


Anyways, I have always enjoyed my mom's handmade idlis/ dosas made by grinding rice and urad dal. Eventually I followed the same steps and made my own version of idlis and dosas. The idlis weren't  always soft and perfect in my initial days after marriage but gradually I have gained confidence in making them in a mixer and have hardly felt the need of a grinder. Many who have tasted the idlis at my home have been asking if I use grinder to make the spongy soft idlis and the ratio of rice and urad dal etc. Even request from one or two good readers who have asked to post this recipe too and I was always lazy to write such an elaborate post and kept postponing.Though the recipe has nothing out of the blue moon but a few tricks and tips that I follow gets me to softer idlis I suppose. I have even started trying out different idlis with barley and quinoa,check out quinoa idlis and barley- oats idlis if interested. One thing for sure is in a grinder,the rice to urad dal(uzhunnu) ratio is very different and is almost 5:1 where as in a blender or mixer the ratio of rice to urad dal is 3:1 or 2:1.The batter for idli and dosa is no different but there are slight changes too. When grinding for dosas, its better to grind with few spoon of aval than cooked rice,that way the dosas gets brown and crispier.


POINTS TO REMEMBER-
  1. Wash and soak the rice and urad dal. Use the soaked water to grind too as the soaked water has starch in it so don't discard this water.
  2. Separately soak each of the dal and rice. 
  3. Don't run the mixer for too long such that the jar gets heated up. Add ice cubes as and when necessary to maintain temperature. 
  4. Use iron griddle to make spongy dosas like set dosas. Non stick dosas don't give that taste and flavor. Gingelly oil helps in easy removal of dosas from griddle and adds a color,flavor to dosas.
  5. Use cooked rice or fenugreek seeds when grinding for idlis. And grind aval/beaten rice when grinding for dosas,yields crispy dosas.
  6. Preferably use good quality steel containers or glass containers with a tight lid to ferment the batter. Its better to avoid plastic containers as the fermented product may react with plastics.

Soaking time~ 5 hours
Cooking time~10 minutes
Serves ~ 24 idlis or 15-16 dosas
Ingredients
raw rice(plain rice /pachari / kolam rice) 1 cup
idly rice 1 cup
urad dal(round)/ muzhuvannu uzhunnu 1/2 cup plus 2 tbsp
* cooked rice 1.5 tbsp(to make idlis) or aval/ beaten rice 1.5 tbsp(to make dosas)
salt to taste

to spread for dosas
gingelly oil/ghee  as needed


How do I prepare the batter?

  • Wash and soak the plain rice,idly rice, urad dal(uzhunnu) separately in different bowls in enough water(water just above the rice for 3-4 hours and for urad dal(uzhunnu) slightly more than that as it soaks up more water) for about 4-5 hours.
  • After 4-5 hours, transfer the plain rice to the mixer. Add as per the holding capacity of the jar. Add in few *ice cubes and water slightly. Pulse the mixer twice and check the water level. Add more water if required(remember that ice cubes turn to water so add water accordingly). Run the mixer and grind until smooth. Transfer the batter to a large bowl.

  • Similarly grind the idly rice and then urad dal(grind each one of this separately as each of the rice and urad dal takes separate time to grind). Add less water while grinding urad dal. Also remember to add the cooked rice (or soaked aval) in the last batch of grinding urad dal.
  • Mix the batter well using hands or a wooden spoon for 5-7 mins. Aerating the batter with clean hands is much better and gives the same softness as you grind with grinders. (Read tips and tricks below)
  • You should see air bubbles on top of the batter once the aerating procedure is done. Cover and leave to ferment in a warm place for 7-8 hours.
MAKING IDLIS
  • In the morning  or after 7-8 hours, add salt to taste and mix the batter well.
  • Heat water in an idli maker or idli cooker and keep for boiling on medium flame.
  • Grease the idli mould with gingelly oil or coconut oil(I use coconut oil). Then pour in batter from the lowest rack to the highest. Pour about 3/4 th full in each mould. Place the next mould tray on top and repeat till you finish. Place this trays in the cooker and steam cook for 10-12 minutes or if you have an apprehension check using a tooth pick inserted in the center of one of the idlis.If the tooth pick comes out clean,then its done. 

  • Remove from the cooker and leave to cool slightly for 5-6 minutes until the idlis leave out from the sides of the mould. Using a large shallow spoon,scoop out the idlis and place it in a casserole. Keep covered.

  • Repeat the same steps till you finish all the batter. If you wish to refrigerate the remaining batter,then transfer this in an air tight container and refrigerate in the first row of the fridge.
  • Serve the idlis with sambar/ tomato chutney / coconut chutney(few more sides listed below). Enjoy!
MAKING DOSAS
  • The basic principles remain the same for grinding for dosas like idlis. If you plan to make set dosas or spongy dosas then make the batter slightly thinner than idli batter. If you plan to make ghee roast or nei roast or paper dosas, then make the batter watery. Add water only after fermentation.
  • Heat the iron griddle or dosa stone(dosa kallu),apply some gingelly oil/ghee using a soft cloth or a peeled shallot poked on  a knife tip. I use a soft cloth and gingelly oil. As soon as you see steam seeping through the stone or griddle, pour one ladle full of batter and spread immediately starting from the center to the outside. Wait till the bubbles surface on top of the batter and break open. Reduce the flame then to low and sprinkle few drops of oil on top(optional),flip to the other side. Cook another 45 seconds and remove on  a plate(the  iron gridlle dosen't get over heated for the next dosa this way if you reduce the flame at this point.

  • Increase flame again, smear oil or ghee and then pour batter,repeat the same steps to make dosas with remaining batter. If at any point if you feel the iron griddle is over heated, then sprinkle few drops of water and wipe the griddle,reduces temperature of the griddle. Then smear oil and pour batter,works good. Otherwise the batter doesn't spread easily on an over heated griddle.
  • I usually don't make and store dosas like idlis in a casserole as dosas turn soggy very soon or becomes hard if left outside. Make hot dosas and serve immediately with sambar/ coconut chutney/ tomato chutney (few more sides listed below).


TIPS & TRICKS -
  1. If you happen to grind the batter early like 5 or 6 pm and leave to ferment till morning,it may go over fermented and turn sour. In that case,I generally refrigerate the batter till 9 pm and then remove it out from fridge. Mix well and leave out to ferment thereafter.
  2.  There should also be enough space in the container for the fermentation. Leave a 2/3 rd space empty so that there is enough space. 
  3. I usually grind for two days and keep one portion of the batter without fermentation in the fridge. The day before I plan to make idlis/dosas,just keep the batter out from fridge. Mix this nicely to aerate and leave to ferment 7-8 hours. Works good.
  4. During winters in US, I used to leave the oven light 'on' and keep the batter in for fermentation or preheat oven for 10 mins and then switch off oven. Place the batter in after 15 minutes.
  5. Another good trick is to place the batter in a container that can fit easily in a Indian type casserole or hot case. Keep the container with batter in the casserole and cover with a lid. This is what I follow now during rainy days. Anyways,these are all few ways that you can adapt or find newer styles. The ultimate aim is to provide good warm atmosphere for the batter to ferment.
  6. Add salt once the batter is fermented without disturbing the air bubbles much. I feel adding salt after fermentation gets the batter fermenting well than adding and leaving to ferment. Anyways that's each one's individual choice.


NOTES
* Mom makes idlis with plain rice(raw rice /kola rice /pachari) alone,you can always try that without adding idly rice but I feel over the time, the idlis made with idli rice combination are more spongier compared to the ones made with raw rice(kolam rice/pachari) alone. I used to make that way to but in that case its better to add more uzhunnu or urad dal, then only the idlis comes out softer like this version.
* Adding plain rice 1 1/4 cups and 3/4 cup of idly rice also yields soft idlis. If you are comfortable in that ratio then go for it.
* Ice cubes help prevent the batter getting over heated and that way the batter doesn't ferment well. Mixer always has a tendency of getting heated and so the contents in it.
* You can add fenugreek seeds (1 tsp) instead of cooked rice. Though the idlis come out very soft but there are chances of batter getting sour if we ferment for 6-7 hours as the batter with fenugreek ferments faster than the batter without fenugreek.The color of idlis is also off white and so I hardly use fenugreek.
* Aerating the batter with hand gives the batter a lighter feel and ferments better.
* Use an iron griddle to make dosas which gives a nice crispy and browner side. Non stick dosas turn hard soon as it cools down though it uses very less oil. Instant hot dosas on non sticks come out good and if served hot,turns good too but once it cooled the dosas turn hard.


TRY OUT & MAKE THE BELOW VARIATIONS USING THE IDLI -DOSA BATTER
* Kanchipuram Idlis
* Masala Dosa
* Dosa Waffles
* Idli Upma
* Baked Idli Snack
* Ghee roast /Nei Roast
* Punugulu
* Potato Stuffed paniyaram
* Dosizza (Dosa Pizza)
* Beet Dosa
* Kuzhi paniyaram
* Omlette Dosa 
* Chicken Masala Dosa


FEW MORE SIDES THAT YOU CAN PAIR WITH IDLIS/ DOSAS-
Ripe Mango Chutney
Idli Milagu podi 
Varutharacha Sambar 
Pottukadala Chutney(Split Dalia) 
Ulli Chammanthi