Do you love meat with potatoes combo? In Kerala, there are a lot of combos of mixing meat with a veggie like beef koorka curry, beef kaya curry, chicken potato curry. This is another tasty combo of mutton with potatoes. Mutton curry is always a big 'yes' here in whichever form, but we don't buy the meat often as it's red meat and may not be very good for health. This time I prepared mutton biriyani with the mutton and had some leftover meat after that which was not enough to make a curry alone. So thought to add potatoes and try this combo of mutton and potatoes in the north Indian style. I already have a Kerala style Mutton Potato Curry, check that out if interested. Kids totally loved the creamy, tasty curry with chapathis. Check it out if you love this combo.
Preparation time ~ 10 minutes
Cooking time ~ 20 minutes
Author ~ Julie
Serves ~ 3-4
Ingredients
mutton 300 gms
potato 2, big cubed
onion 1 sliced
curry leaves 1-2 sprigs
green chillies 2-3, vertical slit
ginger paste 1.5 tsp
garlic paste 1 tsp
coriander powder 2 tsp
hot chilly powder 1tsp
kashmiri chilly powder 1 tsp
turmeric powder 1/2 tsp
garam masala 1/2 tsp
salt to taste
coriander leaves 2-3 tbsp
oil 3-4 tbsp
bay leaves 2
to puree
onion 1 small
tomato 1
Watch on YouTube -
Method
Rinse the mutton under running water and drain water completely. Keep aside.
Wash the tomato & peel the onion. Add to a blender jar and grind smoothly without adding water.Keep aside.
Heat a pressure cooker and add oil. To this add bay leaves and cubed potatoes. Sauté on high flame for 3–4 minutes until lightly browned on the outside. This gives a unique taste to the curry. Drain from oil and keep aside.
To the same oil, add sliced onion and green chillies, curry leaves. Add the ginger-garlic paste. Sauté until lightly browned.
Add the spice powders on low flame and sauté. To this, pour the purée and add 2tbsp water to the jar and add to the mix with 1/4 tsp salt. Cook covered for 2–3 minutes until the tomato onion paste is nicely cooked and oil floats on the surface.
Finally, add in the washed mutton and mix well. Add 1/2 tsp salt and give a quick mix. Cook on high for 3–4 minutes.
Add 1/2 cup water and close the lid. Pressure-cook for 3–4 whistles, or until it's cooked well.
One pressure is released, open the cooker and check if the mutton is cooked well, else cook again till done. Give a quick mix and add the lightly fried potatoes.
Add salt as needed, as the gravy already has salt, and add water if needed. Cook covered for 5–7 minutes.
Check if the potatoes are cooked well and are intact. Don't overcook the potatoes.
Garnish with coriander leaves and switch off the flame. Keep covered for 10 minutes and serve warm with chapathis or naan.
NOTES
* Add the ginger paste slightly more than the garlic paste.
* Depending on the type of meat, cooking time may vary, so just keep a watch. Cook well and then only add the potatoes.
* I have used bot Kashmiri and hot chilly powder, you can use hot chilly powder alone. In that case, adjust the amount as per tolerance.
Easy Chicken curry is the simplest form of chicken curry that can be made minimal ingredients, spices and basic tools like knife and cutting board. This is the basic Indian style chicken curry recipe that you can serve with naan, phulkas, idiyappam, appam, kappa vevichathu, chakka puzhukku or even steamed rice.
I think this may be the first learnt chicken recipes with most of the non vegetarians and so do me. My first learnt basic and frequently made chicken recipes was this soon after marriage. Then what took me so long to post this recipe here is that I had no plans to save this recipe for me as I would always remember lifelong as it was my first learnt ones. Back then, we had no ready-made ginger-garlic paste available and frankly speaking, I never had a mortar and pestle in the initial days to crush the ginger and garlic. So, I chopped all ingredients finely and cooked.
Recently, someone asked me for this basic recipe and I thought to pen it down here so that this may be helpful to many budding chefs too. This is recreating the same recipe here, which is now one of the quickest that I prepare.If you haven't tried a basic chicken curry recipe yet, then go ahead and try this one to surprise your dear ones. Check it out !!
Wash the chicken pieces and drain water completely.
Heat a pan and add coconut oil. Add in the chopped onions and sauté. Add a pinch of salt to fasten sautéing. Add the curry leaves and green chillies. The onions must turn lightly browned (may take5-7 minutes).
Add in the chopped ginger and garlic. Sauté till raw smell disappears.
Add the coriander powder on low flame, sauté. Add the hot chilly powder, kashmiri chilli powder, pepper powder, turmeric powder on low flame. Add 1/4 cup water to prevent spices from burning.
Add the chopped tomatoes, add salt and mix well. Cover and cook for 3–5 minutes, or till the tomatoes mash well.
Add the chicken pieces then and mix well. Add garam masala, give a quick mix. Sauté on high flame for minutes on high. Add 1/2 cup water, add salt. Mix well.
Cook covered for 15–20 minutes on medium flame. Check in between for salt. Finally, check the chicken pieces if cooked well.
The oil starts to appear on a well cooked gravy is a good indicator that the curry is well cooked. Garnish with a few chopped coriander leaves and then switch off.
NOTES
* You can use any oil of your choice as per your tastes for this recipe.
* The chopped ginger and garlic can be added as paste too. In that case, add only 1 tbsp each of ginger & garlic, respectively.
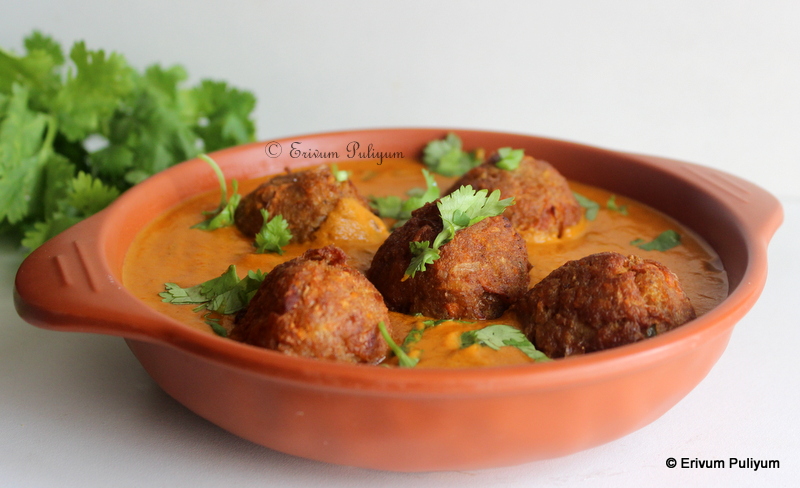
Soya Kofta curry is one of the most delicious preparations that kids love with soya. The koftas are deep-fried and added to the creamy, delicious gravy. I have used an egg as a binder as I felt egg adds to the flavour and gets a nice binding to the koftas too. But if you are a strict vegetarian, then skip the egg and add besan (kadalamavu) instead (check notes).Though this is made every fortnight at home but never got decent pics as this curry is usually made for dinner, or I don't get time to make video so just skip posting. However, this time I made sure to take the video and post it here too. Try these out for a veg party or just like that and enjoy !!
Preparation time ~ 25 minutes Cooking time ~ 20–30 minutes Serves~ 16 koftas Ingredients for koftas soya chunks 1 1/4 cup onion 1 small sized green chillies 3 fine chopped ginger garlic paste 1 tsp *egg 1 (check notes) carrot 1 medium-sized, grated garam masala 1/2 tsp chilly powder/ mulakku podi 1/2 tsp turmeric powder/ manjal podi 1/4 tsp (optional) salt
oil to fry koftas
for gravy tomato 2 large, chopped onion 2 medium-sized, chopped fine ginger garlic paste 2 tsp coriander leaves /cilantro chopped 2tbsp garam masala 1/2 tsp chilly powder/ mulaku podi 3/4 tsp coriander powder / malli podi 2tsp turmeric powder 1/2 tsp cumin powder 1/2 tsp bay leaf 1
cashews (soaked) 15-18 oil 2 tbsp + 2 tsp salt to taste sugar 1/4 tsp
Watch on YouTube -
Method
Wash the soyas and put in a sauce pan with enough water. Boil it until soft. Drain the water and squeeze out all excess water. Rinse under running water 3–4 times and squeeze out all water.
Add the cooked soya to a blender jar and pulse twice till it's crushed. Add the grated carrot, finely chopped green chillies, ginger-garlic paste, finely chopped onion and spice powders. Add salt and mix well. Squeeze out all excess water in a plate and save the water (can add to gravy).
Add in the egg and combine well with the soya mix. Make small balls out of it and keep aside for 5–10 minutes to bind well.
Heat oil in a pan and deep-fry the koftas. Don't overcrowd the wok (kadai) else the koftas will break. The koftas should be fried until lightly browned, and no need to fry deep brown. Drain on a paper towel and keep aside.
In the meantime, soak the cashews in water for 15 mins in water. Drain water.
Heat 2 tbsp of oil in another pan. Add in the ginger-garlic paste and fry the onions until lightly browned. Add in the spice powders listed on low flame. Add in the chopped tomatoes and cook till it's mushy. Add in the salt and mix well. Switch off flame and leave to cool.
Once cooled, grind the onion tomato mix along with almonds, cashews with very little water.
Heat oil in a pan and add 2tsp oil. Add in a bay leaf and add the ground paste. Sauté on low flame and cook covered or else the mix will splash all over. Add 1 cup blender washed water to the pan. Cook again for 3–4 minutes till oil separates. Adjust salt if needed and 1/4 tsp of sugar.
Add the reserved water from making soya mix and boil again for another 2–3 minutes. Add crushed kasuri methi and garnish with chopped coriander leaves and switch off flame.
Finally, add in the koftas just before serving and mix well. You can mix the koftas beforehand, but the koftas will soak up all the gravy.
NOTES * You may bake or use air fryer for the koftas, in that case place the koftas on a baking tray and drizzle oil on top of the koftas. * You can use cashews and almond instead of only cashews.
* You can add an egg for easy binding or add besan (2 tbsp) or 2 mashed potatoes for this measure if you are a strict vegetarian.
Healthy foods and dishes are a comfort meal when served on a daily basis, that is what my family prefer mostly, though we cheat ourselves once in a while to enjoy the other way round too. There is no dearth of these underground roots, tubers, corms or rhizomes in Kerala which are mostly edible and most of the other parts like leaves, stem is also used of these veggies. Colocasia, yam, cassava(tapioca), cheru kizhangu(lesser yam), kachil(violet yam), arrowroot are to name a few. I love chembu astram andchembu mezhukuparetti that I prepare using colocasia. This yam curry is similar to chembu astram but here I have used tamarind extract instead of yogurt. You may even add yogurt, but I feel tamarind adds flavour in this curry. This curry is a delicious combo when served with steamed rice. This is quite simple to prepare as well, enjoy !!
Preparation time ~ 10 minutes
Cooking time ~ 20 minutes
Serves ~ 6
Author ~ Julie
Ingredients
chena/ yam cubed pieces 2 1/4 cups
chilly powder 1/2 tsp
turmeric powder 1/2 tsp
salt
tamarind 1 lemon size
grated coconut 1/2 cup
shallots 4
cumin seeds 1/2 tsp
to temper
coconut oil 1 tbsp
red dry chilly
curry leaves 2 sprigs
shallot sliced 2
Method
Peel the skin of yam and cut in cube size pieces. Then wash the pieces under running water, please use a strainer to remove the pieces from water, else gives a bad irritation to sensitive hands and causes itching. I get it, so I always use a colander to drain the water or use a strainer to remove the pieces and put in a pan.
Add the pieces in enough water, add salt, turmeric powder and chilly powder. Cook covered on medium flame till the pieces looks nicely cooked but not to the level that pieces gets mashed. The pieces should be cooked enough such that when you squeeze a piece in your fingers it should be soft.
In the meantime, grind the coconut, cumin seeds and shallots to a smooth paste(see first pic). Soak the tamarind in enough water to squeeze out the pulp.
Add the ground mix with enough water, adjust salt if needed. Add the tamarind juice after extracting. Simmer over low flame for another 2 minutes and then enjoy.
Heat oil in a pan and add mustard seeds. Splutter mustard, then add the red dry chillies and curry leaves. Add the sliced shallots and sauté until lightly browned. Pour this mix over the curry. Keep covered for 10 minutes and then mix, serve warm with steamed rice.
NOTES
* You can add yogurt instead of tamarind extract too.
The traditional moru curry is a simple curry that all households prepare every other day apart from sambar and rasam. I think moru curry is the only curry that's so easy to assemble if you have yogurt ready at hand, just like punjabi kadi.
Scrolling down the sadya dishes posted so far, I found that moru curry was missing from the list. The obvious reason was that it was so simple to make that all malayalis are aware of preparing, and this was one of my first learnt curries after marriage, he he. But there were times when the moru curry used to curdle initially when preparing because of the lack of experience and sometimes the store brought yogurt wasn't sour enough to give the moru curry- the RIGHT feel. So, this post is totally dedicated to the beginners and the bachelors during their initial days of cooking may want to refer this post to make a good moru curry too.
Preparation time ~ 10 mins
Cooking time ~ 10 minutes
Serves ~ 4-5
Author ~ Julie
Ingredients
yogurt / sour curd 1.5 cups
water 1 cup
turmeric powder / manjal podi 3/4 tsp
fenugreek powder/ uluva podi a good pinch
salt to taste
to temper
shallots 2-3 sliced
garlic chopped 1 tbsp
ginger chopped 1 tbsp
mustard seeds / kaduku 1/2 tsp
fenugreek seeds / uluva 1/ 4 tsp
dry red chilli 1
chilly powder 1/2 tsp
curry leaves a sprig
oil 1 tbsp
Method
Blend the yogurt with half cup of water in a blender. Pulse for 2-3 times. Add the beaten buttermilk(pachamoru) to clay pot of thick bottomed pan. Add another half cup water to rinse the jar and lid, pour this to the buttermilk. Mix and put on flame on low heat.
Add in turmeric powder and stir continuously on low flame for 3-4 minutes. You may see the butter milk gets heated and vapours coming up, then switch off flame. Add in the pinch of uluva podi/ fenugreek powder.
Heat oil in another pan, splutter mustard seeds. Add in fenugreek seeds, wait till it's brown. Add dry red chilli, slide in chopped shallots, garlic and ginger along with curry leaves. Sauté until the shallots turn light brown. Switch off the flame and add the chilly powder (else the powder may burn), sauté for 30 secs and pour over the boiled butter milk. Mix well and serve with steamed rice.
NOTES
* Don't add more water than this ratio mentioned below, else the moru curry will be very watery and doesn't taste good.
* Use a thick bottomed pan or clay pots for best results.
* Continuous stirring of the butter milk is needed throughout the process. Add salt when the mix is slightly cold to prevent curdling.
* You can mix the chilly powder with a tbsp of water and mix well. Then pour this mix in the tempered mix, heat and pour over the moru curry. This way the chilli powder will not be burnt.
Goan vegetable curry is a simple veg curry that pairs well with parathas, naan or jeera riceor ghee rice. I love Goan dishes for two reasons-one they are mostly similar to Kerala recipes and most of them have coconut flavor in them which I know would suit my families taste buds. The second reason is that I love Goan Cuisine to some extent and so have tried few of the Goan dishes listed below. This was tried during the lent time before Easter and I made it with jeera rice which was a lovely combo.
The curry is spicy depending on the type of chillies used and also has the sweet nutty flavour of the coconut. You can always increase the use of spices as per tolerance. The ground paste adds the thickness to the gravy and so is a veg kuruma style curry too. The usage of tamarind can be replaced with tomatoes or dry mango pieces if you wish. The use of any kind of vegetables is good for this curry, but I had some mushroom, baby corn, capsicum and so used it. Do give this a try if you are a hard core veggie or if you love to taste a veg curry sometime.
mixed veg 4 cups (I used baby corn- 1/2 cup, carrot -1cup , beans cut -1 cup, green peas - 1/2 cup, mushroom -1/2 cup, capsicum -1/2 cup)
onion 1 sliced
green chilli 2
turmeric powder 1/2 tsp
coconut oil 1 tbsp
salt to taste
for paste
grated coconut 1/2 cup
black pepper corn 1 tbsp
kashmiri chilli dry 3
coriander seeds 1 tbsp
cumin seeds 1 tsp
garlic cloves 3
onion 1/2 sliced or a small one
tamarind, a little piece(amla size)
Watch on YouTube -
Method
Wash and chop the veggie in about 1 ' piece, keep aside.
Grind the ingredients listed under the 'paste' and grind to a smooth paste by adding little water.
Heat oil in a heavy bottomed pan and add sliced onions followed by green chillies and curry leaves. Saute the onion to slightly translucent.
Add turmeric powder to this and saute. Then add the chopped vegetables.
To this, add the ground paste and half cup of water to the mixer jar cleaning it up. Pour this to the pan, add 1/2 cup more water and simmer the mix to a boil. Cook until the vegetables are nicely cooked, it may take 5-7 minutes. Add salt as needed.
When the gravy looks thick enough switch off flame. Increase the amount of water or decrease the amount of water as per the desired thickness of gravy.
Switch off flame, adjust salt if needed. The oil can be seen floating on top of the gravy once cooked and is nicely thickened. Garnish with coriander leaves(optional) and is ready to serve with parathas, jeera rice or naan.
NOTES
* Increase or decrease the usage of green chilli as per tolerance.
* The mixed veggies can be as per your choice or availability.
Thiruvonam is on its way but I still don't feel much about Onam this year as mostly people are confined at home and haven't moved out much due to Covid-19 precautions. We too haven't done any shopping this Onam and are not planning to do at this time. This year's Good Friday, Vishu, Easter, Eid all went away the same way. We are just comforting on the thoughts that if the family is healthy and sound we can have a elaborate Onam any day when all meet together. I think many of my friends would also share the same thought, right? So let's celebrate this Onam safely at home with minimizing the outside visits thereby reducing exposure to corona and make innovative, improvised dishes if you don't have a particular veggie and come up with a new dish if it clicks in the family too. Also, try to add in pookalam with whatever flowers you have in your garden and enjoy the simplicity for the betterment of our family.
Many of the sadya dishes are already on the blog space but there is no dearth of recipes when it comes to try newer sadya dishes compared to the traditional recipes may that be varieties of payasam, pachadi or any other sides. Scrolling down my sadya dishes, I found that kootu curry has not been posted here so far. Kootu curry was new to me till I tasted this dish during one of our Onam sadya in US. Kootu curry mainly is made to the north of Kerala and down south its replaced with erissery. Erissery and kootu curry preparations are almost the same except the veggies and lentil combos differ. Erissery is made with pumpkin and vanpayar (cow peas) and kootu curry is made with black chickpeas, yam and raw plantain generally. Also, in erissery we don't add jaggery as such and the sweetness is mostly derived from the pumpkin. Kootu curry can be made with split bengal gram,yam and ash gourd combo. Kootu curry is a dry side dish and the fried coconut tempering gives it its unique flavors.
The chickpeas is soaked overnight and then cooked in a pressure cooker. The plantain and yam pieces can be added together and cooked separately till done. Then the chickpeas, veggies are mixe together with coconut paste, spices,salt and jaggery Finally the curry is tempered and poured over the curry. Do give this a try and enjoy with your loved ones!!
Preparation time ~ 15 minutes
Cooking time ~ 25 minutes
Serves ~ 5-6
Author ~ Julie
Ingredients
chick peas 1 cup
yam / chena 3/4 cup
raw plantain / kaya 3/4 cup
coconut grated 1/2 cup
cumin seeds 1/2 tsp(optional)
chilly powder 3/4 tsp
turmeric powder 1/2 tsp *pepper powder(coarsely crushed) 1 tsp
jagerry powder/sharkara 2 tsp
salt to taste
for garnish
coconut grated 3 tbsp
dry red chillies 2 broken
curry leaves a sprig/ thandu
mustard seeds 3/4 tsp
coconut oil 1tbsp + 2 tsp
Watch on YouTube -
Method
Soak the chick peas overnight, drain water and then cook the chickpeas with turmeric(1/4 tsp) and salt in a cooker upto 4-5 whistles. Reserve the cooked water for cooking veggies.
In the meantime, chop the yam and plantain in cube size pieces separately and add to a bowl of water. Also grind the cococnut with cumin seeds(jeerakam) to a fine paste with little water (don't add more water as you may have to dry up all the moisture at the end then).
Now add the plantain pieces to a thick bottomed pan and add the cooked chick peas water. Add remaining turmeric powder and cook the plantain pieces until 1/4 th cooked and add yam pieces(you can even add both veggies together and cook). Cook till both veggies are cooked well. Add in the cooked chickpeas to this.
Add coconut paste, coarse pepper powder, chilly powder and jaggery(add crushed jaggery piece, it will melt down in the heat and mix). Adjust salt if needed.
Mix well and dry up all the moisture well so that the kootu curry looks nicely coated with masala.
Heat oil in another wok/ kadai to temper. Splutter mustard seeds when the oil is hot, then add curry leaves, red dry chillies and finally add grated coconut. Fry the coconut till light brown. Pour this over the kootu curry. Finally, pour 2 tsp of fresh coconut oil on top and keep covered for 20 minutes. Serve warm with steamed rice and other sides.
NOTES
* Whole peppercorns when crushed and added to many of the traditional recipes gives a unique flavor unlike pepper powder, do try that way for authentic tastes. You can even add the crushed pepper corns while tempering, heat and then add to the curry. But I generally add crushed pepper to the cooking mix.
* Kootu curry can also be made with the combination of split bengal gram,yam and ash gourd.
* Final addition of coconut oil on top after tempering is optional but that definitely adds a unique flavor to sadya dishes.
Please refer this link here for more sadya recipes.
Parippu curry is one of the important ozhichu curry in the southern parts of Kerala. We serve it as the first ozhichu curry with pappadam and ghee followed by sambar, rasam and pullisery in my home town. But towards north of Kerala the ozhichu(poured over rice) curry is mainly concentrated on sambar and rasam. Pullisery is taken over as kalan in the northern side. H's place also follow the northern style curry pattern and so after marriage, I hardly make parippu curry for sadya. However, I prepare parippu curry as a regular everyday curry at home and serve with ghee and pappadam which kids do love. Split moong dal is used to make this parippu(dal) curry. Mom uses the whole moong dal to make parippu curry which does a lot better than the split moong kind. She roasts the whole moong well and then crushes on the arakkal (grinding stone) to split it in half and get the skin off(don't try crushing in blender as it gets fine powder in one or two crushes). Wash it nicely, most of the skin floats on water and can be discarded. But I feel kinda lazy to do the tedious process and also don't have an arakkal(grinding stone) here too, I feel using split moong dal eases out the task. This is a midly spiced curry that is packed with protein and so small kids Onam starts with parippu curry and pappadam. Making parippu curry at home is quite simple keeping a few points to remember. The curry shouldn't turn very thick so add enough water to thin out and also remember that the curry thickens as it sits. This curry when served hot tastes best and so should be done accordingly. If you haven't tasted this yet,give it a try.
Preparation time~ 20 minutes Cooking time ~ 25-30 minutes Serves ~ 4 Author ~ Julie Ingredients
parippu / split moong dal 3/4 cup
water 1.5 cups
turmeric powder 1/2 tsp
salt to taste
shallots 2-3 hot chilli powder 1/2 tsp- 3/4 tsp to temper
mustard seeds 1/2 tsp
curry leaves a sprig
dry red chillies 2 broken
coconut oil 2 tbsp
Watch on YouTube-
Method
Heat a thick bottomed pan and add the dal(I use my cooker itself). Stir fry the dal until lightly roasted or till its light brown in color. Switch off flame and leave to cool. Wash the dal 2-3 times and add enough water(more than the dal). Add in turmeric powder and salt. Close in the pressure cooker with weights. Pressure cook for 4-5 whistles or till done(the dal shouldn't fully mash, there should be bits of cooked dal to chew). I love this way but you can fully mash too but I feel fully mashing thickens the dal and doesn't taste very good like the way I generally do.
In the mean time,grind the coconut along with chilli powder,garlic cloves, shallots and cumin seeds to a smooth paste adding little water.
Add this paste to the cooked dal and simmer for 3-4 minutes or until the coconut mixture boils and the dal mashes slightly to thicken the curry. Add more water if its too thick and adjust salt. Switch off flame.
Heat oil in another pan, add mustard seeds when hot. When it splutters add in the curry leaves and red dry chillies. Pour this over the curry, mix and serve hot with boiled rice,a tsp of ghee and pappadam.
NOTES
* The curry is mildly spiced curry, you can always increase the spices as per tolerance.
* You can even add dry chillies to the grated coconut and grind.
Mutton is not a frequent visitor at my home and so I hardly have mutton recipes in my blog. I must say that we rarely buy mutton compared to all other meats as we don't have much fans of mutton at home though once in a while we all love it too. So,whenever I make mutton recipes its invariably the Kerala style recipes only like mutton stew, mutton curry or this roasted coconut type gravy.This roasted coconut type gravy is thick and can be served with steamed rice, ney choru (ghee rice) or any Indian staples. You can avoid adding the coconut too and can serve just before adding the roasted ground coconut paste,it does taste very good. However the roasted form adds the nadan(traditional) aroma to the curry.Do try this out and enjoy !
Preparation time ~ 30 minutes Cooking time ~ 35 minutes Serves ~ 5-6 Author ~ Julie
Ingredients
mutton 1/2 kg (500 gms)
onion 2 medium sliced
shallots / kunjulli 1 cup sliced
ginger garlic paste 2 tbsp
tomato 1 small chopped
turmeric powder / manjal podi 1/2 tsp
chilly powder 1 tsp
kashmiri chilli powder/ mulaku podi 1 tsp
coriander powder/ malli podi 2 tsp
garam masala 1/4 tsp
salt to taste
oil 2tbsp
curry leaves 2 sprig
to roast and grind
grated coconut 3 tbsp
whole garam masala 3 cloves, 2 cardamom, 1 anise, 1" piece cinnamon
fennel seeds/ perinjeerakam 1 tsp
to temper
shallots 3 sliced
curry leaves a sprig
Method
Wash the mutton really nice and rinse 3-4 times. Drain the water and keep aside.
Heat oil in a thick bottomed pan and add the ginger- garlic paste. Saute until its lightly browned and then slide in the onion,shallots, curry leaves. Saute until its lightly browned(add a pinch of salt to fasten this process).
Add in the spice powders, chilli powder,turmeric powder,coriander powder and salt on low flame. Saute until the raw smell disappears and then add in chopped tomatoes. Cook the tomatoes till mushy.
Then transfer the mutton and cooked masala to a pressure cooker, mix well to combine. Add 1/2 cup water and cook for 3 whistles. Wait for the pressure to release and then open the lid,give a quick stir. Then add water( if required) and adjust salt. Close the lid and pressure cook again for another 3 whistles or till done( the cooking time may vary as per the mutton).
Wait for the pressure to relaese and then open lid. In the mean time,dry roast the coconut in another pan along with whole garam masala, fennel seeds listed. Roast until the coconut is nicely browned. Switch off flame,leave to cool. Grind the coconut whole garam masala by adding water to a smooth paste.
Add this paste to the cooked mutton and simmer for another 4-5 minutes. Switch off flame.
In another pan, add oil and add shallots,curry leaves. Fry till the shallots turn slightly browned. Switch off flame and pour this over the curry. Keep covered and serve warm.
NOTES
* If you have time, you can marinate the mutton with chilli powder,turmeric powder and salt for one hour. I sometimes do,sometimes omit this step.
* You can add coriander leaves(2 tbsp) too.
* The double cooking in a pressure cooker gives the mutton to quick properly,a careful watch to prevent overcooking and the onion masala is cooked so well that you hardly any pieces of onion.
Muringayilla(Drumstick leaves) recipes are always a big yes to our family. The only drawback is getting fresh leaves in hand unless you have these at home. When we were in US, the indian stores used to get them and were one of the costliest leaves in the Indian stores due to the increased demand. The bunches would be very limited and would vanish in no time.
Here, I hardly see any supermarkets or grocery shops having muringayilla(Drumstick leaves) for sale. But back home we have fresh leaves in our backyard and all Kerala homes may be having at their home. The tedious task of these leaves is the separating of leaves from the small veins and tiny branches. Although I heard that the leaves if left overnight in the refrigerator eases the task of separation and can be shaked off easily in a bowl. But mom didn't consent to the idea of storing these leaves, and say it should be used fresh as you pluck. Hence, I haven't tried that method yet.
Muringayilla(Drumstick leaves) is used as soups, stir fries or curry. This curry was introduced to me in a restaurant long back as a child. Gradually, mom started making this at home and I adapted from her. I find this as a quick fix curry that you can prepare and if you have nothing left in your pantry. This curry tastes delicious with steamed rice and a spicy stir-fry(mezhukuparetti).
Muringayilla(Drumstick leaves) is a booster pack of all major vitamins and minerals. They are rich in calcium and vitamin A. They also stimulate the nervous system. They have seven times more vitamin C than orange fruit and so boosts the immune system. They prevent anaemia and contains the iron mineral in considerable amounts. Thy have many essential amino acids that increase the appetite. They also have a good amount of fibre that helps prevent constipation. They also help control blood sugar in diabetes. Muringayilla(Drumstick leaves) also acts as a detoxifying agent and there by removes all toxins in the blood. Drumstick leaves soup can be used to treat asthma as it acts as an anti-inflammatory agent. They are also known to increase breast milk secretion and is used by expectant mothers and lactating. So if you get hold of the leaves at least once a month, we should definitely consume them.
PS: It is said that we shouldn't use muringayilla(Drumstick leaves) during karakkidam masam of Malayalam calendar, somewhere in July and August. The leaves are considered toxic in these months. They absorb the toxic minerals from soil and so are said to be inedible during these months, don't know the scientific reasons though.
I have updated a YouTube #shorts of this curry, please watch this link here. In that, I added 1/2 cooked dal too. You can make this curry both ways, with or without cooked dal. With dal, the consistency of the curry is thicker than without dal.
Preparation time~ 30 mins Cooking time~ 20 mins Serves ~ 4 Author~ Julie Ingredients
muringayila/ drumstick leaves/ moringa leaves cleaned 2 cups
chilly powder 1/2- 3/4 tsp
salt to taste
oil 1 tbsp
to temper
dry red chilly 2
mustard seeds 1/2 tsp
curry leaves, a sprig
chilly powder 1/2 tsp
oil 1tbsp
Method
Shake off the leaves by holding the bigger stems(helps to get rid of small insects, spiders if any). Clean the muringayilla (moringa leaves) carefully by removing the bigger stems and then the small little stems to be separated out, leaves should be alone saved in the bowl. Discard any yellow leaves if present.
Wash under running water once to remove any impurities and drain in a colander, else it's hard to hold the leaves together, and they generally float on top of the water.
Heat a kadai or clay pot and pour oil. When it is hot, add the cleaned leaves. Sauté until slightly wilted. Add the chilly powder and sauté on low flame, or add the chilly powder when grinding.
In the meantime, grind the ingredients listed 'to grind' to a smooth paste by adding very little water. Add this paste to the wilted leaves. Cook on low flame for 2 mins. Add a cup or more water to make the gravy watery.Add salt as needed and simmer for 2–3 mins until the curry is thickened and combined well. Switch off flame.
Heat oil in another pan and add the mustard seeds when hot. Add in dry red chillies and curry leaves and chilly powder on low flame, switch off immediately to prevent chilly powder from burning. Pour this over the curry and serve!
NOTES
* You can even cook 1/2 cup tuvar dal(sambar parippu) in a pressure cooker and add to this curry to add protein.You can make this curry both ways, with or without cooked dal. With dal, the consistency of the curry is thicker than without dal.
* Don't cook the leaves too long, or it loses the flavour.
* Add salt once the leaves are wilted, or you might end up adding more salt than required.
* Adding water to the gravy totally depends on your personal preference of how watery you want the gravy.
For all Kerala veg curries(nadan ozhichu curries), Click here in this link.
.png)


.png)
.png)